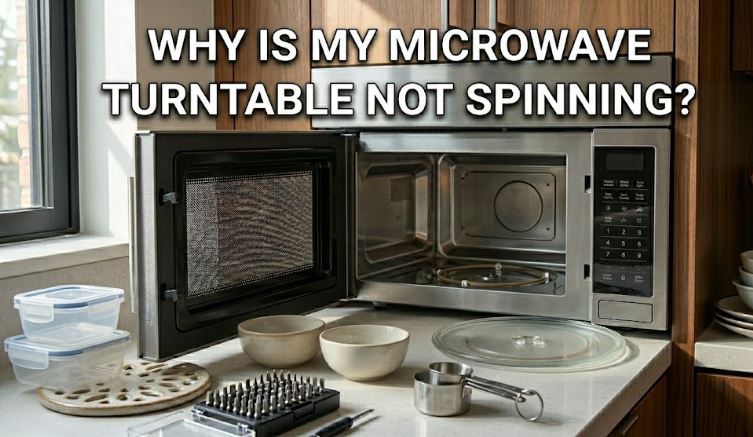
The microwave turntable does one job — rotate — and when it stops, the consequences show up immediately on your plate. One half of your pasta is scorching hot. The other is still cold in the center. You manually rotate it, start it again, and wonder what went wrong with a machine that seemed perfectly fine yesterday.
A microwave turntable not spinning is one of the most common microwave complaints across every brand and price point. It’s also one of the most fixable — in the majority of cases without a technician, without special tools, and often without buying anything at all. This troubleshooting guide covers every real cause in order of likelihood, with honest guidance on what’s a five-minute fix and what’s a component replacement.
Why the Turntable Matters on a Microwave
Microwave ovens heat food using electromagnetic waves that bounce around the interior cavity. These waves don’t distribute evenly — they create standing wave patterns with hot and cold zones inside the oven. The turntable’s job is to continuously rotate food through both zones so that heating averages out across the entire dish.
When the turntable stops, those hot and cold spots stop moving. Food heats unevenly, edges can overcook while centers stay cold, and certain foods — particularly anything requiring consistent internal temperature — can end up genuinely unsafe to eat without additional stirring or manual rotation. For everyday reheating it’s a nuisance. For defrosting meat or heating leftovers, it’s a real food safety consideration.
The Turntable System: What You’re Working With
Before diagnosing the problem, it helps to understand the four components that make the turntable work.
The glass plate is the round tray that your food sits on. It has three small raised feet or a cloverleaf pattern underneath that slots into the drive coupler.
The roller ring (also called the roller guide or turntable support) is a plastic ring with three small wheels that sits in a circular track on the floor of the microwave and supports the glass plate from below, allowing it to rotate smoothly.
The drive coupler (also called the bushing coupler or drive bushing) is the small plastic hub in the center of the microwave floor. It connects the motor shaft below to the glass plate above and physically transmits the rotation.
The turntable motor sits beneath the microwave floor, connected to the coupler through a hole in the base. It’s a small synchronous motor that runs at 2.5–6 RPM — slow, steady, and generally quiet.
Failure in any one of these four components produces the same visible result: a plate that won’t spin. Working through them in order — from most to least accessible — is the fastest way to identify the problem.
How to Fix a Microwave Turntable That Won’t Spin
Here is a step-by-step guide to fixing a microwave turntable not spinning:
Step 1: Start With a Reset
Before touching a single component, unplug the microwave from the wall, wait 30 seconds, and plug it back in. Modern microwave electronics can experience software glitches that freeze the turntable function, particularly after a power surge or interrupted cycle. A hard reset resolves this more often than most guides acknowledge — particularly on newer digital models from LG, GE, and Toshiba.
Also check whether the turntable has been accidentally disabled. Many current microwave models include a button or setting that turns the turntable off — useful for heating oversized dishes that extend to the edges of the tray. On most models, pressing the button labeled “Turntable On/Off” or “Turn Table” toggles the function. Check your control panel before assuming a mechanical failure.
Step 2: Clean the Roller Ring and Track
Food debris is the single most common cause of a microwave turntable not spinning. Appliance repair professionals consistently report that the majority of turntable complaints are resolved entirely by cleaning the components — no replacement parts needed.
Here’s why: grease and food particles that splash off during heating settle into the circular track where the roller ring travels. As they accumulate, they create drag that eventually overcomes the motor’s output torque — and the turntable stops. The glass plate also accumulates buildup underneath, particularly around the cloverleaf slots where it connects to the coupler.
How to clean the turntable system:
- Remove the glass plate and set it aside
- Lift out the roller ring — it sits loosely in the track and lifts straight up
- Wash both pieces thoroughly in warm, soapy water. Use a soft brush or toothbrush on the roller wheels and the cloverleaf slots on the glass plate
- Wipe down the circular track on the microwave floor with a damp cloth, paying attention to the groove where the rollers travel
- Clean around the coupler in the center — grease buildup here prevents the plate from seating correctly
- Dry all components fully before reinstalling
Reinstall the roller ring first, ensure all three wheels are seated inside the track, then place the glass plate on top with the cloverleaf slots aligned with the coupler. The plate should drop into position — not sit on top of it.
Run a test cycle with a cup of water inside. If the turntable resumes spinning, cleaning was the entire solution.
Step 3: Check the Glass Plate for Damage and Fit
If the plate was recently removed for cleaning or replaced, improper seating is a very common reason the turntable won’t spin. The coupler engages with the plate only when the cloverleaf grooves on the plate’s underside align with the corresponding protrusions on the coupler. If the plate is seated slightly off-center — it can look right from above while being misaligned below — the motor turns but the plate doesn’t move.
Lift the plate and reposition it, rotating it slightly in each direction until you feel it drop into the coupler correctly. The plate should have no wobble and sit completely flat.
Also inspect the plate for cracks or chips. A cracked glass plate can bind against the microwave floor or walls during rotation, creating enough resistance to stop the motor. A chipped plate with a piece missing may spin unevenly and eventually stop. A visibly damaged plate should be replaced — beyond performance, cracked glass can shatter inside the microwave and create a safety hazard. Never use a chipped or cracked microwave plate.
Step 4: Inspect the Drive Coupler
The drive coupler is made of plastic and sits directly above the motor shaft. It takes the full rotational force of the motor and transfers it to the glass plate — repeatedly, for years. That plastic eventually cracks, strips, or loses enough structure that it can no longer grip the motor shaft or engage the plate.
To check it: after removing the glass plate and roller ring, look directly at the coupler in the center of the microwave floor. It should be a complete, intact piece — typically a three-pronged or star-shaped hub. If it’s visibly cracked, missing a prong, or has stripped edges that look worn smooth, it’s no longer transferring rotation effectively.
Replacement couplers are inexpensive — typically $5–$15 — and are brand-specific. Search by your microwave’s model number to find the correct part. Many are sold in multi-packs alongside roller rings since both tend to wear at similar rates. Installation takes under two minutes: the old coupler pulls off the motor shaft, and the new one presses on.
Step 5: Test the Roller Ring Wheels
Even after cleaning, the roller ring itself may be the problem. Each of the three small wheels on the roller ring should spin freely when rotated by hand. If any wheel is cracked, seized, or worn flat, it creates a point of drag or resistance that prevents smooth rotation.
Set the roller ring on a flat surface and spin each wheel individually with your finger. They should all rotate freely with minimal resistance. If any feel stiff, sticky, or don’t spin at all, the roller ring needs replacement.
Roller rings are also inexpensive — typically $7–$15 — and are sold in two standard size families (approximately 7–8 inches and 9–10 inches in outer diameter). Measure the ring’s outer diameter before ordering to ensure the right fit.
Step 6: Test and Replace the Turntable Motor
If cleaning, reseating, and replacing the coupler and roller ring haven’t resolved the problem, the turntable motor itself has likely failed. This is a less common failure but a definitive one — and it’s the one component that requires unplugging the microwave and accessing the bottom panel.
Safety first: Always unplug the microwave from the wall before working on the motor. Microwaves contain a high-voltage capacitor that retains dangerous charge even after unplugging — do not touch any internal components beyond the bottom motor access panel. If you need to work inside the main microwave cavity, discharge the capacitor first or call a technician.
How to test the motor:
- Unplug the microwave and flip it over (on a protected surface)
- Remove the bottom panel screws — typically Phillips head, 4–6 screws
- Locate the turntable motor — a small flat unit attached to the center underside
- Disconnect the two wire leads from the motor
- Use a multimeter set to ohms and check for continuity across the motor terminals. A functioning motor will show continuity (a reading, not infinite). No continuity means the motor is dead and needs replacement
How to replace the motor:
- Note how the motor is oriented before removing it
- Unscrew the motor from its mounting — typically 2 screws
- Remove the motor and install the replacement in the same orientation
- Reconnect the wire leads, replace the bottom panel, and test
Replacement motors are typically $10–$25 and are model-specific. The motor shaft shape (D-shaft vs pin-type), drive voltage (21V AC vs 120V AC), and shaft length must match your existing unit. Always check the original motor’s specifications before ordering.
Quick Diagnosis Reference Table
| Symptom | Most Likely Cause | DIY Fix |
|---|---|---|
| Plate not spinning; no noise | Motor off / turntable disabled | Check On/Off setting; reset machine |
| Plate not spinning; hum or buzz heard | Food debris in track; coupler slipping | Clean track and components; check coupler |
| Plate wobbles, doesn’t spin smoothly | Improperly seated plate; cracked roller wheel | Reseat plate; replace roller ring |
| Plate spins but food heats unevenly | Plate off-center on coupler | Remove and reseat; check coupler |
| Plate spins then stops mid-cycle | Debris causing drag; roller wheel seizing | Deep clean; replace roller ring |
| Plate stopped after cleaning | Plate not seated correctly after reassembly | Re-align cloverleaf grooves with coupler |
| Motor runs but plate doesn’t turn | Coupler cracked or stripped | Replace drive coupler |
| No movement, no noise, clean machine | Turntable motor failed | Test motor with multimeter; replace |
| Plate stopped after power outage | Electronic glitch | Hard reset (unplug 30 sec) |
Replacement Parts Available on Amazon
These three parts cover the full spectrum of microwave turntable problems — from a damaged plate to a worn roller ring to a failed motor.
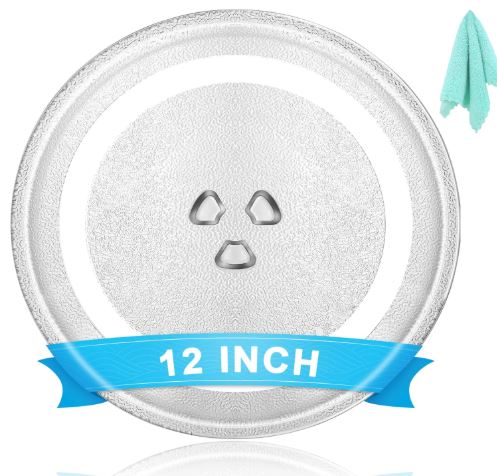
1. 12″ Universal Microwave Glass Turntable Plate Replacement
For a damaged, cracked, or missing glass plate, this universal replacement fits the majority of standard countertop microwave brands including GE, Panasonic, LG, Whirlpool, Maytag, and Cuisinart. It uses the standard cloverleaf slot design compatible with three-notch drive couplers. Made from food-grade toughened glass with a frosted surface center that prevents food from sliding during rotation.
Always measure your microwave interior and the existing plate diameter before ordering — microwave glass plates range from 9.6 inches to 16+ inches and are not interchangeable across sizes. The standard 12-inch size fits most compact and mid-size countertop models.
- 12-inch diameter — fits most standard countertop microwave models
- Standard cloverleaf slot design fits three-notch drive couplers across most brands
- Food-grade toughened glass — heat-resistant and durable for everyday use
- Frosted center surface prevents food from sliding during rotation
- Compatible with GE, Panasonic, LG, Whirlpool, Maytag, and Cuisinart among others
- Dishwasher safe for easy cleaning
- Measure your existing plate before ordering to confirm correct size
Check current price and reviews on Amazon
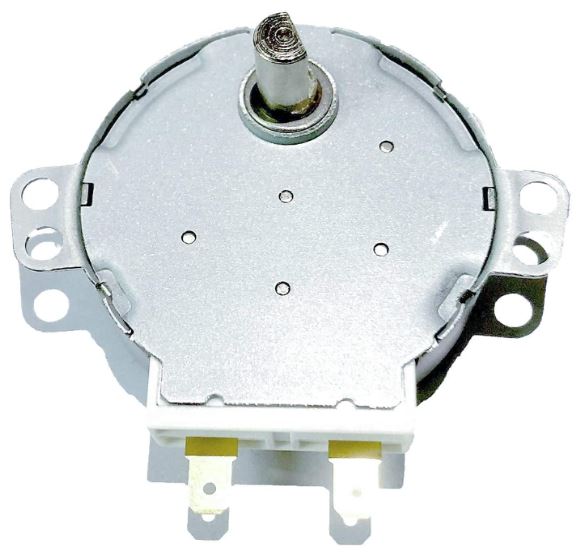
2. WB26X10038 GE Microwave Turntable Motor Replacement
For confirmed motor failure in GE, Hotpoint, and RCA microwave models, this is the direct OEM-equivalent replacement for part number WB26X10038 — one of the most widely used turntable motors across GE’s countertop and over-the-range lineup. It runs at 21V AC with a D-shaped shaft at 2.5–3 RPM, matching the specification of the original motor. Installation requires removing the bottom panel, disconnecting two wire leads, and swapping the motor — a repair most owners complete in under 15 minutes.
Always confirm your microwave’s model number and original motor part number before ordering a motor replacement. Voltage, shaft shape, and shaft length must match for correct installation.
- Direct replacement for WB26X10038 — compatible with GE, Hotpoint, and RCA microwave models
- 21V AC, 50/60Hz, 2.5/3 RPM, 3.0W — matches OEM specifications
- D-shaped shaft for secure coupling to the drive bushing
- Replaces part numbers PS237772, 769741, AP2024962, and WB26X10038
- Unplug microwave before installing — motor is accessible through bottom panel
- Repairs the following symptoms: tray won’t turn, noisy rotation, intermittent spinning
- Straightforward installation: unscrew, swap, reconnect two wire leads
Check current price and reviews on Amazon
Maintenance Tips to Prevent Microwave Turntable Problems
A few simple habits keep the turntable system running without issue for the life of the appliance.
Wipe down the turntable system after anything that splatters. The track is where debris accumulates. A 30-second wipe with a damp cloth after a messy heat cycle prevents the buildup that causes drag.
Remove the plate and roller ring monthly for a proper wash. Both are dishwasher safe in most models. A monthly clean takes two minutes and prevents the gradual accumulation that leads to seized wheels and a stopped turntable.
Never run the microwave empty. Operating without food or a cup of water inside causes the microwave energy to reflect back onto internal components — including the motor and magnetron. This generates heat that accelerates wear on the turntable motor.
Use a microwave cover for liquid-heavy foods. Soups, sauces, and anything with significant moisture are the primary sources of track contamination. A microwave-safe splatter cover costs under $10 and dramatically reduces cleaning frequency for the turntable system.
Also Read:
- KitchenAid Microwave Troubleshooting Guide (Fix Common Issues)
- Whirlpool Over-the-Range Microwave Problems Troubleshooting Guide
Frequently Asked Questions
Why did my microwave turntable suddenly stop spinning?
The most common sudden-stop cause is food debris that has gradually accumulated in the roller ring track to the point where the motor can no longer overcome the drag. It often appears sudden because the buildup reaches a tipping point. Clean the track, roller ring, and plate underside first — this resolves the majority of turntable stoppage cases without any part replacement.
Can I use the microwave if the turntable isn’t spinning?
Yes, the microwave will heat food without the turntable spinning. However, heating will be uneven — you’ll need to manually rotate the dish partway through the cycle and stir where possible. For defrosting meat or heating any food where even temperature distribution matters, consistent manual rotation is important. For simple tasks like reheating coffee or warming bread, the stopped turntable is more a nuisance than a safety concern.
How do I know if it’s the motor or the coupler that’s failed?
Remove the glass plate and roller ring and look directly at the coupler on the microwave floor. If it’s visibly cracked, missing a prong, or has stripped edges, the coupler is the failure point. If the coupler looks intact, start a 30-second test cycle and listen carefully — you should hear the motor attempting to run (a quiet mechanical hum). If you hear the motor but the coupler doesn’t turn, the coupler is slipping on the shaft. If you hear nothing from the center of the floor, the motor has likely failed.
What size roller ring do I need?
Measure the outer diameter of your existing roller ring before ordering. Common standard sizes are approximately 7–7.5 inches and 8.5–9 inches for countertop models, with larger sizes up to 9.5–10 inches for full-size over-the-range models. The roller ring size must correspond to the glass plate size — a ring too small won’t support the plate properly; one too large won’t fit in the track.
Is it worth replacing a turntable motor on an older microwave?
Generally yes, as long as the microwave itself is otherwise working correctly. A replacement motor typically costs $10–$25 — compared to $100–$300 or more for a new countertop microwave. If the microwave is over 10 years old and showing other issues — longer heating times, sparking, or unusual sounds — factor those into the decision. But a stopped turntable alone is not a reason to replace an otherwise functional appliance.
Why does my turntable spin backward?
Turntable motors are synchronous motors that can run in either direction depending on the load resistance at startup. A small amount of backward starting rotation is normal and self-corrects as the motor settles into its operating speed. If the plate consistently rotates backward throughout an entire cycle without correcting, a faulty motor or coupler is the likely cause.
The Bottom Line
A microwave turntable not spinning is almost always a fixable problem — and in most cases, it’s fixed without spending a dollar. Start with a machine reset and a thorough cleaning of the roller ring, track, and plate underside. Those two steps resolve the vast majority of cases.
If cleaning doesn’t do it, work through the coupler and roller ring next — both are inexpensive and replace in minutes. Motor failure is the least likely cause and the only step that requires basic multimeter testing and accessing the bottom of the machine, but even that is a manageable DIY repair for a confident home technician.
The turntable system is simple by design. Four components, clear failure modes, and affordable replacement parts make this one of the most accessible microwave repairs you’ll ever tackle.
For more step-by-step appliance repair guides covering microwaves, dishwashers, washers, dryers, and more, visit RepairMeYourself.com.

Hi, I’m Barlgan! I created Repair Me Yourself to empower homeowners to tackle appliance repairs with confidence. From decoding error codes to fixing cooling issues, I break down complex repairs into simple, actionable steps that save you time and money.