Most homeowners assume an appliance is “fine” as long as it’s running. But the reality is that many appliances are slowly strangling their own efficiency—not because a part has snapped, but because they are physically neglected.
A refrigerator with dust-clogged condenser coils isn’t just a minor housekeeping oversight; it’s a mechanical liability. That thin layer of grime acts as an insulating blanket, forcing the compressor to run hotter and longer to shed heat.
Research into residential energy patterns in 2026 shows that dirty coils can spike electricity consumption by 25% to 35%, adding hundreds to your annual utility bill while potentially slashing 3 to 7 years off the lifespan of the compressor.
Similarly, a window AC unit fighting a clogged filter or a dryer struggling against a lint-packed vent isn’t “broken”—it’s simply operating in a state of high-friction stress. These conditions force motors to draw more current and run for extended cycles, turning what should be a 20-minute task into an hour-long energy drain.
The tools that solve these problems aren’t complex diagnostic computers; they are simple, specialized instruments designed to monitor and restore the thermal and airflow “breathing” of your machines. This guide breaks down the essential maintenance kit that catches these efficiency leaks before they turn into permanent component failures.
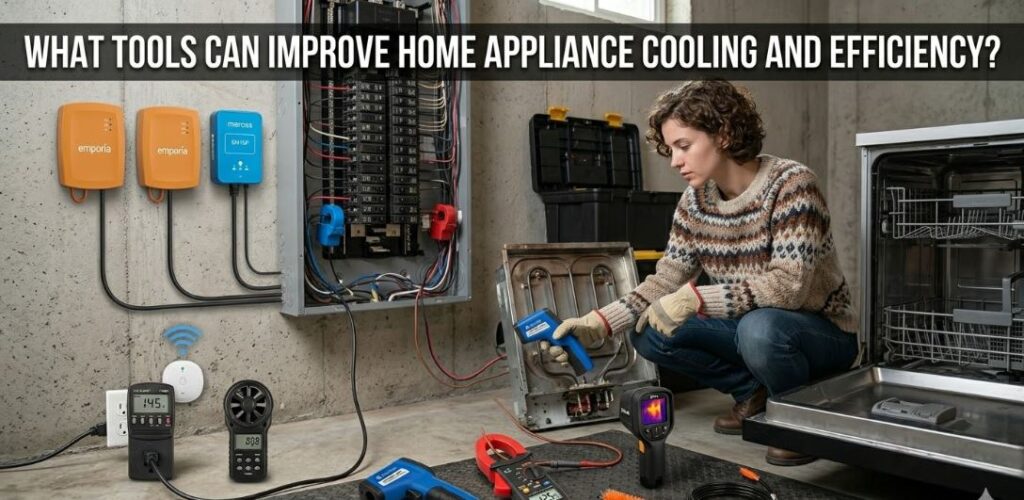
Quick Reference: Tools That Improve Home Appliance Cooling and Efficiency
| Tool | Efficiency Problem Addressed | Best Appliances | Price Range |
|---|---|---|---|
| Infrared thermometer | Heat distribution, condenser performance | Fridge, freezer, AC, dryer | $15–$120 |
| Wireless temperature sensor | Compartment temperature monitoring | Fridge, freezer, wine cooler | $15–$60 |
| Clamp meter | Current draw — efficiency under load | All motor-driven appliances | $45–$120 |
| Anemometer | Airflow volume measurement | AC, dryer, HVAC | $20–$80 |
| Thermal camera | Heat leakage, insulation faults | Fridge, freezer, oven | $150–$400 |
| Kill A Watt energy monitor | Total energy consumption measurement | All plug-in appliances | $25–$50 |
| Condenser coil cleaning brush | Coil airflow restoration | Fridge, AC, heat pump | $10–$30 |
| Refrigerator door gasket tester | Seal integrity | Fridge, freezer | $0–$15 |
| Hygrometer | Ambient humidity impact on efficiency | AC, dehumidifier, fridge | $10–$30 |
| Smart power strip | Standby power elimination | All plug-in appliances | $25–$60 |
Why Efficiency Matters More Than Most Homeowners Realise
Appliance efficiency isn’t an abstract concept — it has direct financial consequences measured in the electricity bill every month. The US Energy Information Administration estimates that appliances and electronics account for around 20% of the average household energy bill. A significant portion of that cost is waste — energy consumed by appliances working harder than necessary due to maintenance neglect, poor operating conditions, or deteriorating components.
The relationship between efficiency and lifespan compounds this. An appliance running inefficiently is an appliance under stress. A refrigerator compressor cycling more frequently than it should accumulates running hours faster, wears bearings sooner, and fails earlier than one maintaining correct temperature with less effort. An air conditioner running with a dirty evaporator coil develops ice buildup that damages the coil and strains the compressor. The efficiency loss and the premature component failure are the same problem expressed differently.
Tools that monitor and restore efficiency address both consequences simultaneously — they reduce current operating costs and extend the interval before the next repair or replacement.
Tool 1: Kill A Watt Energy Monitor — Measuring What You’re Actually Spending
Before optimising any appliance’s efficiency, you need to know its baseline energy consumption. The Kill A Watt energy monitor is a plug-in device that measures exactly how much electricity an appliance consumes — in real time, over a time period, and converted to cost at your local electricity rate.
What It Reveals
Plug any appliance into the Kill A Watt and it displays voltage, current draw in amps, power in watts, and cumulative energy consumption in kilowatt-hours. Set your electricity rate per kWh and it calculates the cost per day, week, month, or year automatically.
This measurement baseline is the foundation of efficiency work. A refrigerator consuming 150 kWh per month that its specification sheet suggests should consume 100 kWh is running 50% above efficiency — a clear indication that something is forcing it to work harder than intended, whether that’s dirty coils, a failing gasket, a poorly calibrated thermostat, or an ambient temperature problem.
Tracking Improvement
The Kill A Watt’s most powerful application is before-and-after comparison. Measure consumption before cleaning condenser coils, record the reading, clean the coils, and measure again. A measurable reduction in kWh consumption confirms that the cleaning improved efficiency in quantitative terms rather than theoretical ones. This is the kind of evidence that motivates consistent maintenance — when you can see the dollar value of a 20-minute cleaning task, it stops feeling optional.
Limitations
The Kill A Watt requires a standard 120V plug-in connection — it doesn’t work on hardwired appliances or 240V appliances like electric dryers and ovens. For these, a clamp meter measuring current draw provides the equivalent consumption assessment.
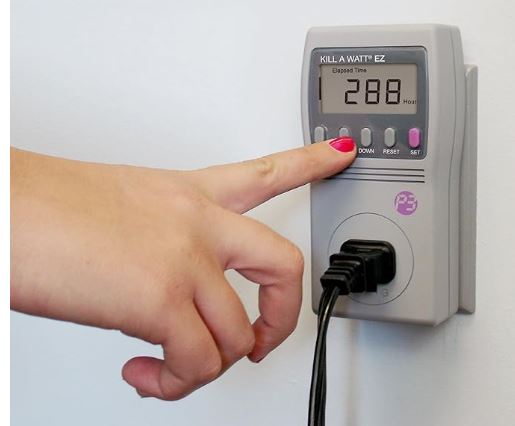
Recommended: P3 International P4460 Kill A Watt EZ Electricity Usage Monitor (View on Amazon)
Tool 2: Infrared Thermometer — Diagnosing Thermal Efficiency Problems
An infrared thermometer is the most versatile efficiency diagnostic tool available for home appliances. It measures surface temperatures across every component involved in heat transfer — condenser coils, evaporator surfaces, compressor bodies, motor housings, duct walls — revealing thermal anomalies that indicate inefficiency before they cause component failure.
Refrigerator and Freezer Applications
The condenser coils are the heat rejection component of any refrigeration system — they dump heat removed from the interior into the surrounding room. Clean condenser coils running efficiently sit 20–30°F above ambient room temperature. Coils running significantly hotter — 40–60°F above ambient — are restricted by dust and debris accumulation that insulates the coil surface and reduces heat rejection capacity, forcing the compressor to run longer and harder.
Scan the condenser coils with the infrared thermometer before and after cleaning. A post-cleaning temperature drop toward the 20–30°F above ambient range confirms the cleaning restored heat rejection capacity. A coil that remains abnormally hot after cleaning may have a condenser fan problem or a refrigerant issue rather than a cleanliness problem.
Air Conditioner Applications
An air conditioner’s efficiency depends on two coil surfaces performing correctly — the evaporator coil inside the unit absorbing heat from the room air, and the condenser coil outside rejecting that heat. The temperature difference across each coil — supply air temperature versus return air temperature for the evaporator, ambient temperature versus coil surface temperature for the condenser — indicates whether each is performing at its rated capacity.
Scan the supply vent air temperature and return air temperature with the infrared thermometer. A correctly functioning central AC system should show a temperature difference — the delta T — of 16–22°F between return and supply air. A delta T below 14°F indicates either low refrigerant, a dirty evaporator coil, or restricted airflow through the unit.
Recommended: Fluke 62 MAX (View on Amazon)
Tool 3: Wireless Temperature Sensor — Continuous Efficiency Monitoring
A wireless temperature sensor placed inside a refrigerator or freezer provides continuous real-time temperature data that reveals efficiency problems invisible to single-point measurements.
What Continuous Monitoring Reveals
A refrigerator that maintains correct temperature at the time you check it but runs its compressor almost continuously to do so is working significantly harder than one that cycles on and off at normal intervals. A freezer that holds 0°F overnight but drifts to 15°F during afternoon hours when the kitchen is warm has an insulation or gasket problem that a single morning temperature check completely misses.
Temperature logging over 24–48 hours reveals the full operating pattern — how frequently the compressor cycles, how far temperature drifts between cycles, whether the defrost cycle is maintaining correct duration, and whether specific times of day correlate with temperature excursions. Each of these patterns points to a specific efficiency problem with a specific solution.
Placement Strategy
Place one sensor in the fresh food compartment at mid-height — away from the air vents and away from the door — for the most representative ambient air temperature reading. A second sensor in the freezer compartment, positioned away from the evaporator coil, gives you both compartments simultaneously. Govee and SensorPush both offer multi-sensor monitoring through a single app.
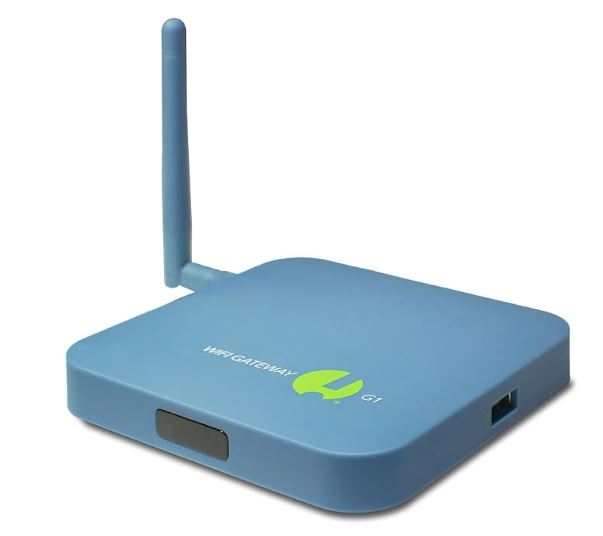
Recommended: SensorPush G1 Wi-Fi Getaway (View on Amazon)
Tool 4: Clamp Meter — Measuring Motor Efficiency Under Load
Every motor-driven appliance — refrigerator, air conditioner, washing machine, dishwasher, dryer — has a rated current draw that represents efficient operation. A clamp meter measures actual current draw under real operating conditions, revealing when a motor is consuming more power than its design requires.
What Elevated Current Draw Indicates
A refrigerator compressor drawing 20% above its nameplate rated amperage is working harder than intended — most likely because dirty condenser coils are forcing it to run against higher head pressure, or because a developing mechanical fault is increasing internal friction. Either way, the elevated current draw directly translates to elevated energy consumption and accelerated component wear.
An air conditioner compressor drawing above its rated amperage during normal cooling operation similarly indicates a condenser airflow restriction, low refrigerant causing high compression ratios, or a compressor beginning to fail mechanically. The clamp meter identifies this months before the compressor fails completely — which is the difference between a planned maintenance intervention and an emergency replacement.
Using It for Efficiency Baseline
Measure and record the current draw of every major motor-driven appliance when it’s functioning correctly and recently serviced. This creates an efficiency baseline for each appliance that future measurements compare against. A gradual increase in current draw over months indicates developing inefficiency — allowing you to intervene before it becomes a fault.
Recommended: Klein Tools CL800 Digital Clamp Meter (View on Amazon)
Tool 5: Anemometer — Restoring Airflow-Dependent Efficiency
Appliances that depend on moving air for their cooling or heating function — air conditioners, dryers, HVAC systems, refrigerator condenser fans — lose efficiency in direct proportion to airflow restriction. An anemometer measures the actual airflow volume, identifying restrictions that reduce efficiency before they cause performance failures.
Air Conditioner Filter and Coil Assessment
Measure airflow at the supply vents of a central AC system or at the outlet of a window unit with a clean filter installed. Record the baseline CFM. Replace the filter with a dirty one — or allow the filter to accumulate its normal dust load over a period — and measure again. The reduction in CFM directly quantifies the airflow efficiency loss caused by filter condition. This measurement motivates filter replacement based on actual measured performance decline rather than calendar schedule alone.
Refrigerator Condenser Fan Assessment
The condenser fan on a refrigerator circulates air across the condenser coils to improve heat rejection. Dust accumulation on the fan blades, a worn motor bearing reducing RPM, or a partially blocked condenser fan inlet all reduce the airflow that makes the condenser coils effective. An anemometer held near the condenser fan outlet — accessible through the rear grille or bottom kickplate — measures whether the fan is moving its rated airflow volume.
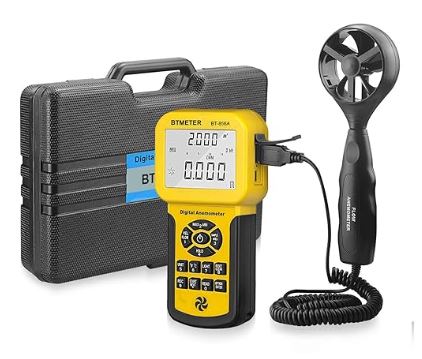
Recommended: BTMETER BT-856A Anemometer (View on Amazon)
Tool 6: Thermal Camera — Finding Hidden Efficiency Losses
A thermal imaging camera renders the full temperature distribution across any surface as a colour-mapped image — revealing insulation failures, heat leakage points, and airflow anomalies that no single-point measurement tool can match for diagnostic completeness.
Refrigerator Insulation Assessment
Scan the exterior panels of a running refrigerator with a thermal camera. Correctly insulated panels show a uniform temperature pattern matching ambient room temperature. Areas of compromised insulation — where the foam insulation has degraded, absorbed moisture, or separated from the panel — show as warmer patches on the exterior surface. These areas are losing cold to the room continuously, forcing the compressor to work harder to compensate.
This is the efficiency fault that’s most difficult to find with any other tool. A moisture meter detects moisture in insulation. An infrared thermometer identifies warm spots. But a thermal camera maps the entire panel simultaneously — showing the extent and location of any insulation fault in a single scan that takes under a minute.
Air Conditioner Duct Leakage
Scan accessible duct runs with the thermal camera while the AC operates. Cool air leaking from a poorly sealed duct joint shows as a cold patch on the surrounding surface — vivid on a thermal image and completely invisible to the eye. Duct leakage in central AC systems is estimated to reduce system efficiency by 20–30% on average — a loss that thermal imaging locates precisely for targeted sealing.
Recommended: FLIR ONE Pro Thermal Camera (View on Amazon)
Tool 7: Condenser Coil Cleaning Brush — Restoring Heat Transfer Efficiency
Condenser coil cleaning isn’t glamorous but it’s one of the highest-return maintenance tasks available for refrigerators and air conditioners. A coil cleaning brush — a long-handled, stiff-bristled brush designed to reach between coil fins — removes the dust, lint, and debris accumulation that insulates coil surfaces and reduces heat transfer efficiency.
Refrigerator Condenser Coils
Most refrigerators have condenser coils accessible from the rear or beneath the unit through the kickplate. Vacuum the coil surface first to remove loose dust. Then work the cleaning brush between the coil fins in the direction of the fins — not across them, which bends the fins and permanently reduces airflow. Follow with a second vacuum pass to remove dislodged debris.
Window and Portable Air Conditioner Coils
Window unit condenser coils are accessible from the rear of the unit. Clean them annually before the cooling season — a coil covered in a season’s worth of outdoor debris and cottonwood seeds transfers heat at a fraction of its rated capacity. The improvement in cooling performance and energy consumption after cleaning is often immediately noticeable.
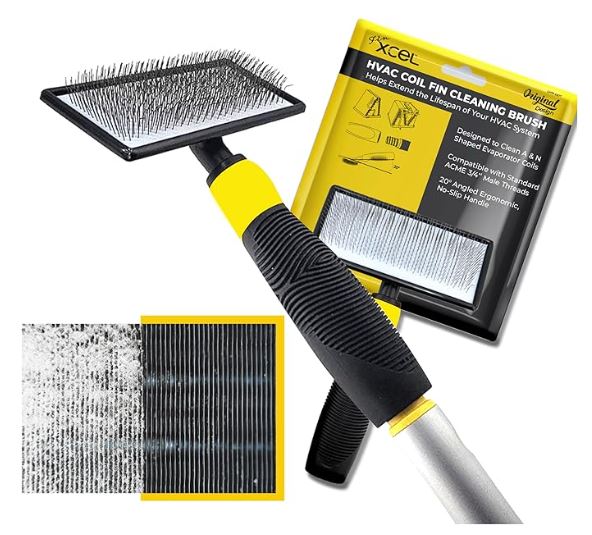
Recommended: AC Condenser Coil Cleaning Brush (View on Amazon)
Tool 8: Hygrometer — Monitoring Ambient Conditions That Affect Efficiency
Ambient humidity directly affects the efficiency of refrigerators, air conditioners, and dehumidifiers. A refrigerator in a humid kitchen works harder because every time the door opens, warm humid air enters — and the evaporator must condense and freeze that humidity as part of the cooling cycle. An air conditioner in a highly humid environment spends a disproportionate share of its capacity removing moisture rather than lowering temperature.
A hygrometer measures ambient relative humidity — identifying when conditions are forcing appliances to work beyond their designed operating parameters. Ideal humidity for a kitchen containing a refrigerator is below 60% relative humidity. Persistent humidity above 70% in a refrigerator’s immediate environment meaningfully increases compressor cycling frequency.
The Govee Indoor Hygrometer is a compact, accurate option at under $15 that monitors both temperature and humidity continuously. Place one near the refrigerator and one in the room where the air conditioner operates — the data informs both appliance maintenance decisions and broader home humidity management.
Recommended: Govee Indoor Hygrometer Thermometer (View on Amazon)
Tool 9: Refrigerator Door Gasket Tester
A failing door gasket is one of the most common and most impactful refrigerator efficiency faults. A gasket that doesn’t seal correctly allows warm room air to infiltrate the compartment continuously — forcing the compressor to cycle more frequently to maintain temperature against the constant warm air intrusion.
The Paper Test
The simplest gasket test costs nothing. Close the refrigerator door on a single sheet of paper and attempt to pull it out. Resistance when pulling — enough to tear the paper before it slides free — indicates adequate gasket pressure at that point. Easy extraction indicates insufficient sealing pressure. Work around the entire door perimeter in 6-inch increments, testing at the top, sides, and bottom.
Infrared Scan Confirmation
An infrared thermometer scanned along the exterior door edge while the refrigerator runs confirms gasket integrity thermally. Correctly sealed edges show a uniform cold temperature matching the adjacent door panel. Warm intrusion points — areas measurably warmer than adjacent sections — pinpoint exactly where the gasket is failing.
A gasket that fails either test is worth replacing. Replacement gaskets cost $20–$50 for most common refrigerator models and the installation requires no special tools — they press or screw into a channel around the door perimeter.
Efficiency Improvement Impact Reference
| Maintenance Action | Tool Used | Typical Efficiency Improvement |
|---|---|---|
| Clean refrigerator condenser coils | Coil brush + IR thermometer | 10–20% energy reduction |
| Replace failing door gasket | Paper test + IR thermometer | 5–15% energy reduction |
| Clean AC filter | Anemometer | 5–15% airflow restoration |
| Clean dryer exhaust duct | Anemometer + cleaning brush | 20–30% cycle time reduction |
| Reduce ambient humidity | Hygrometer | 5–10% compressor cycle reduction |
| Fix AC duct leaks | Thermal camera + foil tape | 15–25% cooling efficiency gain |
| Optimise fridge temperature | Wireless sensor | Up to 10% energy reduction |
Frequently Asked Questions
What is the single most impactful efficiency improvement for a refrigerator?
Cleaning the condenser coils delivers the highest efficiency return of any single maintenance task for most refrigerators. Coils that have accumulated a year or more of dust and lint can cause compressor run time to increase by 15–20% — which directly translates to the same percentage increase in energy consumption. A coil cleaning brush, a vacuum, and 20 minutes of work restores heat rejection capacity immediately and the energy saving is measurable on the next electricity bill.
How do I know if my appliance is using too much electricity?
A Kill A Watt energy monitor plugged between the appliance and the outlet gives you the actual kWh consumption over any time period. Compare the measured consumption against the appliance’s Energy Guide label — which states the estimated annual kWh consumption under normal operating conditions. Consumption significantly above the label figure indicates an efficiency problem worth investigating. For appliances without an Energy Guide label, the manufacturer’s specification sheet states rated power consumption.
Does ambient room temperature really affect refrigerator efficiency?
Yes — significantly. A refrigerator’s efficiency is directly related to the temperature differential between its interior and the room it operates in. Every 10°F increase in ambient room temperature increases compressor run time by approximately 2–3%. A refrigerator in an uninsulated garage in summer, where ambient temperatures may reach 90–100°F, works dramatically harder than one in a temperature-controlled kitchen. If possible, avoid installing refrigerators in spaces where ambient temperatures regularly exceed 90°F or fall below 60°F — both extremes reduce efficiency and compressor lifespan.
How often should I clean refrigerator condenser coils?
Annual cleaning is the minimum recommended schedule for most households. Homes with pets — particularly dogs and cats — should clean every 6 months because pet hair accumulates on condenser coils significantly faster than household dust alone. The infrared thermometer provides an objective trigger for cleaning regardless of schedule — if the condenser coil surface temperature is running more than 35°F above ambient room temperature, cleaning is overdue.
Can a clamp meter tell me if my air conditioner needs a refrigerant recharge?
Indirectly, yes. A low refrigerant charge causes an AC compressor to run at lower suction pressure, which typically reduces its current draw below the nameplate rated amperage. Measuring compressor current with a clamp meter and comparing to the rated RLA (Run Load Amperage) on the unit’s data plate — if current is significantly below rated — is one indicator of low refrigerant alongside other symptoms like reduced delta T across the evaporator and ice formation on the suction line. A definitive refrigerant diagnosis requires a manifold gauge set and EPA certification to handle refrigerants.
Is a thermal camera worth buying just for efficiency monitoring?
For a single homeowner maintaining one or two appliances, a dedicated thermal camera is a significant investment relative to its use frequency. The FLIR ONE Pro attachment for smartphones reduces the entry point to $150–$200 and provides genuine capability for refrigerator insulation assessment, AC duct leak detection, and electrical component hot spot identification. If you’re maintaining multiple appliances, running a rental property, or want the most comprehensive efficiency diagnostic capability available, it earns its place quickly. For occasional use, sharing the investment with neighbours or renting one for a seasonal inspection is a practical alternative.
What is the fastest way to check if an appliance is running efficiently?
The infrared thermometer and Kill A Watt combination provides the fastest meaningful efficiency assessment for most appliances. The Kill A Watt gives you actual energy consumption compared to specification. The infrared thermometer reveals whether thermal components — condenser coils, exhaust temperatures, motor surfaces — are running within normal ranges. Together they take under 10 minutes per appliance and identify the majority of significant efficiency problems without any disassembly.
Conclusion
Appliance efficiency isn’t a set-and-forget property — it degrades gradually and invisibly through normal use, and the tools in this guide make that degradation visible before it shows up as a component failure or an inexplicably high electricity bill.
The Kill A Watt energy monitor establishes the consumption baseline. The infrared thermometer identifies thermal inefficiencies at specific components. The wireless temperature sensor monitors refrigeration performance continuously. The clamp meter catches motor inefficiency under real load. The anemometer quantifies airflow restriction. The thermal camera maps insulation and duct leakage. The coil cleaning brush restores what the measurements reveal has degraded.
Start with the Kill A Watt and infrared thermometer — under $45 combined, they cover the most impactful efficiency assessments for every plug-in appliance in the home. Add the wireless temperature sensor for continuous refrigerator monitoring. Build the toolkit in response to what the measurements reveal, and every tool you add will pay for itself in reduced energy costs before the year is out.
Efficient appliances aren’t just cheaper to run. They’re quieter, they last longer, and they work the way they were designed to — which is the best outcome for every dollar invested in maintaining them.
Browse appliance efficiency tools on Amazon and start measuring before the next electricity bill arrives.

Hi, I’m Barlgan! I created Repair Me Yourself to empower homeowners to tackle appliance repairs with confidence. From decoding error codes to fixing cooling issues, I break down complex repairs into simple, actionable steps that save you time and money.