When washing machines drain into basement sinks, standpipes, or complex plumbing systems, backflow becomes a real possibility that threatens clean laundry, causes flooding, and violates plumbing codes. The humble washing machine check valve stands guard against these scenarios, functioning as a one-way gate that permits drainage while blocking reverse flow.
Yet confusion abounds about when these devices are necessary, where they belong in your drainage system, and which type suits your specific installation—leaving many homeowners either installing unnecessary hardware or skipping critical backflow prevention.
A washing machine check valve is a one-way plumbing device installed in drainage systems to prevent wastewater from flowing backward into the washer tub. These valves are essential for basement installations, utility sinks, or any scenario where the drain connection sits at or above the washer’s water level, preventing contaminated water from siphoning back and protecting against sewage backups during drain blockages.
Check Valve Application Scenarios
| Installation Type | Check Valve Needed | Valve Location | Primary Protection |
| Basement floor drain (gravity) | Yes – Required | Drain hose before standpipe | Sewage backup prevention |
| Upper floor standard drain | No – Optional | Not applicable | Generally unnecessary |
| Utility sink connection | Yes – Recommended | Between washer and sink | Sink backflow prevention |
| Standpipe above washer | Maybe – Situational | Drain hose end | Siphoning prevention |
| Municipal sewer connection | Check local code | Per code requirements | Cross-contamination prevention |
| Septic system | Yes – Recommended | Main drain line | System overload protection |
What Is a Washing Machine Check Valve?
Check valves represent elegant mechanical solutions to directional flow problems. Understanding their design and function helps you determine appropriate applications.
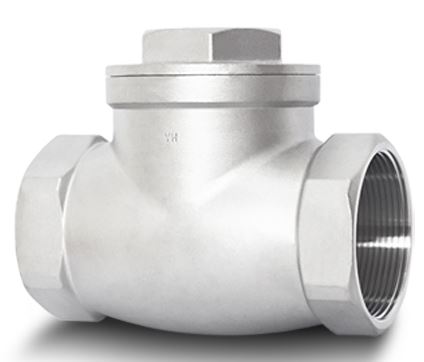
A check valve is a plumbing fitting containing an internal mechanism that opens for flow in one direction and closes against reverse flow. No external power or control systems are needed.
The valve body houses a moveable element—typically a flapper, ball, or spring-loaded disc. Water pressure in the correct direction pushes this element open allowing flow through the valve.
When water attempts to flow backward, pressure forces the moveable element against its seat. This creates a watertight seal preventing any reverse flow regardless of pressure differential.
Washing machine check valves are specifically designed for appliance drainage applications. They accommodate the high flow rates washing machines produce during pump-out cycles.
Standard check valves pass 8-12 gallons per minute without creating significant back pressure. This flow capacity matches typical washing machine drain pump outputs preventing drainage restrictions.
The valve mechanism operates passively requiring no maintenance or adjustment. As long as the seal remains intact, the valve provides reliable one-way flow indefinitely.
Materials matter significantly in appliance applications. Quality check valves use corrosion-resistant plastics or brass bodies with rubber or silicone sealing elements resistant to detergent exposure.

Internal Valve Mechanisms
Different check valve designs suit different applications. Understanding mechanism types helps select appropriate products for washing machine use.
Flapper-style valves use a hinged disc that swings open with forward flow and falls closed against reverse pressure. Gravity assists closure making these valves position-dependent.
These work best in vertical installations where gravity helps seat the flapper. Horizontal mounting reduces closure effectiveness allowing some backflow leakage.
Spring-loaded valves incorporate springs forcing the closure element shut when no forward flow exists. These operate effectively in any orientation.
The spring provides positive closure preventing backflow even in horizontal or inverted positions. However, springs require slightly higher forward pressure to open.
Ball check valves use a spherical element rolling into position to block reverse flow. Ball diameter exceeds the outlet opening preventing the ball from passing through.
These simple designs offer excellent reliability with minimal parts. However, debris can prevent the ball from seating properly causing leakage.
Duckbill valves feature a rubber sleeve with a flattened end. Forward pressure opens the sleeve while reverse pressure collapses it shut.
This elastic design tolerates debris better than mechanical types. The rubber material provides excellent sealing but degrades over time requiring periodic replacement.
Pressure Ratings and Flow Capacity
Washing machine check valves must balance two competing requirements: low forward resistance and high reverse pressure tolerance.
Forward flow resistance should remain minimal. Excessive resistance causes backpressure against the drain pump motor reducing drainage efficiency and accelerating pump wear.
Quality check valves add less than 1 PSI resistance at normal drain flow rates. This negligible resistance allows pumps to operate within design parameters.
Reverse pressure tolerance determines maximum backflow pressure the valve withstands while maintaining seal integrity. Most washing machine valves tolerate 5-15 PSI reverse pressure.
This rating exceeds typical household plumbing scenarios. Sewage backups rarely generate pressures exceeding 10 PSI before finding alternate relief paths or flooding.
Flow capacity specifications indicate maximum gallons per minute the valve passes without excessive back pressure. Look for ratings matching or exceeding 10 GPM for washing machine applications.
Oversized valves reduce forward resistance but may not seal effectively at low flows. Match valve size to your drain hose diameter—typically 1 to 1.5 inches for residential washers.
Do I Need a Check Valve on a Washing Machine?
Not every washing machine installation requires check valve protection. Several factors determine necessity in your specific situation.
Basement and Below-Grade Installations
Basements represent the highest-risk scenario for washing machine backflow problems. Municipal sewer lines run deeper than basement floors making gravity drainage impossible.
When sewer mains clog or backup occurs, sewage seeks the lowest available opening. Basement floor drains and washing machine connections become entry points for contaminated water.
Without check valve protection, raw sewage flows backward through your washing machine’s drain connection. This contamination ruins the washer, floods the basement, and creates serious health hazards.
Every basement washing machine should have check valve protection. This represents essential plumbing safety rather than optional convenience.
Some homes use sewage ejector pumps for basement drainage. These systems pump waste upward to gravity sewer lines at higher elevations.
Ejector pump failures allow sewage backup into connected appliances. Check valves provide secondary protection when ejector systems malfunction or lose power during storms.
Basement utility sinks connected to washing machine drains amplify backflow risks. Sink drain clogs cause washing machine wastewater to back up into the sink creating unsanitary conditions.
Upper Floor Installations
Washers installed on ground floors or upper levels rarely need check valve protection. Gravity drainage and proper vent systems prevent most backflow scenarios.
Standard plumbing configurations position drain connections below washer tub levels. Water can’t flow uphill naturally preventing spontaneous backflow during normal conditions.
However, specific upper floor situations still benefit from check valves. If drain standpipes rise significantly above the washer—exceeding 8 feet—siphoning becomes possible.
After the drain pump stops, remaining water in elevated standpipes can siphon backward through the drain hose. This pulls small amounts of drain water back into the washer tub.
Utility room sinks sharing drain lines with washers on any floor benefit from check valve installation. This prevents sink water from draining into the washer during sink use.
Municipal Code Requirements
Some jurisdictions mandate check valve installation regardless of practical necessity. Plumbing codes prioritize cross-contamination prevention protecting public water supplies.
Check your local plumbing codes before installing new washing machines or relocating existing units. Code compliance may require check valves even when backflow risks seem minimal.
Building inspectors verify code compliance during inspections. Unpermitted installations lacking required check valves face correction orders before passing inspection.
Some municipalities distinguish between single and double check valves. These codes respond to specific contamination risks in local water systems.
Homeowners associations sometimes impose requirements exceeding municipal codes. Review HOA covenants before beginning plumbing work ensuring installations meet all governing standards.
Water Supply Considerations
Check valve necessity also depends on water supply characteristics. Homes using well water face different risks than municipal supply connections.
Well water systems rarely require washing machine check valves. The private water supply doesn’t connect to public systems eliminating cross-contamination concerns.
However, wells drawing from shallow aquifers may be vulnerable to surface contamination. Check valves prevent washing machine wastewater from migrating toward well casings during unusual conditions.
Municipal water supplies with documented low pressure problems may benefit from check valves. Low pressure creates vacuum conditions that can siphon contaminated water backward through plumbing fixtures.
Homes with backflow prevention devices on main water lines already have system-level protection. Additional appliance-level check valves provide redundant safety but may not be strictly necessary.
Find quality check valves on Amazon!
Can I Use a Check Valve for Washing Machine Drain?
Check valves work excellently in washing machine drainage applications when properly selected and installed. However, specific considerations ensure optimal performance.
Drainage System Compatibility
Check valves integrate into most standard washing machine drainage configurations. The key requirement is proper positioning within the drain path.
Standard standpipe drains accept check valves easily. Install the valve in the drain hose between the washer and standpipe opening preventing backflow from the building’s drainage system.
Utility sink connections benefit most from check valve installation. The valve prevents sink contents from draining into the washer when both connect to common drain lines.
Floor drain connections in basements absolutely require check valves. These drains connect directly to sewer lines where backup risks are highest.
Laundry tub drains shared between sinks and washers need check valves protecting the washer. Position valves on the washer’s drain line before it joins the common drain.
Some drainage configurations use air gaps instead of check valves. These create physical separations preventing backflow through gravity rather than mechanical sealing.
Air gaps work by elevating the drain hose terminus above the flood rim of receiving fixtures. Water must fall through air space preventing any backflow path.
Drain Pump Compatibility
Modern washing machine drain pumps tolerate check valve back pressure without problems. However, valve selection affects pump longevity and drainage efficiency.
Choose check valves specifically rated for washing machine applications. These designs minimize forward flow resistance preventing excessive pump strain.
Generic plumbing check valves may create too much back pressure. The additional resistance forces drain pumps to work harder consuming more electricity and wearing faster.
Test drainage performance after check valve installation. Complete drain cycles should take the same time as before installation indicating adequate flow capacity.
If drainage slows noticeably, the check valve may be undersized or restricting flow excessively. Upgrade to a larger valve or different mechanism type.
Some high-efficiency washers use low-power drain pumps optimized for minimal resistance. These machines are more sensitive to check valve back pressure requiring careful valve selection.
Front-loading washers with drain pumps positioned low in the cabinet tolerate check valves better than top-loaders. The gravity assist from water height helps overcome valve resistance.
Material Durability
Washing machine wastewater contains detergents, fabric softeners, bleach, and various chemicals. Check valve materials must withstand continuous exposure to these substances.
Plastic check valves use PVC, ABS, or polypropylene bodies. These materials resist chemical attack from laundry products and won’t corrode like metal alternatives.
However, plastics vary in quality significantly. Cheap valves use thin-walled construction that cracks under pressure or temperature cycling. Invest in quality products from reputable manufacturers.
Brass check valves offer superior durability and pressure tolerance. The metal construction withstands higher pressures and physical abuse better than plastic.
Brass costs more than plastic but lasts decades with zero maintenance. For permanent installations in challenging locations, brass represents the better long-term investment.
Rubber and silicone seal elements deteriorate over time. Detergent exposure, heat cycling, and mechanical wear gradually reduce sealing effectiveness.
Plan to inspect and potentially replace check valves every 5-7 years. This preventive maintenance ensures continued protection as seal materials age.
How Do You Install a Check Valve on a Washing Machine?
Proper installation ensures check valves function reliably providing intended backflow protection. Follow this systematic approach for professional results.
Pre-Installation Planning
- Identify the optimal check valve location before purchasing components. The valve must be accessible for future maintenance while protecting against backflow.
- For standpipe drains, install the check valve in the drain hose near the standpipe opening. This positioning blocks backflow from the building’s drainage system.
- Utility sink connections need valves between the washer drain hose and sink drain connection. This prevents sink water from entering the washer.
- Basement floor drains benefit from valves installed in vertical sections of drain hose. Vertical orientation helps gravity assist flapper-style valve closure.
- Measure your existing drain hose to determine required check valve size. Most washing machines use 1-inch or 1.5-inch diameter drain hoses.
- Purchase check valves matching your hose diameter. Oversized valves require adapters increasing installation complexity and potential leak points.
- Verify you have adequate drain hose length for valve installation. Adding a valve consumes several inches requiring longer hoses in tight installations.
- Consider access requirements for future valve inspection or replacement. Install valves in locations you can reach without moving the washer.
Required Tools and Materials
Gather necessary supplies before beginning installation preventing mid-project delays.
- Check valve sized to match drain hose diameter
- Hose clamps (stainless steel resists corrosion)
- Screwdriver or nut driver for hose clamps
- Utility knife for cutting drain hose if needed
- Bucket and towels for catching residual water
- Teflon tape for threaded connections if applicable
- Silicone lubricant for sliding hoses onto fittings
Optional but helpful items include adjustable pliers for stubborn clamps and a flashlight for viewing tight spaces.
Step-by-Step Washing Machine Check Valve Installation Process
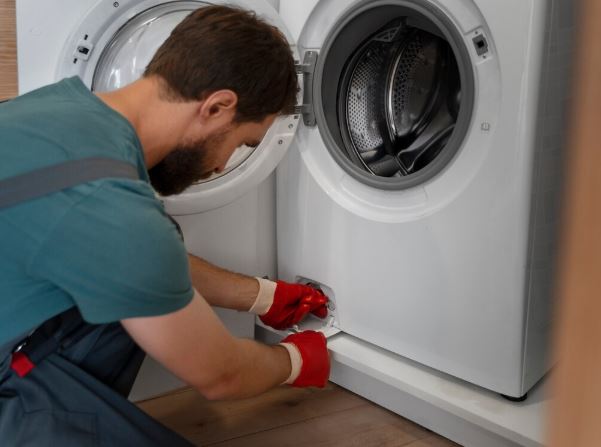
Step 1: Disconnect power and water – Unplug the washing machine and turn off hot and cold water supply valves. This prevents accidental startup during installation.
Step 2: Drain residual water – Pull the drain hose from the standpipe or drain connection. Position the end in a bucket allowing residual water to drain completely.
Step 3: Determine cutting location – Decide where to insert the check valve in your drain hose. For standpipe drains, position it 6-12 inches from the hose end.
Step 4: Cut the drain hose – Use a sharp utility knife to make a clean perpendicular cut through the drain hose. Avoid crushing or deforming the hose during cutting.
Step 5: Prepare hose ends – Clean cut hose ends removing any burrs or irregularities. Smooth ends slide onto valve barbs more easily creating better seals.
Step 6: Install valve onto first hose – Slide the check valve’s inlet fitting into one hose end. Push firmly until the hose seats completely against the valve body shoulder.
Step 7: Secure with hose clamp – Position a hose clamp over the connection point. Tighten the clamp firmly compressing the hose against the valve barb.
Step 8: Connect second hose end – Slide the valve’s outlet fitting into the remaining hose section. Verify correct flow direction matching valve arrow markings.
Step 9: Install second clamp – Secure the outlet connection with another hose clamp. Tighten until firm but avoid over-tightening which can crack plastic valve bodies.
Step 10: Reconnect drain – Place the drain hose back into the standpipe or drain connection. Ensure proper depth and secure positioning.
Step 11: Test the installation – Restore power and water supply. Run a drain cycle observing for leaks around valve connections.
Orientation and Positioning
Check valve orientation critically affects performance. Incorrect installation renders valves useless or creates drainage restrictions.
Every check valve has directional flow markings. Arrows molded into valve bodies or printed on labels indicate proper flow direction.
Install valves with arrows pointing away from the washing machine toward the drain. Flow must move from washer through valve to drainage system.
Reversed installation blocks all drainage completely. The valve sees normal drainage as “backflow” and remains closed.
Vertical orientation works best for gravity-assisted flapper valves. Position these valves with the flapper element at the bottom allowing gravity to help closure.
Spring-loaded valves tolerate any orientation. The internal spring provides positive closure regardless of positioning.
Avoid installing valves in the lowest point of drain hose loops. Water collects here creating continuous pressure that may prevent proper valve closure.
Support long drain hose runs preventing excessive sagging. Proper support maintains consistent hose diameter and reduces stress on valve connections.
Testing and Verification
Thorough testing confirms successful installation and proper valve operation.
Run a complete wash cycle including drainage phases. Monitor valve area for leaks around hose clamps or valve body joints.
Tighten any weeping connections immediately. Small leaks worsen over time as vibration and pressure cycling loosen fittings.
Listen for unusual drainage sounds. Gurgling or slow drainage indicates excessive valve back pressure or improper installation.
Verify valve closure by creating a backflow scenario. With the washer off, pour water into the standpipe above the check valve.
Water should not flow backward through the valve into the drain hose. Any backflow indicates valve failure, incorrect orientation, or defective components.
Check valve operation several times over the first week. Some valves require a break-in period before sealing optimally.
Document your installation with photos showing valve location and orientation. This reference helps future troubleshooting or valve replacement.

Does a Washing Machine Need a Double Check Valve?
Double check valves consist of two check valves in series providing redundant backflow protection. Their necessity depends on specific risk factors and code requirements.
Understanding Double Check Valve Assemblies
Double check valve assemblies contain two independent check valves separated by a small chamber. Test ports allow verification of each valve’s sealing effectiveness.
The dual valve design provides fail-safe protection. If one valve leaks or fails completely, the second valve still blocks backflow maintaining system protection.
Commercial and industrial installations commonly require double check valves. The added protection justifies higher costs when contamination risks threaten public health or safety.
Residential washing machines rarely need double check valve protection. Single check valves provide adequate backflow prevention for typical household installations.
However, specific scenarios justify double check valve consideration. Homes with documented sewer backup history benefit from redundant protection.
Properties using washing machines for commercial purposes—like home-based laundry services—may face code requirements for double check valves.
Medical offices or care facilities with residential-style washers need enhanced contamination protection. Double check valves meet stricter health code standards.
Code Requirements and Compliance
Plumbing codes specify single versus double check valve requirements based on hazard classifications.
Low-hazard applications include typical residential washing machines draining to standard sewer connections. Single check valves satisfy code requirements for these installations.
High-hazard applications involve potential contamination sources threatening public water supplies. Commercial laundries, medical facilities, and industrial washers fall into this category.
Check local plumbing codes for specific requirements. Some jurisdictions classify all basement installations as high-hazard requiring double check valves.
Building inspectors verify code compliance during final plumbing inspections. Non-compliant installations require correction before receiving occupancy approval.
Professional plumbers understand local code variations. Consult licensed professionals when installing washers in commercial properties or unusual residential scenarios.
Cost-Benefit Analysis
Double check valves cost 2-3 times more than single check valves. Installation complexity also increases with additional components and testing ports.
Residential washing machine installations rarely justify this expense. Single check valves provide sufficient protection at reasonable cost.
However, consider double check valves when replacement costs for backflow damage exceed valve expense. Finished basements with expensive furnishings warrant enhanced protection.
Properties with history of sewer backups benefit from redundant valve protection. The additional valve cost proves insignificant compared to repeated flooding damage.
Evaluate your specific risk factors objectively. Most homeowners overestimate backflow risks purchasing unnecessary protection exceeding actual needs.
Maintenance Considerations
Double check valve assemblies require periodic testing verifying both valves seal properly. Test ports facilitate this verification without disassembly.
Test procedures require specialized gauges measuring pressure differential across each valve. Most homeowners lack equipment for proper testing.
Annual testing maintains certification for high-hazard applications. Skip testing and you risk code violations and insurance claim denials.
Single check valves need no routine testing. Visual inspection and basic functionality verification suffice for residential applications.
The maintenance burden of double check valves often exceeds their benefit in residential settings. Reserve these assemblies for truly high-risk scenarios.
Troubleshooting Washing Machine Check Valve Problems
Even properly installed check valves occasionally malfunction. Recognizing symptoms enables quick resolution before problems escalate.
Incomplete Drainage Symptoms
Slow drainage or incomplete pump-out cycles indicate excessive valve back pressure or partial blockage.
Run a wash cycle monitoring drainage duration. Compare against normal drainage times before valve installation.
If drainage takes noticeably longer, the check valve restricts flow excessively. The valve may be undersized or internally obstructed.
Remove and inspect the valve. Look for debris wedged in the flapper or ball mechanism preventing full opening.
Lint, fabric fragments, and detergent residue accumulate in check valves over years of service. This buildup gradually restricts flow.
Clean valves thoroughly using water and mild detergent. Brush soft deposits from sealing surfaces and mechanical elements.
If cleaning doesn’t restore full flow, replace the valve. Internal wear or deformation prevents proper opening despite external cleanliness.
Backflow and Leakage Issues
Backflow through supposedly closed valves indicates seal failure or incorrect installation.
Test closure by pouring water into your standpipe above the check valve. Water flowing backward through the valve confirms sealing problems.
Verify correct valve orientation first. Arrows should point away from the washer toward the drain.
Reversed valves never seal—they’re installed backward treating normal flow as backflow requiring blockage.
Inspect valve sealing surfaces for damage, debris, or wear. Even small particles prevent complete closure allowing backflow.
Flapper-style valves suffer from hinge wear over time. The flapper element doesn’t seat squarely allowing edge leakage.
Replace worn check valves rather than attempting repairs. Internal components aren’t serviceable and replacement ensures reliable protection.
Noise and Vibration
Check valves sometimes create clicking, knocking, or vibration sounds during operation.
Clicking occurs when valve elements strike their seats repeatedly. This happens during turbulent flow conditions or at drainage cycle end.
Some clicking is normal and doesn’t indicate malfunction. However, loud persistent knocking suggests improper valve sizing or positioning.
Secure drain hoses firmly preventing movement during drainage. Loose hoses amplify valve operating sounds through vibration.
Install vibration dampeners—foam sleeves or rubber isolators—around hoses near check valves. These absorb mechanical vibration reducing transmitted sound.
Spring-loaded valves create less noise than flapper types. Consider upgrading if valve noise proves bothersome.
Position valves away from wall contacts. Vibration transfers into walls broadcasting sound throughout your home’s structure.
Alternative Backflow Prevention Methods
Check valves aren’t the only backflow prevention option. Alternative approaches suit specific situations better than mechanical valves.
Air Gap Installations
Air gaps create physical separation between drain outlets and receiving fixtures. Water must fall through air space preventing any backflow path.
Standard air gap installations elevate drain hose termination above the flood rim of receiving fixtures. Minimum 2-inch gaps provide adequate separation.
This method works perfectly for laundry tubs and utility sinks. Secure the drain hose above water level using hose clips or brackets.
Air gaps cost nothing requiring no additional hardware. However, they’re impractical for floor drains or situations where hose elevation isn’t feasible.
Splashing and spray sometimes occur with air gap drainage. Position discharge points carefully avoiding water spray onto walls or floors.
Backwater Valves
Backwater valves are larger devices installed in main drain lines rather than appliance connections. They protect entire drainage systems from sewer backup.
These valves mount in basement floor drain lines or main sewer laterals. When sewage backs up, the valve closes blocking all reverse flow.
Backwater valves provide whole-house protection benefiting all basement fixtures simultaneously. This system-level approach proves more economical than individual appliance valves.
However, backwater valve installation requires significant plumbing work. Excavation and concrete cutting may be necessary for proper positioning.
Professional installation costs $800-1,500 depending on accessibility and local labor rates. Compare this against installing individual check valves at multiple fixtures.
Sump Pump Systems
Homes with chronic drainage problems sometimes install dedicated sump pump systems (View on Amazon) for washing machine drainage.
The washer drains into a collection basin. When water reaches a certain level, the sump pump activates forcing water into overhead drain lines.
This approach eliminates backflow risks entirely. Water can’t flow backward against pump discharge pressure.
Sump systems cost significantly more than simple check valves. Pumps, basins, piping, and electrical work total $600-1,200 for typical installations.
Reserve sump systems for situations where gravity drainage proves impossible or unreliable. Most homes don’t need this level of complexity.
Maintenance and Longevity
Proper maintenance extends check valve service life ensuring continued backflow protection over years of operation.
Routine Inspection Schedule
Inspect check valves annually verifying physical condition and sealing effectiveness.
- Visual examination catches obvious problems like cracked bodies, damaged hose clamps, or corroded components.
- Test valve closure using the standpipe water test described earlier. Annual testing confirms the valve still prevents backflow effectively.
- Look for detergent residue accumulation around valve exteriors. Surface buildup suggests internal accumulation requiring cleaning.
- Check hose clamp tightness. Vibration gradually loosens clamps over months of operation causing leaks.
- Tighten loose clamps immediately but avoid over-tightening. Excessive force cracks plastic valve bodies or crushes hoses.
Cleaning Procedures
Accumulated lint and detergent residue restrict valve operation gradually. Periodic cleaning maintains optimal performance and here’s how to do it:
- Disconnect the check valve following installation steps in reverse. Remove both hose clamps and slide hoses off valve barbs.
- Disassemble the valve if design permits. Some models use threaded unions allowing access to internal components.
- Flush valve internals with warm water removing loose debris. Use a soft brush cleaning sealing surfaces and moving elements.
- Avoid harsh chemicals or abrasive cleaners. These damage rubber seals and plastic components reducing valve longevity.
- Inspect sealing elements closely during cleaning. Look for cracks, hardening, or permanent deformation indicating replacement necessity.
- Reassemble and reinstall the cleaned valve. Test operation immediately verifying proper drainage and backflow prevention.
Replacement Indicators
Several signs indicate check valve replacement necessity rather than continued service. That includes:
- Persistent backflow despite cleaning confirms seal failure. Worn sealing surfaces can’t be restored through cleaning alone.
- Cracked or damaged valve bodies compromise pressure tolerance. Even small cracks propagate under pressure causing catastrophic failure.
- Severely corroded metal valves lose structural integrity. Corrosion weakens metal until it fails suddenly under normal operating pressure.
- Valves exceeding 7-10 years of service should be replaced preventively. Rubber seals deteriorate with age regardless of apparent condition.
- Upgraded washing machines may require larger check valves. New high-efficiency models with faster drain cycles need valves with higher flow capacity.
Selecting the Right Washing Machine Check Valve
Numerous check valve models exist creating confusion about optimal selection for washing machine applications.
Valve Type Comparison
Compare mechanism types considering your specific installation requirements.
Flapper valves work best in vertical orientations where gravity assists closure. They’re inexpensive and widely available.
Choose flapper valves for standard standpipe installations where vertical positioning is natural. Avoid them for horizontal or inverted applications.
Spring-loaded valves operate effectively in any orientation. The internal spring provides consistent closure force regardless of positioning.
Select spring-loaded designs for installations where valve orientation can’t be controlled. These cost more but offer superior versatility.
Duckbill valves tolerate debris better than mechanical alternatives. The flexible rubber sleeve self-cleans preventing jams.
Consider duckbill valves for installations prone to debris accumulation. However, plan for more frequent replacement as rubber degrades.
Ball check valves provide reliable operation with minimal parts. Gravity positions the ball blocking reverse flow.
These work well for larger diameter applications where higher flow capacity is needed.
Size and Capacity Matching
Match valve size to your washing machine’s drain hose diameter for optimal performance.
Measure your existing drain hose’s inside diameter. Most residential washers use 1-inch, 1.25-inch, or 1.5-inch hoses.
Purchase check valves matching this measurement exactly. Oversized valves require adapters complicating installation.
Verify valve flow capacity ratings. Look for specifications of at least 8-10 GPM for standard washers or 12-15 GPM for large capacity models.
Undersized valves restrict drainage forcing pumps to work harder. This increases electricity consumption and accelerates pump wear.
When in doubt, choose slightly oversized valves over undersized alternatives. Excess capacity rarely causes problems while restrictions definitely do.
Brand and Quality Considerations
Check valve quality varies dramatically between manufacturers affecting longevity and reliability.
Research brands reading customer reviews and professional recommendations. Established plumbing manufacturers generally produce superior products.
Avoid the cheapest available options. Ultra-budget valves use thin materials that crack or fail prematurely.
Professional-grade valves cost 20-40% more than consumer-grade but last two to three times longer. The per-year cost favors quality products.
Look for valves with manufacturer warranties. One to two-year warranties indicate confidence in product durability.
Brass valves from reputable manufacturers represent the best long-term investment despite higher initial costs. These often outlast the washing machines they protect.
Frequently Asked Questions
Can a check valve cause my washing machine not to drain properly?
Yes, check valves can restrict drainage if undersized, improperly installed, or internally blocked. The valve should match your drain hose diameter and arrow markings must point away from the washer. Clean or replace valves causing drainage slowdowns exceeding 20% of normal duration.
Where exactly should I install a washing machine check valve?
Install check valves in the drain hose between the washer and drainage system connection point. For standpipes, position the valve 6-12 inches from the hose end. For utility sink connections, place it before the washer drain joins the sink drain. Always install with flow arrows pointing toward drainage.
How long do washing machine check valves typically last?
Quality check valves last 5-10 years with proper installation and minimal maintenance. Harsh water chemistry, frequent use, and detergent exposure accelerate degradation. Brass valves outlast plastic alternatives. Inspect annually and replace when backflow testing fails or visible damage appears.
Do front-load washers need check valves more than top-loaders?
Installation location matters more than washer type. Both front-load and top-load washers need check valves in basement installations, utility sink connections, or other backflow-prone scenarios. Washer type doesn’t significantly affect backflow risk compared to drainage system configuration.
Can I install a check valve horizontally?
Spring-loaded check valves work effectively in horizontal orientations. Flapper-style valves should be vertical with the flapper at the bottom for optimal gravity-assisted closure. Duckbill valves tolerate any orientation. Check manufacturer specifications for your specific valve model’s orientation requirements.
Will a check valve prevent sewer gas from entering through my washer drain?
Check valves provide minimal sewer gas protection. They’re designed for liquid backflow prevention, not gas sealing. Sewer gas problems require proper drain trap installation and venting. P-traps in drainage systems provide effective gas barriers while check valves prevent liquid backflow.
What’s the difference between a check valve and a backflow preventer?
Check valves are simple one-way valves for basic backflow prevention. Backflow preventers are more complex assemblies with testable components meeting specific code requirements for potable water protection. Washing machines typically use check valves on drain lines, not backflow preventers on supply lines.
Protecting Your Investment Through Proper Drainage
Water always seeks the path of least resistance. Without proper directional controls, that path sometimes leads backward through your washing machine creating contamination, damage, and costly repairs.
Check valves stand guard against these scenarios operating silently and reliably for years. These simple mechanical devices prevent thousands of dollars in potential damage costing less than $30.
Installation determines effectiveness. Follow proper procedures ensuring correct orientation, adequate sizing, and secure connections. A perfectly good valve installed backward provides zero protection.
Not every washing machine needs check valve protection. Understand your specific drainage configuration before purchasing unnecessary hardware. Upper floor installations with proper venting rarely require additional backflow prevention.
Basement washers universally benefit from check valve installation. The minimal investment provides insurance against devastating sewage backups that destroy property and create health hazards.
Utility sink connections represent another high-value check valve application. These prevent cross-contamination between fixtures sharing common drain lines.
Maintain installed check valves through annual inspections and periodic cleaning. Proactive maintenance ensures continued protection as components age and wear.
Replace aging valves before complete failure. Preventive replacement costs far less than dealing with contamination from failed backflow protection.
Your washing machine represents a significant investment deserving proper protection. Check valves provide that protection for the price of dinner for two.

Hi, I’m Barlgan! I created Repair Me Yourself to empower homeowners to tackle appliance repairs with confidence. From decoding error codes to fixing cooling issues, I break down complex repairs into simple, actionable steps that save you time and money.