Your refrigerator temperature swings from too cold to too warm, creating frozen vegetables one day and spoiled milk the next. These unpredictable fluctuations threaten food safety and waste money on spoiled groceries.
Refrigerator temperature fluctuates due to a faulty thermostat or temperature sensor, blocked air vents, a malfunctioning defrost system, compressor cycling issues, or damaged door seals allowing warm air entry. When your refrigerator can’t maintain consistent temperature, one or more components in the cooling or control system has failed or requires adjustment.
This guide will help you identify why your refrigerator temperature won’t stabilize and show you how to fix the problem for consistent cooling.
Refrigerator Temperature Fluctuations Quick Reference
| Cause | Temperature Pattern | Difficulty Level | Estimated Fix Time |
|---|---|---|---|
| Faulty Thermostat/Sensor | Random swings, unstable readings | Moderate | 45-90 minutes |
| Blocked Air Vents | Warm front, cold back, uneven cooling | Easy | 15-30 minutes |
| Defrost System Failure | Gradual warming, then sudden cooling | Moderate to Hard | 1-3 hours |
| Compressor Short Cycling | Frequent temperature changes | Moderate | 30 min to 2 hours |
| Damaged Door Seals | Warmer after door openings | Easy | 30-60 minutes |
Refrigerator Temperature Fluctuates Causes
A properly functioning refrigerator maintains steady temperature within a narrow range. Your fridge should stay between 35°F and 38°F consistently, varying no more than 2 to 3 degrees.
When temperature swings beyond this range, components that regulate cooling or airflow have malfunctioned. Sometimes the problem is simple overpacking. Other times, critical control components have failed.
Understanding normal refrigerator operation helps diagnose fluctuations. The compressor cycles on to cool, then cycles off when target temperature is reached. This creates minor temperature variations of 2 to 3 degrees, which is normal. Larger swings indicate problems.
Here are the likely causes when your refrigerator temperature fluctuates:
1. Defective Thermostat or Temperature Sensor
Your refrigerator’s thermostat or temperature sensor monitors internal temperature and controls when the compressor runs. Older refrigerators use mechanical thermostats with sensing tubes. Newer models use electronic sensors connected to control boards.
When these components fail, they send incorrect temperature readings. The refrigerator can’t determine when to cool, causing wild temperature swings.
Signs of Thermostat/Sensor Failure
- Temperature fluctuates dramatically without any pattern. Your refrigerator might be 45°F one hour and 30°F the next.
- Adjusting the temperature control dial or digital setting produces no change in actual temperature. The refrigerator ignores your settings.
- The compressor runs constantly without ever cycling off, or it barely runs at all. Both extremes indicate faulty temperature sensing.
- Food freezes in the refrigerator compartment, particularly items near the back wall. This indicates the thermostat isn’t detecting actual temperature accurately.
How to Test the Thermostat
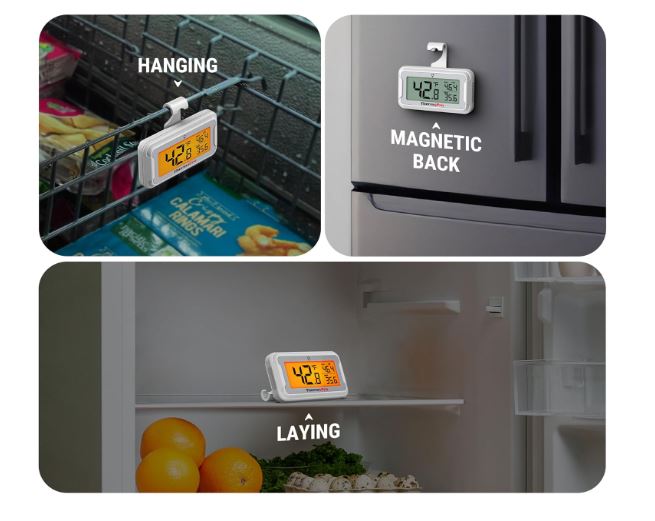
Place an appliance thermometer (View on Amazon) in the center of your refrigerator, away from walls and door. Wait 24 hours, then check the reading.
Compare this reading to your temperature control setting. A significant difference (more than 5 degrees) suggests thermostat problems.
Try adjusting the control to a warmer setting. Wait another 24 hours and check again. If temperature doesn’t change, the thermostat has failed.
For mechanical thermostats, you can test with a multimeter (View on Amazon). Access the thermostat, disconnect wires, and test continuity at different temperature settings.
How to Fix It
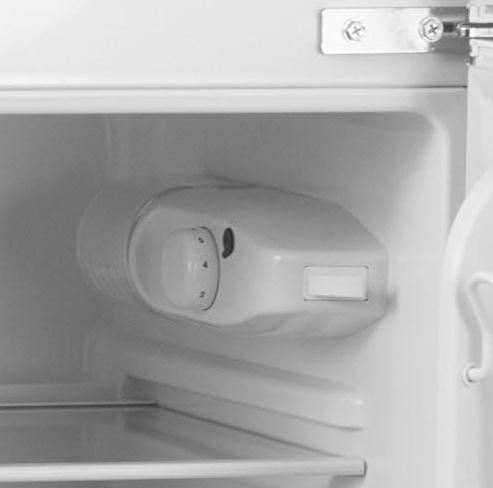
Replacing a mechanical thermostat is a moderate DIY repair. Unplug your refrigerator and locate the thermostat, typically behind the temperature control dial.
Remove the control knob by pulling it straight off. Remove screws securing the thermostat housing and carefully pull it forward.
Disconnect the sensing tube from its mounting clips. Be extremely careful not to kink or damage this thin tube.
Install the new thermostat by reversing these steps. Thermostats cost $25 to $80 depending on your refrigerator model.
For electronic temperature sensors, locate the sensor inside your refrigerator. It’s typically a small probe near the air return vent.
Disconnect the wire connector and remove mounting screws. Install the new sensor and reconnect wiring. Electronic sensors cost $20 to $60.
When to Replace the Control Board
If replacing the sensor doesn’t fix fluctuations, the main control board may have failed. Control boards cost $150 to $400 and require careful installation.
For expensive control board repairs, weigh repair cost against refrigerator age and replacement cost. Professional installation adds $100 to $200 to the total.
2. Blocked or Restricted Air Vents
Your refrigerator circulates cold air from the freezer through vents into the refrigerator compartment. This airflow system maintains even temperature throughout the unit.
When items block these vents, cold air can’t circulate properly. Some areas become too cold while others warm up, creating temperature fluctuations across the refrigerator.
Signs of Blocked Vents
- Temperature varies significantly between different areas of your refrigerator. The back wall might be very cold while the door shelves are warm.
- Items placed directly against the back wall freeze solid. Meanwhile, items near the door or front of shelves are barely cool.
- You notice frost building up around vent openings. This indicates cold air backing up instead of circulating.
- Temperature stabilizes when you remove items, then fluctuates again when you restock the refrigerator fully.
Where to Find Air Vents
Look for slotted openings or grilles on the back wall of your refrigerator. Most models have vents at the top, bottom, or both.
Some refrigerators have additional vents on the ceiling or sides. Check your user manual for vent locations specific to your model.
Inside the freezer, locate the air return vents where cold air originates before circulating to the refrigerator section.
How to Fix It
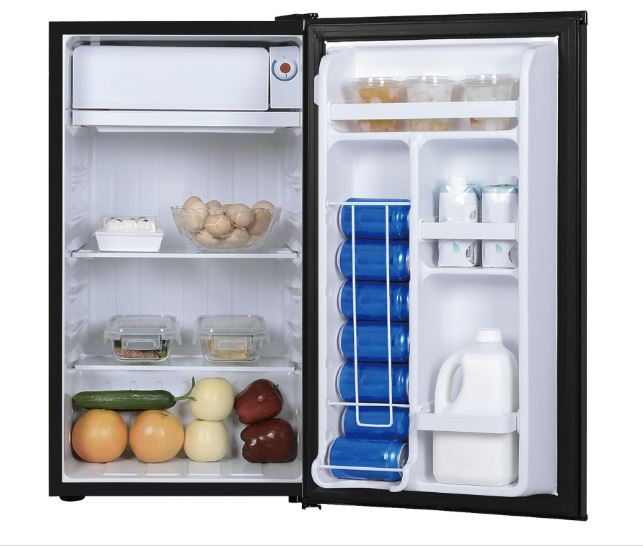
Remove all items blocking air vents. Maintain at least 2 to 3 inches of clearance around all vent openings.
Reorganize your refrigerator to ensure air can flow freely. Avoid packing items so tightly that air can’t circulate between them.
Don’t overfill your refrigerator beyond about 75% capacity. Overcrowding inevitably blocks airflow and creates temperature problems.
Use bins or organizers to keep items away from vents. This maintains proper spacing even when the refrigerator is well-stocked.
Cleaning Vent Areas
Check for frost or ice blocking vents. If present, this indicates a defrost system problem requiring separate attention.
Clean vent covers with a damp cloth. Dust and debris can restrict airflow even without obvious blockages.
Ensure nothing has fallen behind drawers or shelves that might block hidden vent pathways.
Temperature Monitoring
After clearing vents, place thermometers in different locations. Check front, middle, and back positions. All should read within 3 degrees of each other.
Large temperature variations after clearing vents indicate additional problems beyond simple airflow restriction.
3. Malfunctioning Defrost System
Your refrigerator’s automatic defrost system periodically melts frost from the evaporator coils. This system includes a defrost heater, timer or control board, and defrost thermostat.
When defrost components fail, frost accumulates on the evaporator coils. This frost insulates the coils, preventing proper heat exchange and causing temperature fluctuations.
Signs of Defrost System Problems
- Temperature gradually rises over several days. Your refrigerator can’t maintain coldness and food starts warming.
- Then temperature suddenly drops when you manually defrost or frost melts during long door openings. This creates a fluctuating pattern of warm periods followed by brief cold periods.
- Heavy frost builds up on the back wall inside your freezer compartment. This frost might be half an inch thick or more.
- Your refrigerator works fine for a few days after manual defrosting, then temperature problems return. This confirms defrost system failure rather than other issues.
Components to Check
The defrost timer controls when defrost cycles occur. Located behind the front grille, control panel, or at the back of the refrigerator, this timer can fail mechanically.
The defrost heater sits on or near the evaporator coils. When it fails, frost never melts and accumulates continuously.
The defrost thermostat monitors evaporator temperature and controls the heater. A failed thermostat prevents the heater from activating.
How to Diagnose Defrost Issues
Manually defrost your refrigerator completely. Unplug it, remove all food, and leave doors open for 6 to 8 hours.
Once defrosted, plug it back in and monitor temperature for several days. If temperature gradually rises again as frost rebuilds, your defrost system has failed.
Listen during defrost cycles (typically every 8 to 12 hours). You should hear water dripping into the drain pan. No dripping sounds indicate defrost cycles aren’t occurring.
How to Fix It
Testing individual defrost components requires a multimeter and electrical knowledge. The defrost heater should show continuity across its terminals.
The defrost thermostat should show continuity when cold and open when warm. Meanwhile, the defrost timer should advance mechanically or electronically at proper intervals.
Replace failed components based on testing results. Defrost heaters cost $20 to $60, defrost thermostats cost $15 to $40, while defrost timers cost $25 to $80 (View all on Amazon).
Replacement involves unplugging your refrigerator, accessing the evaporator compartment by removing panels, and installing new parts.
When to Call a Professional
Defrost system repairs involve working inside the evaporator compartment near refrigerant lines. If you’re uncomfortable with this work, hire an appliance repair technician.
Professional defrost system repair costs $150 to $350 including parts and labor. This is worthwhile for newer refrigerators but may not justify repair costs for units over 10 years old.
4. Compressor Short Cycling or Relay Problems
Your compressor should run in regular cycles, typically 15 to 30 minutes on, followed by a similar off period. This cycling maintains stable temperature.
Short cycling means the compressor turns on and off much more frequently than normal. Each cycle is very brief, preventing the refrigerator from reaching proper temperature before shutting down.
Signs of Short Cycling
- Temperature fluctuates frequently throughout the day. Your refrigerator never stabilizes at the set temperature.
- You hear the compressor starting and stopping every few minutes. Normal cycling is every 30 minutes to an hour, not every few minutes.
- The compressor runs very briefly (less than 5 minutes) before shutting off. It then immediately restarts after a short pause.
- Your electricity bills increase because the compressor uses more power during frequent startup cycles than during steady operation.
What Causes Short Cycling
A failed start relay causes repeated start attempts without successful compressor operation. Each attempt counts as a cycle, creating temperature fluctuations.
Dirty condenser coils prevent proper heat dissipation. The compressor overheats quickly and shuts down, then restarts when cool enough.
Low refrigerant levels prevent proper pressure buildup. The compressor can’t operate effectively, causing rapid cycling as it struggles to cool.
A faulty overload protector shuts down the compressor prematurely. It trips too easily, creating short cycles.
How to Diagnose Short Cycling
Time your compressor cycles. Use a stopwatch or timer to track how long the compressor runs before shutting off.
Normal cycles last 15 to 30 minutes or longer. Cycles shorter than 10 minutes indicate short cycling problems.
Feel the condenser coils at the back or bottom of your refrigerator. If they’re caked with dust, cleaning is necessary.
Listen for clicking sounds accompanying short cycles. Clicks indicate start relay or overload protector problems.
How to Fix It
Start by cleaning condenser coils thoroughly. Unplug your refrigerator, access the coils, and use a vacuum or coil brush to remove all dust and debris.
Ensure adequate ventilation around your refrigerator. Move it away from walls to provide proper clearance for heat dissipation.
Test and replace the start relay if necessary. This repair is covered in detail in start relay troubleshooting guides. Relays cost $15 to $45.
For low refrigerant or overload protector issues, professional service is required. These repairs involve refrigerant handling or electrical components requiring expertise.
Monitoring After Repairs
After addressing short cycling, monitor compressor operation for 24 hours. Cycles should normalize to proper duration.
Temperature should stabilize within a few hours of fixing short cycling issues. Place a thermometer inside to track improvement.
5. Damaged or Worn Door Seals
Your refrigerator door seal (gasket) creates an airtight barrier when the door closes. This prevents warm, humid air from entering the refrigerator.
When seals wear out, crack, or become deformed, warm air leaks in continuously. This creates temperature fluctuations, especially noticeable after door openings when extra warm air enters.
Signs of Door Seal Problems
- Temperature rises noticeably after opening the door, then takes longer than normal to recover. A tight seal should restore temperature within 10 to 15 minutes.
- You feel cold air escaping from the refrigerator when standing near it. This indicates gaps in the door seal.
- Condensation forms on the outside of your refrigerator door or around the edges. This shows warm air meeting cold surfaces at seal gaps.
- Your refrigerator runs almost constantly trying to compensate for warm air entry. The compressor rarely cycles off.
How to Test Door Seals
Perform the dollar bill test. Close a dollar bill in the door so half is inside and half is outside.
Try to pull the bill out. It should resist with firm, even pressure. Any spot where the bill slides out easily indicates a weak seal.
Test around the entire door perimeter. Even a small gap in one corner allows significant warm air entry.
Visual inspection reveals obvious problems. Look for cracks, tears, or areas where the seal has pulled away from the door.
How to Fix It
For minor seal issues, clean the gasket thoroughly with warm soapy water. Food residue and sticky substances prevent proper sealing.
Apply a thin layer of petroleum jelly to clean, dry seals. This restores flexibility and improves sealing performance.
Check door alignment. Sometimes doors sag slightly over time, preventing proper seal contact. Adjust door hinges to restore proper alignment.
For damaged or permanently deformed seals, replacement is necessary. Order a replacement gasket specific to your refrigerator model.
Replacement gaskets (View on Amazon) cost $50 to $140 depending on refrigerator brand and size. Installation involves removing the old seal from its retaining channel and pressing the new seal into place.
Some seals attach with screws hidden behind the gasket. Loosen these screws slightly, position the new gasket, then retighten evenly.
Prevention Tips
Clean door seals monthly to prevent buildup that affects sealing. Never use harsh chemicals that dry out or crack the rubber.
Don’t hang items on refrigerator doors or overload door shelves. Excess weight stresses seals and can pull doors out of alignment.
Relevant:
How to Check Refrigerator Temperature
How to Check if Your Fridge is Cooling Properly
Frequently Asked Questions
What is the ideal refrigerator temperature?
The ideal refrigerator temperature is between 35°F and 38°F. This range keeps food fresh while preventing freezing.
Your freezer should maintain 0°F for proper long-term food storage. Temperatures above 5°F risk food quality degradation.
Use an appliance thermometer to verify actual temperature. Don’t rely solely on built-in displays, which can be inaccurate.
How much temperature fluctuation is normal?
Minor fluctuations of 2 to 3 degrees are normal during compressor cycling. Temperature rises slightly when the compressor is off, then drops when it runs.
Fluctuations beyond 5 degrees indicate problems. Your refrigerator should never swing from 30°F to 45°F under normal conditions.
Temperature should stabilize within 30 minutes after door openings. Longer recovery times or larger swings suggest seal or airflow problems.
Can overpacking cause temperature fluctuations?
Yes, overpacking is a common cause of temperature problems. Blocked air vents prevent proper circulation, creating hot and cold spots.
Items packed too tightly trap cold air in some areas while blocking it from others. This creates uneven cooling throughout the refrigerator.
Maintain about 25% empty space in your refrigerator for optimal air circulation. Organize items to keep vent areas clear.
How long after adding warm food does temperature recover?
After adding warm food, temperature should recover within 1 to 2 hours. The exact time depends on how much warm food you added.
Always cool cooked foods to room temperature before refrigerating when possible. This reduces the temperature load on your refrigerator.
Divide large quantities of warm food into smaller containers. This helps them cool faster and reduces impact on refrigerator temperature.
Should I replace or repair a refrigerator with temperature problems?
For refrigerators less than 7 years old, repair usually makes sense. Most temperature problems are fixable with affordable parts.
For units over 10 years old, consider replacement, especially if repairs exceed 50% of a new refrigerator’s cost.
Factor in energy efficiency. Newer refrigerators (View on Amazon) use significantly less electricity. Energy savings can offset replacement cost over 5 to 7 years.
Achieve Stable Refrigerator Temperature
You now understand why your refrigerator temperature fluctuates and how to diagnose each potential problem. Most issues are fixable with basic maintenance or affordable part replacement.
Start troubleshooting with the simplest solutions. Clear blocked air vents and ensure proper organization. This alone solves many temperature fluctuation problems.
Test your door seals using the dollar bill method. Replace worn seals to prevent warm air entry and temperature instability.
Clean condenser coils if you haven’t done so recently. This simple maintenance task takes 30 minutes and often resolves cycling and temperature issues.
For persistent fluctuations, test your thermostat or temperature sensor. Place thermometers in multiple locations to identify patterns and narrow down the cause.
Monitor defrost cycles by listening for water dripping into the drain pan. If you never hear dripping, your defrost system may have failed.
Address compressor short cycling by ensuring proper ventilation and replacing faulty start relays. Short cycling wastes energy and creates constant temperature swings.
Keep a written log of temperature readings over several days. Note when fluctuations occur, by how many degrees, and what might have triggered them. This information helps diagnose complex problems.
When DIY troubleshooting doesn’t resolve fluctuations, consult a qualified appliance repair technician. Professional diagnosis ensures accurate problem identification.
Remember that food safety depends on stable refrigerator temperature. Don’t ignore persistent fluctuations, as they risk food spoilage and potential illness.

Hi, I’m Barlgan! I created Repair Me Yourself to empower homeowners to tackle appliance repairs with confidence. From decoding error codes to fixing cooling issues, I break down complex repairs into simple, actionable steps that save you time and money.