Your Maytag gas dryer tumbles clothes for an hour but they come out cold and damp. Or the igniter glows bright orange but gas never ignites. Gas dryers combine electrical systems, mechanical components, and combustion equipment, creating three failure domains instead of the two that electric models face.
When problems strike, you need to determine whether the issue lies in the gas supply, ignition system, electrical control, or mechanical drive. Unlike electric dryers where “no heat” usually means a broken element, gas dryers present multiple combustion-related failure points from igniters to flame sensors to gas valve coils.
Maytag gas dryer troubleshooting most commonly involves weak igniters unable to open gas valves (40% of cases), clogged burner tubes preventing proper combustion, failed gas valve coils blocking fuel flow, dirty flame sensors shutting off gas prematurely, and thermal fuses interrupting control circuits. Most issues are diagnosable through systematic ignition sequence observation and component resistance testing in 30-60 minutes.
This troubleshooting guide addresses problems unique to gas-powered operation, from gas flow verification to burner assembly cleaning, while also covering the mechanical and electrical issues that affect all Maytag dryers regardless of fuel type.

Quick Maytag Gas Dryer Troubleshooting Reference
| Specific Symptom | Gas System Component | How to Verify | Typical Repair |
|---|---|---|---|
| Igniter glows but no ignition | Gas valve coils or gas supply | Listen for valve click, smell for gas | Replace gas valve assembly ($100-150) |
| No glow, no heat | Failed igniter | Test igniter resistance (50-400 ohms) | Replace igniter ($30-50) |
| Lights briefly then goes out | Dirty flame sensor | Clean sensor rod with fine sandpaper | Clean or replace sensor ($15-30) |
| Strong gas smell without ignition | Gas valve stuck open or leak | Shut off gas immediately, call professional | Emergency—professional only |
| Ignites then cycles on/off rapidly | Flame sensor or thermistor issue | Test sensor continuity and position | Adjust or replace sensor |
| Takes multiple cycles to ignite | Weak igniter or low gas pressure | Test igniter current draw, check supply pressure | Replace igniter or adjust pressure |
Understanding Maytag Gas Dryer Operation
Gas dryers operate fundamentally differently than electric models, creating unique failure patterns.
The ignition sequence follows precise timing. When you start a drying cycle, the control board first starts the motor to rotate the drum and blower. After confirming airflow, it sends power to the igniter, which is a silicon carbide or silicon nitride element that glows orange-white hot while drawing 3-4 amps and heating to approximately 2500°F.
After 30-90 seconds of igniter glow time (varies by model), the control board energizes the gas valve coils. These electromagnetic coils open the valve mechanically, allowing gas flow to the burner tube, and gas immediately ignites from the hot igniter with an audible “whoosh.” The flame should be steady blue with orange tips.
The flame sensor (a thin metal rod positioned in the flame path) detects combustion by sensing heat or conducting a small current through ionized flame gases. If the sensor confirms flame within 3-5 seconds of valve opening, the gas valve stays open and the burner continues heating. If the sensor doesn’t detect flame, the control board shuts the gas valve immediately for safety.
During normal operation, the cycling thermostat turns the burner on and off to maintain proper drum temperature, and the burner might cycle 4-8 times during a typical load. The high-limit thermostat provides safety backup by cutting power if temperatures exceed safe limits.
This sequence has multiple potential failure points. The igniter might not glow, preventing valve opening. The valve coils might fail, preventing gas flow despite proper igniter operation. The flame sensor might be dirty, causing premature shutdown. Gas supply issues prevent combustion entirely, and each failure creates distinct symptoms that guide diagnosis.
Maytag Gas Dryer Not Heating
No heat in a gas dryer requires systematically checking the ignition sequence and combustion components. Here’s what you can do:
Observe the Complete Ignition Sequence
Start a heating cycle and watch the ignition area through the lint trap opening or lower access panel (if your model allows safe viewing). Note exactly what happens:
Normal sequence:
- Motor starts, drum rotates (immediate)
- Igniter begins glowing (within 10 seconds)
- Igniter reaches full brightness (30-90 seconds)
- Gas valve clicks audibly
- Gas ignites with “whoosh” sound (immediately after click)
- Steady blue flame with orange tips
- Flame sensor allows sustained burn
What you observe reveals specific failures:
- No igniter glow: Igniter failed, no power to igniter, or control board problem
- Igniter glows dimly: Weak igniter drawing insufficient current
- Igniter glows bright but no click: Gas valve coils failed or no power to valve
- Valve clicks but no ignition: No gas supply or burner tube blockage
- Brief ignition then immediate shutdown: Flame sensor dirty or failed
- Ignition works but cycles constantly: Cycling thermostat or temperature sensor issue
This observation takes 2-3 minutes and identifies which component system to test.
Test the Igniter
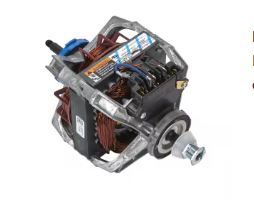
The igniter is the most common gas dryer failure point. These elements weaken over time, eventually drawing insufficient current to open the gas valve’s safety mechanism. A weak igniter glows but can’t generate the 2.5-3.5 amps needed for valve operation.
Disconnect power and access the igniter by removing the lower front panel or rear panel depending on model. The igniter mounts near the burner tube entrance as a white or gray ceramic element about 2-3 inches long.
Test resistance with a multimeter (View on Amazon). Most Maytag gas dryer igniters measure 50-400 ohms depending on type:
- Round igniters (older models): 50-150 ohms
- Flat igniters (2010+ models): 150-400 ohms
Compare your reading to specifications for your exact model. Resistance significantly outside this range indicates failure, and infinite resistance means the element broke internally (a clear failure).
Critical insight: An igniter can show correct resistance but still fail to draw adequate current. If resistance tests borderline (upper end of range) and you observe weak glow or delayed ignition, replace the igniter. Current draw testing requires specialized equipment most homeowners lack, so replace marginal igniters rather than further testing.
Visual inspection helps too. Look for cracks, breaks, or sections that glow dimmer than others since the igniter should glow uniformly bright. Uneven glow or dark spots indicate damaged elements that need replacement.
Check Gas Valve Coil Operation
The gas valve assembly contains two electromagnetic coils where the primary coil opens the valve initially and the holding coil maintains the open position during combustion. Either coil failing prevents gas flow.
Access the gas valve (typically mounted on the burner assembly behind the drum). It’s a rectangular metal housing with wire terminals, so disconnect power before testing.
Test each coil separately with a multimeter where each coil should measure 1000-1500 ohms resistance. Readings outside this range indicate coil failure, and note that both coils must be within specification since one good and one bad still results in no heating.
The gas valve also contains a mechanical safety mechanism operated by the igniter’s current draw. When the igniter draws sufficient current (2.5+ amps), it heats a bimetal element that mechanically releases the valve. If the igniter is weak, this safety prevents valve opening even when coils function perfectly.
Never attempt to repair, adjust, or modify gas valves. Always replace the complete valve assembly since improper valve work creates explosion and carbon monoxide hazards requiring professional intervention.
Verify Gas Supply to the Dryer
No gas flow prevents heating regardless of perfect electrical function. Check gas supply systematically:
Locate the gas shutoff valve behind or beside the dryer. It should be parallel to the gas pipe (open position). If perpendicular, someone closed it, so turn it slowly to the open position.
Verify your home has gas service by checking other gas appliances (furnace, water heater, stove). If all gas appliances aren’t working, you have a utility service interruption or main valve closure. Contact your gas utility.
Check the dryer’s gas supply pressure if you have a manometer. Maytag gas dryers require 5-7 inches water column (0.18-0.25 PSI) at the dryer inlet, and lower pressure causes weak flames or ignition failures. This requires professional adjustment at the gas meter regulator since you should never adjust gas pressure yourself.
Smell near all gas connections for leaks. Natural gas has added sulfur smell for safety, and any gas odor requires immediately shutting off gas supply and calling a professional. Never operate gas appliances with suspected leaks.
Inspect and Clean the Flame Sensor
The flame sensor (also called flame rod or flame rectification probe) is a metal rod extending into the burner area. It must be positioned correctly in the flame path and clean for proper operation.
Remove the burner cover or access panel to see the sensor. It’s typically a 3-8 inch metal rod held by a ceramic insulator or bracket. Don’t confuse it with the igniter since the sensor is much thinner and doesn’t glow.
Carbon buildup, oxidation, or corrosion on the sensor prevents it from detecting flames. Clean it gently with fine-grit sandpaper (320-400 grit) or emery cloth, then wipe clean with a dry cloth. Don’t use water or solvents since they leave residues that interfere with sensing.
Verify the sensor positions correctly in the flame. When the burner lights, the flame should envelop the sensor rod. If the sensor sits outside the flame path, it can’t detect combustion and shuts the valve immediately. Adjust the sensor bracket or mounting if needed to position it in the flame.
Test sensor continuity with a multimeter. At room temperature, it should show very high resistance or open circuit. Don’t worry if you can’t get a reading since flame sensors operate through ionization and microamp-level signals difficult to measure with standard multimeters.

Examine the Burner Tube and Assembly
The burner tube distributes gas for even combustion. Blockages from lint, dust, or spider webs prevent proper flame distribution, and you’ll see yellow flames, sooting, or failure to ignite completely.
Remove the burner assembly for inspection (varies by model with typically 2-6 screws holding it in place). Shine a flashlight through the burner tube and look for any obstructions, debris, or corrosion inside.
Clean the burner tube thoroughly:
- Blow compressed air through the tube
- Use a vacuum to remove debris
- For stubborn blockages, use a flexible wire or pipe cleaner
- Ensure all ports along the tube are clear
- Wipe exterior clean
Inspect the burner funnel (where gas enters). This cone-shaped opening should be completely clear since even small obstructions here prevent proper gas mixing and combustion.
Check the flame spreader or burner head (if equipped). Some models have a perforated metal piece that distributes flame, and you need to ensure all holes are clear of debris.
Maytag Gas Dryer Won’t Start
Gas dryers experience starting failures from both gas system issues and standard electrical/mechanical problems.
Distinguish Gas vs Electrical Starting Failures
When a gas dryer “won’t start,” clarify exactly what’s happening:
- Completely dead (no lights, no sound): Electrical power problem (check circuit breaker, outlet, and power cord). This isn’t gas-related.
- Panel lights work but no response to start button: Electrical safety interlock problem (test door switch, thermal fuse, and start switch). Gas system not involved yet.
- Drum tumbles but no heat: This is the gas system problem involving igniter, valve, or supply issue. The dryer technically “started” but won’t heat.
- Drum tumbles, igniter glows, but no ignition: Gas supply or valve problem. The electrical start circuit works perfectly.
Most “won’t start” complaints about gas dryers actually mean “won’t heat.” True starting failures (no power, no drum rotation) follow the same troubleshooting as electric dryers since they’re not gas-system related.
Check Thermal Safety Components
Gas dryers use the same thermal fuses and cutoffs as electric models to protect against overheating. These components interrupt the start circuit when tripped, preventing any operation.
Locate and test the thermal fuse on the blower housing. Disconnect one wire terminal and test for continuity, where no continuity means the fuse blew and requires replacement. Thermal fuses never reset, so replacement is mandatory.
Find the thermal cutoff switch (if equipped), usually a red or black button on the blower housing. Press it firmly to reset since a tripped cutoff prevents starting. If it trips repeatedly, you have an airflow restriction causing overheating, so clean vents thoroughly.
Test high-limit and cycling thermostats mounted on the blower housing or burner assembly. These should show continuity at room temperature, and no continuity indicates open thermostats requiring replacement.
Gas dryer specific concern: Overheating in gas dryers can result from combustion problems in addition to vent restrictions. Improper burner adjustment or flame characteristics cause excessive heat that trips safety devices. If thermal components fail repeatedly despite clean vents, the burner assembly may need professional adjustment.
Verify Door Switch and Latch
The door switch prevents operation when the door is open as a basic safety feature. This switch fails commonly after 5-7 years of use from repeated door closures.
Close the door and listen for the latch engaging. You should hear a distinct click, and no click suggests latch or strike misalignment.
Test the door switch with a multimeter by accessing it through removing the top or control panel depending on model. With the door closed, the switch should show continuity, while an open door should break continuity. Failed switches require replacement.
Inspect the door strike (the metal piece on the door that engages the latch). It can bend or break from forceful door closures, so adjust or replace bent strikes.
Test the Start Switch and Controls
The start button itself wears out from thousands of presses. The contacts corrode or break, preventing the start signal from reaching the control board.
Remove the control panel (typically a few screws along the top edge or inside lint trap area). Press the start button while watching its mechanical movement where it should depress smoothly and spring back consistently.
Test start switch continuity by pressing and holding the button (should show continuity), then releasing (should break continuity). Inconsistent readings indicate switch failure.
If your model has an electronic control board, visual inspection sometimes reveals problems. Look for burned components, bulging capacitors, or damaged circuit traces. Electronic boards can’t be easily tested but obvious damage indicates replacement needs.
Check the Drive Motor and Capacitor
The motor runs on 120V in gas dryers (unlike 240V in many electric models). Motor failures prevent starting even when all controls work properly.
Listen carefully when pressing start. A humming sound without drum rotation indicates motor problems, either motor failure or broken belt preventing load from the drum.
Access the motor by removing the front panel and test motor windings with a multimeter:
- Main windings: 3-6 ohms typical
- Start windings: 15-30 ohms typical
- Infinite resistance in either winding indicates motor failure
Some gas dryer motors use start capacitors for additional starting torque. These cylindrical components fail from age and heat, so test with a capacitor tester or multimeter with capacitance function. Replace capacitors reading more than 10% off rated value.
How to Reset Your Maytag Gas Dryer
Gas dryers respond to reset procedures that clear error states and restart control systems.
Perform Standard Power Reset
The most effective reset is a complete power cycle that fully discharges all capacitors and clears control board memory:
- Unplug the dryer from the wall outlet
- Turn off the gas supply at the shutoff valve
- Wait exactly 5 minutes (critical, don’t shorten this time)
- Turn gas supply back on
- Plug in the dryer
- Wait 30 seconds before attempting operation
This reset clears temporary control board glitches, error codes, and electronic hiccups. It doesn’t fix mechanical problems but resolves software issues in 60-70% of cases.
After the reset, the control board runs through initialization. You might hear relays clicking or see display lights flashing briefly, which is normal and indicates successful reset.
Reset Thermal Safety Devices
The thermal cutoff switch is manually resettable unlike the one-time thermal fuse. If your dryer suddenly stopped working mid-cycle, the thermal cutoff likely tripped.
Locate it on the blower housing as a small disc with a protruding button (red or black). Press firmly until you hear and feel a click, and the switch is now reset.
Important: Only reset after identifying why overheating occurred. Clean vents completely before resuming operation since repeatedly resetting without fixing root causes risks fire or component damage.
If the thermal cutoff won’t reset (won’t click no matter how hard you press), it has failed mechanically and requires replacement. The reset mechanism broke or corroded.
Clear Maytag Control Board Error Codes
Some gas dryer models with digital displays store error codes in memory. These codes persist even after fixing problems, preventing normal operation.
After completing repairs, perform the power reset procedure to clear codes. If codes return immediately after reset, the underlying problem wasn’t actually fixed, so continue troubleshooting the system the code indicates.
Models without digital displays don’t show error codes to users, but the power reset still helps by clearing any internal flags the control board set during failure detection.
Reset After Gas Supply Interruption
If gas service was interrupted (utility work, valve accidentally closed, empty propane tank), the dryer may not immediately resume normal operation after gas restoration.
After verifying gas supply restored:
- Turn off dryer power at the outlet
- Wait 2-3 minutes for gas lines to purge any air
- Restore power
- Start a cycle (first ignition may take longer than normal)
Air in gas lines prevents immediate ignition. The system may attempt ignition 2-3 times before successfully lighting as air clears from lines, which is normal after service interruptions.
When Resets Don’t Resolve Problems
If the dryer still won’t work after multiple reset attempts, you have an actual component failure rather than a temporary glitch:
- Thermal fuse blown (must replace, never resets)
- Door switch failed (test and replace)
- Control board permanently damaged (requires replacement)
- Gas valve coils failed (replace complete valve)
- Motor or mechanical component broken (repair needed)
Resets only help with electronic glitches and temporary conditions. Real hardware failures need actual component replacement, so don’t waste time with repeated resets when testing identifies failed parts.
Gas-Specific Maintenance Requirements
Gas dryers need additional maintenance beyond standard dryer care due to combustion components.
Quarterly Gas System Inspection
Every 3-4 months, perform these gas-specific checks:
Inspect the burner area through the lint trap opening or access panels and look for:
- Rust or corrosion on burner components
- Lint accumulation near the burner (fire hazard)
- Proper blue flame with orange tips
- Steady combustion without excessive flickering
Remove the burner assembly once annually for deep cleaning by blowing compressed air through the burner tube, vacuuming all dust and lint, and cleaning the flame sensor.
Check all gas connections for tightness using the soap-and-water bubble test around connections where bubbles indicate leaks requiring immediate attention and professional repair.
Verify the igniter glows bright and even. Dim or irregular glow predicts imminent failure, so replace weak igniters proactively to avoid sudden heating loss.
Optimize Combustion Efficiency
Proper combustion provides maximum heat while minimizing gas consumption. Check these indicators:
Flame appearance: Should be mostly blue with orange/yellow tips. All blue indicates too much air (inefficient), while yellow flames indicate insufficient air or burner blockage (dangerous and creates carbon monoxide).
Ignition speed: From igniter glow to ignition should take 30-90 seconds. Longer times indicate weak igniters or low gas pressure, while shorter times might indicate over-pressure (dangerous).
Flame stability: Flames should be steady without excessive flickering. Wild flickering suggests airflow problems or pressure fluctuations.
If flames appear wrong, shut off the dryer and call a professional. Combustion adjustment requires specialized knowledge and equipment, and DIY adjustment of gas-air mixture creates carbon monoxide hazards.
Annual Professional Inspection
Gas dryers benefit from annual professional inspection beyond typical appliance service.
A qualified technician should:
- Test gas pressure at the dryer inlet (5-7″ water column spec)
- Verify proper gas-air mixture and combustion
- Check for gas leaks throughout the system
- Test ignition system response times
- Verify flame sensor operation
- Inspect vent system for restrictions
- Measure burner exhaust temperature
Professional service costs $80-150 annually but prevents dangerous conditions and extends dryer lifespan. Gas appliance safety justifies this investment.
Maytag Gas Dryer Belt Replacement
Belt replacement on gas dryers follows similar procedures to electric models but requires extra care around combustion components.
Safety Preparations for Gas Dryer Belt Work
Critical first step: Shut off the gas supply completely. Turn the gas shutoff valve perpendicular to the pipe (closed position). Never work on a gas dryer with gas supply active, even with power disconnected.
Unplug the dryer from the electrical outlet. Gas dryers use 120V power for controls and motor (simpler than the 240V needed for electric dryers) but still dangerous when working inside cabinets.
Move the dryer away from the wall to access all sides where you’ll need 2-3 feet of clearance behind the unit. Have a helper available since gas dryers weigh 150-200 pounds and moving them safely requires two people.
Access the Belt and Drum
Remove the lint screen and unscrew the lint trap housing (typically 2-3 Phillips screws). Lift the dryer top by releasing spring clips along the front edge using a putty knife or paint scraper. Push inward and upward at each corner where the top pops up on clips.
Prop the top against the wall behind the dryer and disconnect any wire harnesses preventing the top from fully opening (some models have none, others have 1-2 connections).
Remove the front panel by unscrewing mounting screws (usually two screws along the top edge visible with the top open, and two screws inside the door opening). Lift the panel slightly and pull forward to unhook bottom retention tabs.
Gas dryer specific caution: Note the position of gas lines and igniter wires before removing anything. These components are fragile and expensive to replace if damaged, so take photos showing wire routing before disconnection.
Remove and Replace the Belt
With the front panel removed, you can see the drum, belt, and pulley system. The belt wraps around the drum, under a spring-loaded idler pulley, and around the motor pulley.
Support the drum from underneath since it’s heavy and will drop when you release the belt. Have your helper hold the drum or use a sturdy box for support.
Push the idler pulley toward the motor to release belt tension, then slip the belt off the motor pulley and off the idler pulley. The drum is now free.
Carefully tilt the drum forward and lift it out of the cabinet. Watch for gas lines and igniter wires running below and behind the drum, and don’t snag or stress these components. The drum weighs 40-60 pounds, so lift with your legs, not your back.
Remove the old belt and inspect the drum’s belt channel for lint or debris. Clean thoroughly and check the drum support rollers and rear bearing for wear while you have access.
Loop the new belt around the drum with grooves facing the drum surface. The flat back of the belt faces outward, and position the belt in the drum’s center groove.
Lift the drum and guide it back into the cabinet. Align the rear shaft with the bearing sleeve (this takes patience and maneuvering). Once the drum sits properly, it should rotate with moderate resistance.
Route the belt under the idler pulley and around the motor pulley. Pull the idler arm toward the motor to create slack for belt installation, then ensure the belt seats properly in all pulley grooves.
Manually rotate the drum several complete revolutions. The belt should track evenly without slipping off pulleys and check that the belt stays centered in the drum’s groove.
Reassemble and Test
Reconnect any wire harnesses you disconnected and position the front panel, hooking the bottom tabs. Install the mounting screws.
Lower the top panel and press firmly until spring clips engage with audible clicks. Reinstall the lint trap housing screws.
Before turning on gas supply, inspect all gas connections you may have disturbed and look for loose fittings or damaged pipes. If everything looks undisturbed and secure, slowly open the gas shutoff valve.
Mix soap and water in a spray bottle and spray all gas connections. Look for bubbles indicating leaks, and any bubbles require immediately shutting off gas and tightening connections. If leaks persist after tightening, call a professional.
Plug in the dryer and run a test cycle with a few dry towels. Listen for unusual noises and verify the drum rotates smoothly. The first ignition after reassembly might take slightly longer than normal as air purges from gas lines.
Troubleshooting Intermittent Maytag Gas Dryer Problems
Some gas dryer issues occur sporadically, complicating diagnosis.
Diagnose Occasional Ignition Failures
The dryer usually lights fine but sometimes won’t ignite, requiring cycle restarts or multiple attempts.
Weak igniter: As igniters age, they work when cool but fail when hot. First cycle of the day ignites normally but subsequent cycles fail. The solution is igniter replacement even though it seems to work sometimes.
Flame sensor position: Vibration gradually shifts the sensor out of optimal flame position. It works most of the time but occasionally misses the flame, so adjust sensor position so flame reliably envelops it.
Low gas pressure: Marginal pressure (4-5″ water column vs. 5-7″ spec) works when other gas appliances are off. When the furnace or water heater runs simultaneously, pressure drops below minimum and the dryer won’t ignite. This requires utility company or professional adjustment.
Cycling thermostat drift: The thermostat calls for heat appropriately sometimes, but other times fails to close the circuit. Replace cycling thermostats showing intermittent operation.
Address Erratic Heating Patterns
The dryer heats but temperature seems inconsistent, sometimes too hot and sometimes barely warm.
Cycling thermostat calibration: The thermostat might cycle at wrong temperatures where it cuts off too soon (clothes stay damp) or too late (clothes overheat). Replace out-of-calibration thermostats.
Flame sensor sensitivity: An overly sensitive sensor shuts off gas prematurely. The burner lights, heats briefly, then shuts off before reaching proper temperature. Clean or replace the sensor.
Vent restrictions: Partially blocked vents create back-pressure that affects burner performance. The dryer overheats initially, then thermal protection cycles the burner off frequently. Clean vents thoroughly.
Gas pressure fluctuations: Variable pressure from the utility creates inconsistent flame intensity. When pressure is high, heating is vigorous. When pressure drops (other appliances demanding gas), heating weakens. Document the pattern and contact your gas utility.
Preventive Measures for Maytag Gas Dryer Longevity
Specific maintenance extends gas dryer life and prevents dangerous conditions.
Weekly Tasks
After every 3-4 loads, inspect the visible burner area (through lint trap or access panel) and look for lint accumulation near combustion components. Vacuum any lint immediately since it’s a fire hazard near flames.
Ensure strong exhaust airflow by feeling the exterior vent while dryer runs since weak airflow leads to overheating that stresses gas system components.
Monthly Tasks
Run an empty dryer cycle to burn off any lint that bypassed the trap. This prevents lint accumulation in the burner area.
Inspect visible gas connections for any signs of corrosion, damage, or loosening, and tighten connections if they’ve loosened from vibration.
Check that the gas shutoff valve operates smoothly by turning it off then on (with dryer not running). Seized valves prevent emergency gas shutoff if needed.
Seasonal Tasks
At the start of heating season (fall) and cooling season (spring), perform comprehensive gas system checks:
- Clean burner assembly thoroughly
- Vacuum all lint from around combustion components
- Test igniter resistance and replace if borderline
- Clean flame sensor
- Verify all gas connections tight
- Deep clean exhaust vent system
Seasonal maintenance takes 60-90 minutes but prevents mid-season failures when you need the dryer most.
Also Read: Samsung Dryer Symbols and Their Meaning Explained
Frequently Asked Questions
Why does my Maytag gas dryer igniter glow but not light?
The igniter glows but insufficient current flows to open the gas valve safety mechanism. Most common cause is a weakening igniter that needs replacement even though it appears to work. Also possible: failed gas valve coils (test resistance where they should be 1000-1500 ohms each) or closed gas supply.
How long should a gas dryer igniter last?
Typical lifespan is 4-7 years with regular use. Igniters gradually weaken as the element ages and continue working but draw less current over time until eventually they can’t open the gas valve. Replace igniters proactively at 5-6 years to avoid sudden failure.
Can I use my gas dryer with a weak igniter?
No, a weak igniter prevents proper gas valve operation creating safety hazards. The valve might partially open allowing small gas flow without ignition, or ignition might be delayed allowing gas buildup. Replace weak igniters immediately since they cost $30-50 and take 30 minutes to change.
What does it mean when the gas dryer flame is yellow instead of blue?
Yellow flames indicate incomplete combustion from insufficient air mixing or burner tube blockage. This creates carbon monoxide (deadly) and soot buildup, so shut off the dryer immediately. Clean the burner tube thoroughly, and if flames remain yellow after cleaning, call a professional for burner adjustment.
How do I know if my gas valve coils are bad?
Test each coil’s resistance with a multimeter where they should read 1000-1500 ohms. Outside this range indicates coil failure. Also, if the igniter glows properly but you never hear the valve click open, coils likely failed. The valve assembly costs $100-170 and includes both coils.
Is it normal for the igniter to take 90 seconds to open the valve?
Yes, 30-90 seconds is normal igniter glow time before valve opening. Longer than 2 minutes indicates a weakening igniter that’s slow to reach temperature. Shorter than 20 seconds suggests igniter over-drawing current (rare but possible with wrong part installed).
Why does my gas dryer smell like gas when running?
Small gas odor during ignition can be normal as air purges from lines. Persistent gas smell indicates a leak, so shut off gas immediately and call a professional. Never operate gas appliances with suspected leaks since gas leaks create explosion hazards requiring emergency response.
Can I replace just the igniter or do I need the whole burner assembly?
In most cases, the igniter replaces independently. It mounts to the burner assembly with one screw and wire terminals, so you don’t need the complete burner assembly unless it’s damaged, corroded, or has clogged tubes. The igniter alone costs $30-60 vs $80-150 for the complete assembly.
Maintain Your Maytag Gas Dryer Through 2026
Maytag gas dryers deliver efficient drying when combustion systems function properly. The ignition sequence (igniter glow, valve opening, flame sensing) must execute perfectly every cycle. Weak igniters cause 40% of gas dryer heating failures and cost just $30-50 to replace.
Regular burner cleaning and flame sensor maintenance prevent the other common failure modes. Unlike electric dryers where element replacement fixes most heating problems, gas dryers demand attention to multiple combustion components.
Master the ignition sequence observation technique, test components systematically, and never ignore gas safety warnings. Annual professional inspection costs $100-150 but ensures safe, efficient operation and catches developing problems before they strand you with wet laundry.

Hi, I’m Barlgan! I created Repair Me Yourself to empower homeowners to tackle appliance repairs with confidence. From decoding error codes to fixing cooling issues, I break down complex repairs into simple, actionable steps that save you time and money.