If your refrigerator is running constantly, your electricity bill has jumped unexpectedly, or your food isn’t staying as cold as it should, dirty condenser coils are likely the culprit. This simple maintenance task gets overlooked by most homeowners, yet it’s one of the most impactful things you can do to keep your refrigerator running efficiently.
Cleaning refrigerator coils is straightforward: unplug the unit, locate the coils (usually on the back or bottom of the fridge), and use a specialized coil brush combined with a vacuum to remove accumulated dust and debris.
The entire process takes just 15-30 minutes and requires minimal tools. Dirty coils reduce efficiency by 25-35%, increase energy bills substantially, and can shorten your appliance’s lifespan by years. Cleaning them every 6-12 months depending on your environment restores optimal performance and prevents costly repairs.
This troubleshooting guide will walk you through the complete process, showing you exactly where to find your coils, what tools work best, and how to clean them safely and effectively regardless of your refrigerator type.

Why Refrigerator Coil Cleaning Matters
Before grabbing your vacuum, understanding why this maintenance matters helps you appreciate its importance and perform it more effectively.
How Refrigerator Coils Work
Condenser coils are the black or copper-colored tubes on your refrigerator’s exterior (back or bottom). These coils release heat that’s been extracted from inside your fridge to the outside air. Think of them as your refrigerator’s radiator.
For this heat exchange to work efficiently, air must flow freely around the coils. When dust, pet hair, and debris accumulate on the coils, they act as insulation, trapping heat instead of releasing it. The trapped heat forces your compressor to work harder and run longer to achieve the same cooling effect.
Measurable Impacts of Dirty Coils
The consequences of neglected coils are both immediate and long-term, and they include:
- Energy consumption increases dramatically
Heavily dusty coils force your refrigerator to consume 25-35% more electricity than when clean. For a refrigerator normally using 400 kWh annually (about $52 at average rates), dirty coils add $13-18 to your yearly electricity costs. Over a decade, that’s $130-180 wasted on a problem you can fix in 20 minutes.
- Compressor lifespan decreases significantly
The compressor is your refrigerator’s most expensive component. Constant overwork from dirty coils can reduce compressor lifespan by 30-50%, turning a 15-year appliance into a 7-10 year one.
- Internal temperature becomes unstable
When coils can’t dissipate heat properly, internal temperature can rise 3-5°F above your set point, creating food safety concerns and accelerated spoilage.
Warning Signs Your Coils Need Cleaning
Watch for these indicators that cleaning is overdue:
- Refrigerator running constantly without cycling off
- Exterior back or bottom panel feels unusually hot to touch
- Unexplained increase in electricity bills
- Food not staying as cold as usual despite correct temperature settings
- Compressor sounds louder or more strained than normal
- Visible dust accumulation if you can see the coils
If you experience any of these symptoms, coil cleaning should be your first troubleshooting step before calling expensive repair services.
Tools and Supplies for Cleaning Refrigerator Coils
Gather these items before starting to make the process smooth and efficient.
Essential Tools
Vacuum cleaner with hose attachment: Your standard household vacuum works perfectly. The hose attachment allows you to reach into tight spaces and remove loosened debris.
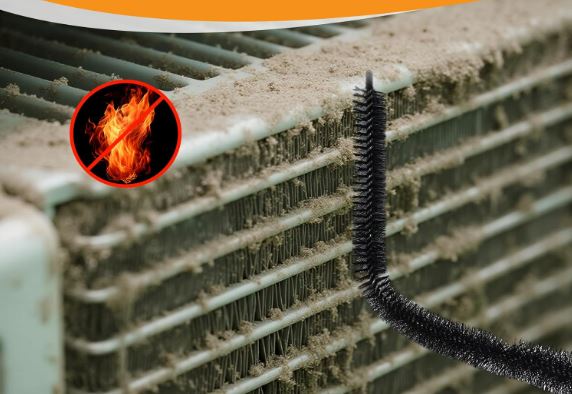
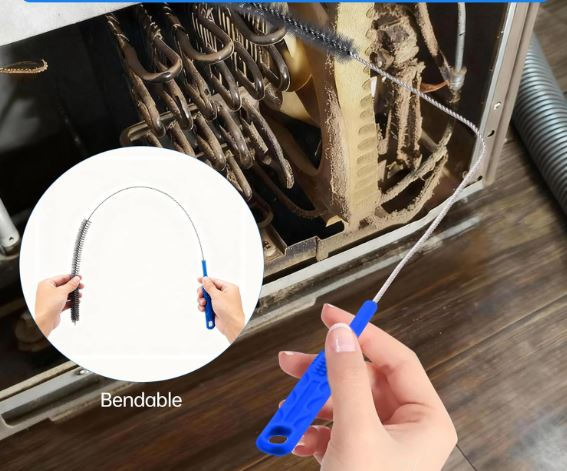
Refrigerator coil brush: This specialized brush (View on Amazon) features long, narrow bristles designed specifically to fit between coil rows. The brush is worth the investment; standard brushes won’t reach into the tight spaces where dust accumulates.
Flashlight or headlamp: Coil areas are often dark and cramped. Good lighting helps you see what you’re doing and verify when coils are truly clean.
Screwdriver set (View on Amazon): Some refrigerator grilles require Phillips or flathead screwdrivers for removal. Have both types available.
Optional But Helpful Items
A shop vacuum provides more powerful suction than household models, making debris removal faster. An extendable duster helps reach deep into bottom-mounted coil cavities.
Place an old towel or drop cloth beneath your work area to catch falling debris. Work gloves protect your hands from sharp coil edges. Compressed air (in a can, not a high-pressure compressor) can dislodge stubborn debris in very tight spaces.
What NOT to Use
Never use water or liquid cleaning solutions near refrigerator coils. Electrical components throughout the area create shock and damage risks. Avoid metal objects that could puncture or bend delicate coil fins. Don’t use high-pressure air compressors, which can permanently bend the thin aluminum fins that improve heat dissipation.
Step-by-Step: How to Clean Refrigerator Coils
Follow these steps carefully for safe, effective cleaning. The exact process varies slightly based on coil location, so we’ll cover both common configurations.
Safety First: Preparation Steps
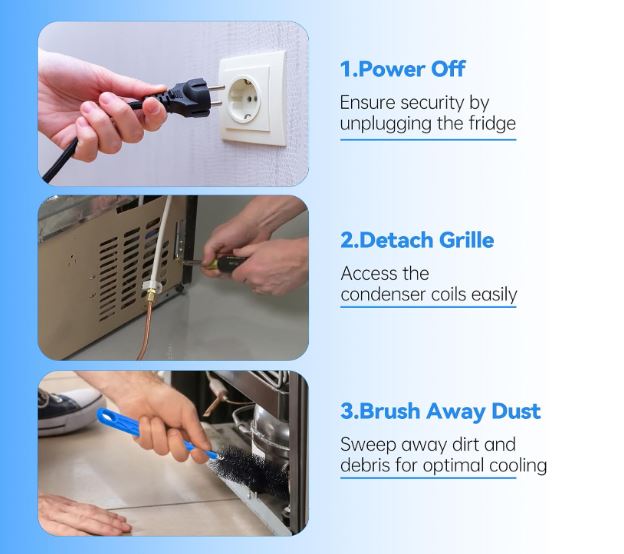
Step 1: Unplug the refrigerator.
Locate the power cord and pull the plug from the wall outlet. Never skip this critical safety step. If the plug is inaccessible behind cabinetry, turn off the circuit breaker supplying power to the kitchen. Wait 5 minutes before proceeding to allow the compressor to settle.
Step 2: Determine coil location.
Refrigerators use three common coil placements:
- Back-mounted coils: Most common in models built before 2005. You’ll see a large black grid on the rear panel when you look behind the fridge.
- Bottom-mounted coils with front access: Common in modern refrigerators. Look for a grille or kick plate at the base of the fridge below the door.
- Bottom-mounted coils with rear access: Less common. Coils are underneath but must be accessed from behind.
Check your refrigerator manual if uncertain, or search your model number online to find coil location diagrams.
For Back-Mounted Coils (Older Models)
Step 3: Move the refrigerator away from the wall.
Enlist a helper if available since refrigerators are heavy. Pull straight out 2-3 feet to create adequate working room. If concerned about floor scratching, place a towel under the front feet. Take extreme care not to kink the water line if your refrigerator has an ice maker or water dispenser.
Step 4: Perform initial visual inspection.
Use your flashlight to assess dust accumulation on the coils. Look for pet hair clumps, spider webs, and general debris buildup. Note how much cleaning will be required. This also gives you an opportunity to check for any visible damage or corrosion that might indicate other problems.
Step 5: Vacuum loose debris.
Attach the hose to your vacuum and use gentle suction to remove surface dust and debris from the coils. Work systematically from top to bottom. Avoid pressing hard against the coils, which could bend the delicate fins. Get the vacuum nozzle into spaces between coil loops as much as possible.
Step 6: Brush stubborn buildup.
Insert your coil brush between the coil rows and use gentle up-and-down motions to dislodge compacted dust that vacuuming alone couldn’t remove. The brush releases debris trapped deep within the coil structure. Work methodically across the entire coil surface, section by section.
Step 7: Second vacuum pass.
Vacuum again to capture all the debris loosened by brushing. Pay particular attention to the floor area beneath the coils where dust falls during cleaning. Ensure all loose material is removed so it won’t be sucked back into the coil area when the refrigerator runs.
For Bottom-Mounted Coils (Modern Refrigerators)
Step 3: Remove the kick plate or grille.
Most front bottom grilles simply snap off or have spring clips. Some models require removing one or two screws. Carefully remove the grille and set it aside where it won’t be stepped on. Keep track of any screws in a small container.
Step 4: Assess accessibility.
Shine your flashlight into the opening to see the coils. Front-access coils can be cleaned from the front using extended tools. Some configurations may benefit from pulling the fridge forward 6-12 inches for a better cleaning angle, though full removal isn’t necessary.
Step 5: Vacuum from the accessible angle.
Insert your vacuum hose as far as possible into the cavity. Angle the hose to reach deep into the space where coils are located. You may need to work from multiple angles (left side, center, right side) to reach the entire coil surface. Use your flashlight periodically to verify debris removal.
Step 6: Use the coil brush for depth cleaning.
Extended coil brushes are designed specifically for these tight bottom-mounted spaces. Insert the brush and use gentle back-and-forth motions to dislodge accumulated dust. Rotate the brush to capture debris from all sides of the coil tubes. This step requires patience since you can’t see as clearly as with back-mounted coils.
Step 7: Final vacuum and verification.
Vacuum again after brushing to remove all loosened debris. Shine your flashlight into the cavity and look for any remaining buildup. If heavily soiled, repeat the brush-vacuum cycle until you see clean coil surfaces. Don’t forget to vacuum the surrounding floor area.
Universal Final Steps
Step 8: Clean the surrounding area.
Thoroughly vacuum the floor beneath and behind the refrigerator. Wipe down the exterior back panel if it’s dusty. If you can access the drip pan (a shallow tray beneath many refrigerators), remove and clean it as well. Ensure nothing will obstruct airflow around the fridge when you push it back.
Step 9: Reassemble and reposition.
Replace the grille or kick plate securely. If you removed screws, verify they’re tightened but not over-tightened. Push the refrigerator back into position, maintaining 1-2 inches of clearance from the wall for proper air circulation. Use a level to ensure the unit sits evenly; an unlevel refrigerator creates door seal problems. Check that the water line hasn’t kinked or become damaged during the process.
Step 10: Restore power and monitor.
Plug the refrigerator back in or restore power at the breaker. Listen for normal startup sounds. The compressor should begin running within a few minutes. Over the next 10-15 minutes, verify that the compressor runs then cycles off as it should. Monitor internal temperature over the next 24 hours. You should notice more efficient temperature maintenance and less frequent compressor cycling.
Special Considerations for Different Refrigerator Types
Not all refrigerators are created equal when it comes to coil access and cleaning requirements.
Built-In and Counter-Depth Refrigerators
Premium built-in models often have bottom-mounted coils with restricted access due to custom cabinetry. You may need to remove more panels or work from challenging angles. Some high-end models feature sealed systems designed for professional service only. Check your warranty documentation before attempting DIY cleaning, as some warranties require professional maintenance to remain valid.
French Door and Side-by-Side Models
These popular configurations typically feature bottom-mounted coils with front access through wider grilles, potentially making the cleaning process easier. Some larger models have dual coil systems or more complex layouts that benefit from professional service every few years alongside your regular DIY maintenance.
Older vs. Newer Models
Pre-2000 refrigerators almost universally feature easy-access back-mounted coils. Models from 2000-2010 show a mix of mounting styles. Refrigerators manufactured after 2010 predominantly use bottom-mounted, front-access designs. A small number of newer premium models incorporate self-cleaning features, though these remain uncommon.
Refrigerators in Challenging Locations
Garage refrigerators operate in harsher environments with more dust, temperature extremes, and often higher humidity. Clean these coils 2-3 times per year instead of the standard twice yearly.
Pet households generate significantly more airborne hair. If you have shedding pets, quarterly cleaning prevents heavy hair accumulation.
Dusty environments near unpaved roads, construction sites, or agricultural areas require more frequent attention.
Humid climates may develop condensation issues in coil areas that need monitoring during cleaning.
Common Mistakes to Avoid When Cleaning Refrigerator Coils
Learning from others’ errors helps you achieve better results and avoid damage. Here are the mistakes to avoid:
Using Water or Cleaning Solutions
The coil area contains electrical components throughout. Introducing moisture creates short circuit and corrosion risks. Stick exclusively to dry cleaning methods using vacuum and brush. The only exception is wiping exterior surfaces well away from any electrical components.
Bending Coil Fins
The thin aluminum fins attached to coil tubes bend extremely easily. Bent fins significantly reduce heat dissipation efficiency. Use gentle pressure with your brush and avoid dragging metal vacuum attachments across fins. If you discover already-bent fins, you can carefully straighten them with a specialized fin comb, but prevention through gentle cleaning is far better.
Forgetting to Unplug
Always disconnect power before beginning. Besides the obvious shock risk, moving the refrigerator while it’s plugged in can cause the plug to pull partially out, creating a dangerous situation. Additionally, the compressor could start while you’re working, which can startle you and potentially cause injury.
Insufficient Cleaning Frequency
Once every six months represents the minimum for most homes. Quarterly cleaning suits high-dust environments. Annual cleaning is insufficient for maintaining optimal efficiency. If you skip cleaning for multiple years, dust becomes heavily compacted and much harder to remove, potentially requiring professional service with specialized equipment.
Damaging Water Lines
Ice maker and water dispenser lines are often routed behind refrigerators. Kinking these lines while moving the fridge causes leaks that can damage floors and cabinetry. Before pulling your refrigerator forward, identify where the water line enters and note its path. Some people place tape markers to remember the line location during repositioning.
Ignoring Other Maintenance Opportunities
While you have your refrigerator pulled out and unplugged, take advantage of the access. Check door seals for cracks or gaps using the dollar bill test. Verify the unit sits level (unlevel refrigerators have door seal issues). Clean the drip pan if accessible. Check that the defrost drain isn’t clogged.

How Often Should You Clean Refrigerator Coils?
Cleaning frequency depends heavily on your specific environment and household conditions.
| Environment Type | Recommended Frequency | Reasoning |
|---|---|---|
| Standard household | Every 6 months | Typical dust accumulation rate |
| Homes with pets | Every 3-4 months | Pet hair accelerates buildup |
| Dusty environments | Every 2-3 months | High airborne particle count |
| Garage refrigerators | Every 4-6 weeks | Extreme dust and temperature conditions |
| Multiple pets | Every 2-3 months | Heavy shedding compounds quickly |
| Near construction | Every 6-8 weeks | Construction dust is pervasive |
Seasonal Timing Considerations
Schedule one cleaning before summer when your refrigerator works hardest due to heat and increased usage. A second cleaning before winter prepares for holiday cooking and food storage demands. After spring cleaning season addresses winter dust accumulation. Setting calendar reminders helps maintain the schedule consistently.
Signs You’ve Waited Too Long to Clean Refrigerator Coils
If you can see thick dust accumulation on visible coils, you’re overdue. Noticeably reduced cooling performance, constant compressor operation without normal cycling, or unexplained electricity bill increases all indicate the need for immediate cleaning.
Creating Sustainable Maintenance Habits
Add coil cleaning to your seasonal home maintenance checklist alongside tasks like changing HVAC filters and testing smoke detectors. The similarity in timing makes it easy to remember. This 20-minute task prevents repairs costing hundreds of dollars and extends refrigerator lifespan by 3-5 years through reduced wear.
Measuring the Impact: Before and After Results
Verifying that your cleaning made a difference helps motivate consistent maintenance.
How to Verify Cleaning Effectiveness
Note your electricity usage or bill total before cleaning. After one full billing cycle, compare usage. If coils were significantly dirty, expect a 5-10% reduction in overall electricity consumption.
Use an infrared thermometer (View on Amazon) to measure exterior coil area temperature. Properly functioning coils should feel warm but not uncomfortably hot.
Listen to your compressor run time. It should cycle on for several minutes, then off, rather than running continuously. Check that the internal temperature remains stable at your set point without fluctuations.
Expected Improvements from Proper Cleaning
Energy consumption reduction ranges from 10-35% depending on how dirty the coils were initially. Compressor run time decreases by 20-40% since the system cools more efficiently. Internal temperature becomes more stable with fewer fluctuations that risk food quality.
The exterior coil area radiates noticeably less heat. Most significantly, you extend appliance lifespan by an estimated 2-5 years by reducing component stress.
When Cleaning Doesn’t Help
If you clean the coils thoroughly but notice no improvement in performance, other issues exist beyond dirty coils. Possible problems include refrigerant leaks, failing compressors, thermostat malfunctions, or door seal failures.
Professional diagnosis becomes necessary when cleaning produces no results. Don’t delay addressing these issues; small problems escalate into expensive repairs when ignored.
Professional Cleaning vs. DIY
Understanding when to tackle this yourself versus calling experts helps you make informed decisions.
When DIY Cleaning Is Appropriate
Standard preventive maintenance on normally functioning refrigerators suits DIY perfectly. If you can access the coil location reasonably, have basic comfort with appliance maintenance, and notice no performance issues beyond occasional longer run times, cleaning the coils yourself makes complete sense.
When to Hire Professionals
If coils haven’t been cleaned in 5+ years, heavily compacted buildup may require specialized tools and techniques beyond typical homeowner capabilities. When your refrigerator shows performance problems beyond just dirty coils (not cooling properly, making unusual noises, leaking), professional diagnosis is warranted.
Physical limitations that prevent safely moving heavy appliances make professional service appropriate. Warranty concerns matter too; some warranties specify professional maintenance requirements. Built-in models with complex access or custom cabinetry often benefit from technician service.
Professional Cleaning Costs
Standalone coil cleaning typically costs $75-150. Comprehensive appliance maintenance plans that include coil cleaning plus other preventive service run $150-250 annually. Mobile appliance services may charge additional travel fees.
Evaluate cost-benefit: DIY saves money while professional service ensures thoroughness and often includes other inspections and adjustments.
Maintaining Coil Cleanliness Between Deep Cleans
Simple habits between full cleanings reduce buildup and extend the time between major efforts.
Simple Prevention Strategies
Maintain 2-3 inches of clearance between your refrigerator and the wall. This spacing improves airflow and reduces dust accumulation rates. Vacuum the floor behind and beneath the fridge monthly during your regular cleaning routine. This prevents dust from ever reaching the coils.
Consider using air purifiers (View on Amazon) in your kitchen to reduce overall airborne particles. Keep pets groomed regularly to minimize shedding. Address other home dust sources like leaky doors or windows.
Quick Monthly Check
Pull off the kick plate and visually inspect for visible buildup. If you see dust accumulation, do a quick vacuum pass. This takes just 3-5 minutes and prevents heavy accumulation that requires more intensive cleaning. Regular light maintenance is easier than periodic heavy cleaning.
Environmental Modifications
Install HEPA filters in your home’s HVAC system to reduce airborne particles throughout your house. Seal gaps in garages or basements where refrigerators are located to reduce dust infiltration.
Use quality doormats (View on Amazon) at all entrances to minimize tracked-in dirt. Keep the kitchen exhaust fans clean to reduce grease particles in the air.
Frequently Asked Questions
Can you clean refrigerator coils without moving the fridge?
Yes, for modern refrigerators with bottom-mounted coils and front access. Simply remove the kick plate at the base, then use an extended coil brush and vacuum hose to clean from the front. Work the brush back and forth to dislodge debris, then vacuum thoroughly.
For truly comprehensive cleaning, pulling the fridge forward 6-12 inches improves your angle of access without requiring full removal. However, back-mounted coils found in older models absolutely require moving the refrigerator completely away from the wall. Even with front-access coils, pulling the fridge out every 12-18 months allows more thorough cleaning and lets you clean the floor beneath properly.
What happens if you never clean refrigerator coils?
Neglecting coil cleaning creates a progressive cascade of problems. Initially, you’ll notice higher electricity bills as the compressor works harder to compensate. Over months and years, the compressor runs almost continuously, causing excessive wear that can shorten its lifespan by half. Internal temperatures become unstable, risking food spoilage and safety.
Eventually, the overworked compressor may overheat and fail completely, requiring $400-800 in repairs or total refrigerator replacement. Energy waste alone can cost $50-100+ annually. Dust buildup that goes uncleaned for 5-10 years becomes so heavily compacted that removal becomes extremely difficult, often requiring professional service with specialized equipment. In rare extreme cases, severely overheated components present fire risk, though this is uncommon.
How do I know if my refrigerator coils are dirty?
Visual inspection provides the clearest answer if coils are accessible. For back-mounted coils, look behind your fridge at the black coil grid. If it appears gray with dust instead of black, or you see visible pet hair and debris, cleaning is needed. For bottom-mounted coils, remove the front kick plate and shine a flashlight inside.
Performance indicators also signal dirty coils: constant compressor operation without normal cycling, unusually hot exterior back or bottom panels, unexplained electricity bill increases, or internal temperature not reaching your set point. If your refrigerator is over one year old and you’ve never cleaned the coils, they almost certainly need attention regardless of visible signs.
Can dirty coils cause a refrigerator to stop cooling?
Yes, though it typically happens gradually rather than suddenly. Extremely dirty coils prevent proper heat dissipation, eventually causing the compressor to overheat. Most compressors have thermal protection switches that shut them down when they get too hot. Your refrigerator may cool intermittently as the compressor cools enough to restart, then shuts down again when overheating returns. Internal temperature becomes inadequate even while the unit appears to run.
In severe neglect cases, the constant overwork can cause permanent compressor failure, completely stopping cooling. However, sudden total cooling loss more commonly indicates other problems like refrigerant leaks, failed compressors, or broken thermostats. Clean the coils first since it’s quick and free, but call a technician if cooling doesn’t improve within 24 hours.
Is it safe to vacuum refrigerator coils?
Yes, vacuuming is the recommended primary method for cleaning refrigerator coils, provided you unplug the unit first. Use gentle suction and avoid metal vacuum attachments that could damage delicate coil fins. Standard household vacuums with hose attachments work perfectly. Some people worry about static electricity, but with the refrigerator unplugged, no electrical risk exists.
The only caution involves avoiding excessive force that could bend the thin aluminum fins attached to coil tubes. These fins increase surface area for better heat dissipation, but they bend easily. If you discover already-bent fins, specialized fin combs can carefully straighten them, but gentle cleaning prevents the problem. Never use water, steam, or liquid cleaners anywhere near refrigerator coils due to electrical components throughout the area.
Also Read:
- How to Troubleshoot a Fridge’s Buzzing Noise That Comes and Goes (DIY Guide)
- How to Troubleshoot a Fridge’s Clicking Noise Problem
- Why Your Freezer Fan Runs But Not Cold Enough
- How to Check if Your Refrigerator is Cooling Properly
Master the Art of Cleaning Refrigerator Coils!
Cleaning refrigerator coils is one of the simplest yet most impactful appliance maintenance tasks any homeowner can perform. This 15-30 minute job requires minimal investment in tools but delivers measurable benefits immediately.
Schedule your first cleaning today. Gather a vacuum, coil brush, and flashlight. Unplug your refrigerator, locate the coils, and remove the accumulated dust and debris that’s costing you money every single day. Commit to repeating this simple process every six months.
Your refrigerator will run more efficiently, your electricity bills will decrease, and you’ll extend your appliance’s lifespan by years. The peace of mind knowing your food stays properly cold and your compressor isn’t working itself to death makes the small time investment worthwhile.
Don’t wait until your refrigerator fails. Clean those coils this weekend and enjoy immediate efficiency improvements that put money back in your pocket.

Hi, I’m Barlgan! I created Repair Me Yourself to empower homeowners to tackle appliance repairs with confidence. From decoding error codes to fixing cooling issues, I break down complex repairs into simple, actionable steps that save you time and money.