Your fridge has always been there in the background — a quiet hum you stopped noticing years ago. Then one day it changes. A grinding from the freezer. A loud clicking every few minutes. A buzzing that wasn’t there before. The noise is telling you something, and the type, location, and timing of that sound is usually enough to point directly at the component responsible.
Refrigerators are not complicated machines at their core. A compressor, two fans, a defrost system, and an ice maker assembly cover almost every moving part. When one of them develops a fault, the acoustic signature changes in a predictable way.
A grinding or scraping sound means something is hitting something. A rapid repeated click means an electrical component is trying and failing to start. A loud buzz often means a motor is straining. Once you understand which sounds correspond to which components, you stop guessing and start diagnosing.
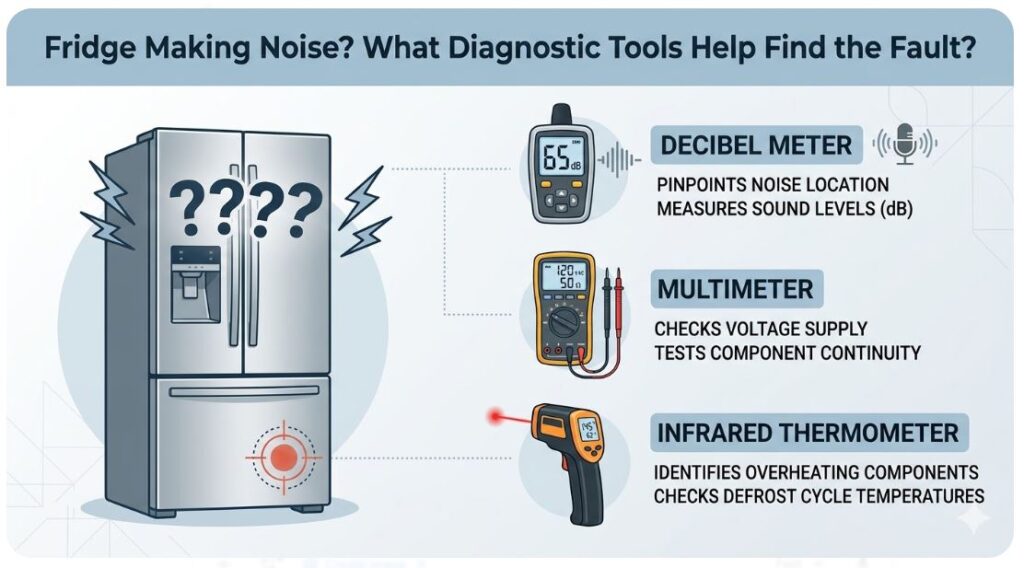
This troubleshooting guide covers the tools that help you do exactly that — locate the noise source, measure its severity, check the associated components electrically, and identify whether you’re dealing with a maintenance issue, a cheap part replacement, or something that needs a technician.
Quick-Reference Summary Table
| Tool | Role in Diagnosis | Approx. Price | Where to Buy |
|---|---|---|---|
| TopTes TS-501B Decibel Meter | Measure noise level and locate the loudest source position | ~$20–$28 | Amazon |
| Etekcity Lasergrip 1080 Infrared Thermometer | Check compressor temperature, condenser coil surface heat, evaporator vent output | ~$16–$22 | Amazon |
| KAIWEETS TRMS 6000 Counts Digital Multimeter | Test fan motors, start relay, water inlet valve, defrost components | ~$30–$42 | Amazon |
Decode the Noise First: Sound as a Diagnostic Clue
The most efficient way to diagnose a noisy fridge is to treat the sound itself as the first piece of data. Before reaching for any tool, spend two minutes listening carefully with the fridge running normally.
| Sound Type | Likely Location | Most Probable Cause |
|---|---|---|
| Grinding or scraping | Freezer interior | Evaporator fan hitting ice buildup or frost |
| Grinding or scraping | Behind/bottom of fridge | Condenser fan hitting debris or failing bearing |
| Loud humming, increases when freezer opened | Freezer interior | Evaporator fan motor wearing out |
| Loud humming from rear | Back of unit | Condenser fan motor or compressor strain |
| Rapid repeated clicking (every few minutes) | Rear/bottom | Failing start relay — compressor trying to start |
| Single click at start/end of cycle | Anywhere | Normal — defrost timer or thermostat switching |
| Buzzing only when ice maker fills | Near ice maker | Water inlet valve coil or water hammer |
| Rattling or vibrating | All over / base | Unit not level, loose drain pan, items on top |
| Gurgling or bubbling after compressor stops | Interior | Normal — refrigerant flowing; not a fault |
Opening the freezer door while the fridge is running is one of the fastest diagnostic moves available. If the noise gets louder when you open the freezer, the evaporator fan is the primary suspect. If the noise is unaffected by the freezer door, the source is at the back of the unit — condenser fan or compressor.
Step 1 — Measure and Locate the Noise with a Decibel Meter
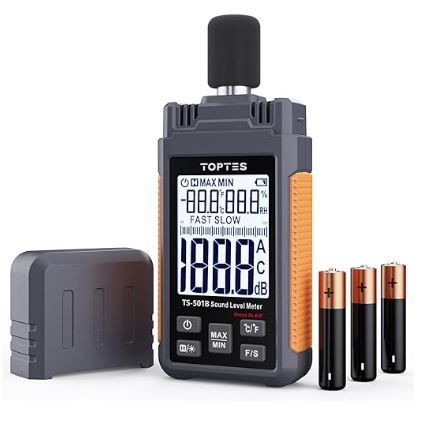
The first tool in the diagnostic process is the TopTes TS-501B Decibel Meter (View on Amazon). Rather than relying on subjective impressions of whether the fridge sounds “louder than usual,” the TS-501B gives you a numerical reading of the noise level — and when you take readings at different positions around and behind the fridge, those numbers tell you where the loudest source is.
The TS-501B uses a precision condenser microphone and measures 30 to 130 dB with ±1.5 dB accuracy across a frequency range of 30–8,000 Hz. It supports both A-weighting (which mirrors how the human ear perceives sound — most useful for appliance noise assessment) and C-weighting (flatter response, better for low-frequency mechanical noise from compressors and motors).
The 2.25-inch backlit LCD displays real-time readings alongside MAX/MIN capture, and the data hold function freezes the current reading so you can move around the fridge and compare positions without watching the screen constantly. It comes factory calibrated with three AAA batteries and a carry case, and carries a 3-year warranty. At $20–$28, it’s one of the most practical home environment tools available.
How to Use It for Fridge Diagnosis
With the fridge running in its normal noisy state, hold the TS-501B at a consistent distance — about 12–18 inches — and take readings at four positions: the front of the freezer door area, the side panels, the back of the unit at mid-height, and the bottom rear near the compressor and condenser fan. Switch to MAX mode to capture peak readings at each position.
A quiet refrigerator typically runs at 35–45 dB from a meter away. Most manufacturers spec their models at 40–50 dB under normal operation. Readings persistently above 55–60 dB from a meter away indicate abnormal mechanical noise that warrants investigation. The position with the highest reading tells you where to focus — and that tells you which component to inspect first.
Step 2 — Use the Infrared Thermometer to Connect Noise to Thermal Performance
A refrigerator making noise is an early warning system. The critical question is whether the noise source is also affecting cooling efficiency — because a fan motor that’s failing generates abnormal noise before it stops altogether, and a compressor running too hot makes more noise before it seizes. The Etekcity Lasergrip 1080 Infrared Thermometer (View on Amazon) gives you this thermal picture without opening any panels.
The Lasergrip 1080 reads surface temperatures from -58°F to 1130°F with a 12:1 distance-to-spot ratio, adjustable emissivity from 0.1 to 1.0, and backlit LCD display. At $16–$22, it’s the standard homeowner IR thermometer for appliance, HVAC, and cooking temperature work.
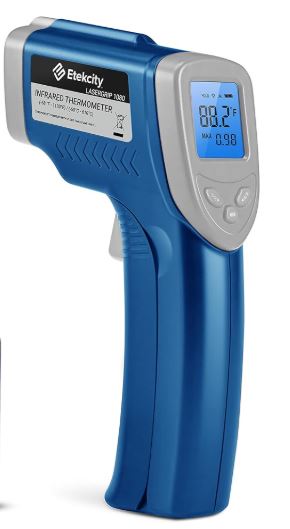
Three Targeted Checks for a Noisy Fridge
Check 1 — Compressor surface temperature. With the fridge running, point the Lasergrip at the compressor housing at the bottom rear of the unit. A healthy compressor typically runs at 120–180°F on its surface. A surface temperature above 200°F indicates the compressor is working under significant strain — most often from dirty condenser coils forcing it to work harder to reject heat. This is also the condition that creates louder-than-normal compressor hum.
Check 2 — Condenser coil surface temperature. Scan the condenser coils (located at the back or bottom of the unit depending on model). Evenly distributed elevated heat across the coil surface is normal. Sections of coil that are significantly hotter than adjacent sections may indicate blockage from lint accumulation forcing uneven heat distribution. Sections that are unexpectedly cool may indicate a refrigerant flow issue.
Check 3 — Evaporator vent output temperature. Open the fridge, locate the rear air vents where cold air enters from the freezer evaporator, and hold the Lasergrip at the vent. You should feel and see cold air flow — temperatures at the vent should be significantly below ambient, typically 0–20°F on a working unit. If the vent temperature is at or near room temperature and the freezer is making grinding or scraping noise, ice has almost certainly built up around the evaporator fan blades, which is both the noise source and the cooling problem.
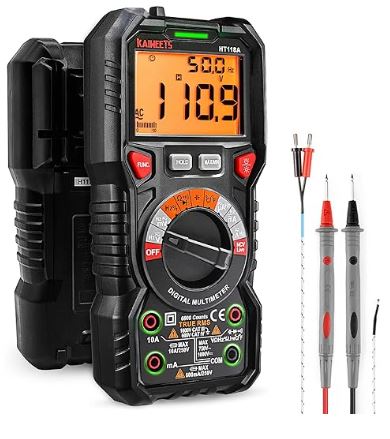
Step 3 — Test the Electrical Components
Once you’ve located the noise source by position and confirmed whether it’s affecting thermal performance, the KAIWEETS TRMS 6000 Counts Digital Multimeter (View on Amazon) handles every electrical test needed to confirm a component fault. Auto-ranging TRMS 6000-count measurement, NCV detection, LED port indicators, built-in flashlight, and CAT III 1000V / CAT IV 600V safety ratings make it the right tool for this and every other appliance electrical diagnosis.
Work through the components in the order suggested by your acoustic and thermal findings above.
Test 1 — The Start Relay (Rapid Repeated Clicking)
The start relay is a small plug-in component on the side of the compressor that helps it start each cooling cycle. When it fails, the compressor attempts to start, can’t, clicks off, and tries again every few minutes. This is one of the most distinctive and diagnosable fault sounds in a refrigerator — a rapid clicking cycle with no compressor running between clicks.
Unplug the fridge. Pull out the fridge and locate the compressor (black dome-shaped component at the bottom rear). The start relay plugs directly into the side of the compressor. Pull it off — it unclips or slides out. Shake it. A working relay is silent; a failed relay rattles because the internal pellet has broken loose. If it rattles, it needs replacement regardless of the multimeter test. For confirmation, set the HT118A to continuity mode and test across the relay terminals — a failed relay will show no continuity. Replacement relays for most models cost $10–$25 and take under five minutes to install.
Test 2 — Fan Motors (Grinding, Scraping, or Loud Humming)
The evaporator fan (inside the freezer behind the rear panel) and the condenser fan (at the back of the unit behind a panel near the compressor) can both develop bearing wear that produces grinding or humming noise before they fail completely.
With the fridge unplugged, access each fan by removing the relevant panel. First, spin the fan blade by hand. A healthy fan blade spins freely and silently. Resistance, grinding, or wobbling indicates a bearing fault and the motor should be replaced. Then disconnect the motor wiring harness and test the motor windings with the HT118A on resistance mode. Fan motor windings typically read 100–300 Ω — an OL reading indicates an open winding and the motor has failed electrically. Motors that pass both the spin test and resistance test are functional; the noise may be caused by ice buildup on the blades rather than motor failure.
If frost or ice is contacting the evaporator fan blades, the fix is a forced defrost of the freezer (unplug for 24–48 hours with the freezer door open) rather than a motor replacement. Confirm the issue by carefully inspecting the blade clearance to the surrounding housing after defrosting.
Test 3 — Water Inlet Valve (Buzzing During Ice Maker Fill)
A loud buzzing sound that occurs only when the ice maker is filling with water typically indicates a partially failing or clogged water inlet valve — the solenoid valve at the back of the fridge where the water supply line connects. When the valve solenoid coil begins to fail or mineral deposits partially obstruct the valve, it vibrates excessively during the fill cycle rather than opening smoothly.
Access the valve at the rear of the fridge where the water line connects. Disconnect the wiring harness. Set the HT118A to resistance mode and test across the solenoid coil terminals. A healthy water inlet valve solenoid reads approximately 200–500 Ω. An OL reading (open coil) means the solenoid has failed and the valve needs replacement (~$20–$50). A reading within range but with persistent buzzing noise suggests mineral buildup in the valve body — replacement is still typically the most practical solution.
Test 4 — Defrost Components (Clicking or Buzzing During Defrost Cycle)
If the noise occurs on a roughly 8–12 hour cycle and is accompanied by occasional hissing or sizzling (water dripping onto the defrost heater), the defrost system is operating — which is normal. However, a defrost thermostat that’s failing can cause the defrost heater to cycle on and off repeatedly, producing intermittent clicking during the defrost phase.
Test the defrost thermostat with the HT118A continuity function. At room temperature, a functioning defrost thermostat should show continuity (closed circuit). If it shows no continuity at room temperature, it has failed open and the defrost heater can’t operate, which will eventually lead to ice buildup on the evaporator coils and the associated fan noise that follows.
Noise Source Quick-Reference Guide
| What You Hear | When It Occurs | Where It’s Loudest | Start Here |
|---|---|---|---|
| Grinding/scraping | Continuous | Freezer interior (louder with door open) | Evaporator fan — check for ice, then test motor |
| Grinding/scraping | Continuous | Rear bottom | Condenser fan — spin blade, check for debris |
| Rapid clicking (no compressor run) | Every 2–5 minutes | Rear bottom | Start relay — shake test + continuity |
| Loud humming | Constant | Rear/bottom | Compressor strain — check coils + compressor temp with IR |
| Buzzing only when ice maker fills | Intermittent | Near water inlet (rear top or bottom) | Water inlet valve — resistance test |
| Rattling at all times | Continuous | Base or anywhere | Level the fridge — check drain pan and clearances |
| Clicking at regular intervals | Every 8–12 hours | Interior | Defrost cycle — normal unless excessive |
When to Call a Technician
The diagnostic process above covers every refrigerator noise fault that a homeowner can safely investigate and resolve. Two serious situations warrant professional involvement.
Compressor Replacement
If the start relay tests and sounds good, condenser coils are clean, and the compressor surface is still running extremely hot with loud persistent noise — the compressor motor itself may be failing. Compressor replacement requires specialized refrigerant handling equipment and EPA Section 608 certification. On a fridge more than 10–12 years old, a compressor failure is often better handled by replacement of the unit than by a repair that costs $400–$800 in parts and labor.
Refrigerant-Related Sounds
A persistent high-pitched hissing or gurgling that is continuous (not the normal brief post-compressor-shutoff gurgling) combined with a fridge that isn’t cooling may indicate a refrigerant leak. Refrigerant diagnosis and repair requires licensed technicians. The IR thermometer will flag this indirectly — sections of the condenser coil will appear abnormally cool if refrigerant is not circulating properly — but the actual leak detection and repair is not DIY territory.
Frequently Asked Questions
How do I know if my fridge noise is normal or abnormal?
Every refrigerator makes some sound during normal operation — a low compressor hum, soft fan whir, clicking at the start or end of defrost cycles, and gurgling as refrigerant flows. The key distinction is change. If a sound is new, has gotten significantly louder over days or weeks, is rhythmically repetitive at short intervals (every 2–5 minutes), or is accompanied by a change in cooling performance, it’s abnormal and worth investigating. The TopTes TS-501B gives you a baseline dB reading at installation or first use so you have an objective reference point for future comparisons.
My fridge started making noise after a power outage. Is that normal?
Brief clicking after a power outage (lasting 3–5 minutes) is normal — the compressor is attempting to restart against residual pressure in the refrigerant lines. Most modern compressors have a built-in restart delay of 3–5 minutes for this reason. If the clicking continues beyond 10–15 minutes after power restoration, the start relay may have been damaged by the power event and should be tested with the multimeter.
Should I clean the condenser coils even if the noise doesn’t seem to come from them?
Yes, always. Dirty condenser coils force the compressor to run harder, longer, and hotter to maintain temperature. This increases compressor noise even when the coils themselves aren’t the direct noise source. Cleaning them (using the Brushtech B47C coil brush, as covered in earlier articles in this series) eliminates one of the most common compressor strain conditions before testing any electrical component. It takes 15 minutes and should be done annually.
The grinding noise stops when I press the door switch inside the freezer. What does that mean?
This is a classic evaporator fan diagnosis. The evaporator fan stops running when the freezer door is opened (the door switch cuts power to it as a safety measure). If pressing the door switch manually stops the noise, the evaporator fan is confirmed as the noise source. The next question is whether it’s fan motor wear or ice buildup — inspect the blade clearance after defrosting first before assuming motor failure.
Can I use a decibel meter app on my phone instead of a dedicated meter?
Smartphone microphones are designed and calibrated for voice calls, not precise acoustic measurement. They typically introduce 3–8 dB of error, vary significantly between phone models, and have no A/C weighting options. For a subjective sense of whether something sounds loud, a phone app is functional. For actual diagnostic comparison between positions, before-and-after measurements, or determining whether a fridge exceeds normal operating levels, the TS-501B’s dedicated condenser microphone and calibrated measurement are significantly more reliable.
Conclusion
A noisy fridge is a refrigerator talking. The sound tells you the location, the character tells you the component, and three tools give you the objective measurements to confirm what your ears suspect. The TopTes TS-501B maps the noise to its source by decibel level across positions. The Etekcity Lasergrip 1080 connects the noise to thermal performance — telling you whether the fault is also costing cooling efficiency. The KAIWEETS HT118A tests the suspect component electrically, delivering a definitive pass or fail before you spend anything on a replacement part.
Total outlay for all three is under $90. A service call that arrives at the same diagnosis typically starts at $100 before any repair begins.

Hi, I’m Barlgan! I created Repair Me Yourself to empower homeowners to tackle appliance repairs with confidence. From decoding error codes to fixing cooling issues, I break down complex repairs into simple, actionable steps that save you time and money.