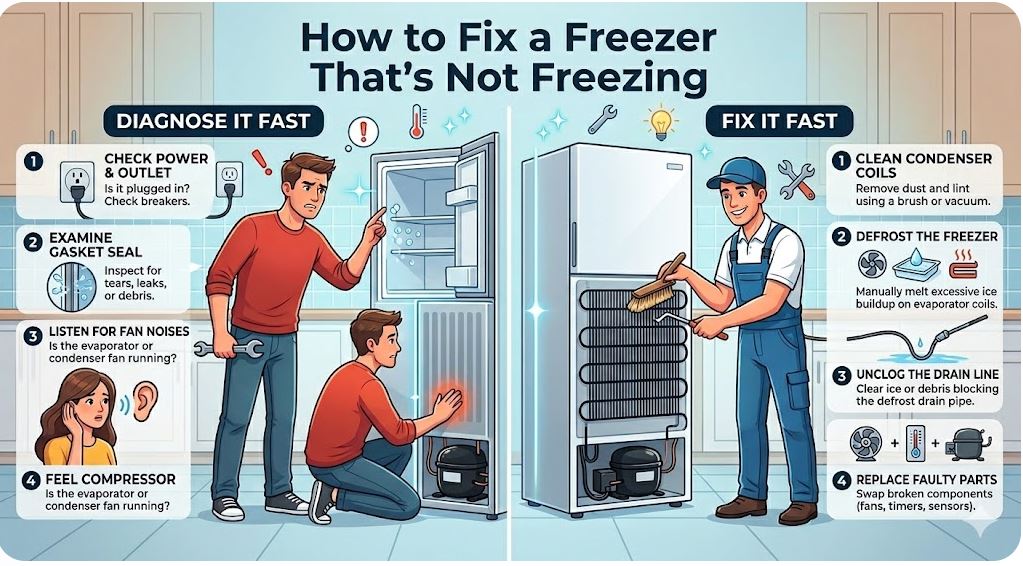
Your freezer is running. The compressor hums occasionally. The interior feels cool. But ice cream is soft, meat is thawing, and the temperature display — if your unit has one — shows a number that clearly doesn’t reflect reality. The freezer is on, but it isn’t actually freezing.
This is one of the most deceptive appliance faults because the unit appears to be working. The compressor cycles, the light comes on, the fans run — but the temperature never gets to 0°F and stays there.
The cause could be as simple as a blocked air vent or a dusty condenser coil, or it could be a failed defrost heater that’s allowed ice to silently choke the evaporator over several weeks. It could also be a failed start relay that’s preventing the compressor from running properly, or a door gasket that’s been quietly letting warm humid air in every cycle.
The three tools in this guide let you work through a logical diagnostic sequence — starting with what you can confirm without touching any components, then identifying thermal problems that point to specific causes, then testing the electrical components that control the entire freezing process. Most freezer failures are diagnosable and fixable in under an hour with parts that cost under $50.
Quick-Reference Summary Table
| Tool | Role in Diagnosis | Approx. Price | Where to Buy |
|---|---|---|---|
| ThermoPro TP19H Digital Instant Read Thermometer | Confirm actual freezer temperature, map zones, identify temperature recovery after defrost | ~$15–$20 | Amazon |
| Etekcity Lasergrip 1080 Infrared Thermometer | Check condenser coil surface heat, evaporator vent output temperature, door gasket leaks | ~$16–$22 | Amazon |
| KAIWEETS HT118A Digital Multimeter | Test evaporator fan motor, defrost heater, defrost thermostat, start relay, temperature thermostat | ~$30–$42 | Amazon |
What a Freezer That Isn’t Freezing Actually Looks Like
Before reaching for any tools, understanding the symptom pattern tells you a great deal about where to focus the diagnosis. A freezer that “isn’t freezing” can present in several distinct ways, and each pattern points toward a different root cause.
| Symptom Pattern | Most Likely Cause | Diagnostic Priority |
|---|---|---|
| Both freezer and fridge too warm, compressor barely running | Failed start relay or compressor | Electrical — start relay first |
| Freezer marginal (10–20°F), fridge normal or cold | Evaporator fan failure or ice blockage | Airflow — evaporator fan and coil inspection |
| Freezer and fridge both warm, excessive frost visible inside | Defrost system failure — ice blocking evaporator | Defrost heater, thermostat, timer/control board |
| Freezer slowly warming over days/weeks, no frost | Dirty condenser coils or door gasket leak | Condenser coil cleaning, gasket test |
| Freezer warm only in certain zones | Blocked vents, overloading, or partial evaporator icing | Physical inspection and airflow check |
| Temperature fluctuates widely between cycles | Thermostat or temperature control board fault | Temperature thermostat continuity test |
Step 1 — Confirm the Real Temperature and Map the Problem
The first task is establishing objective temperature data. Do not rely on the built-in display. Most freezer temperature displays measure at a single fixed sensor and can read 10–15°F colder than the actual average compartment temperature during a fault condition — because the sensor is typically positioned near the evaporator where temperatures are coldest, while the rest of the compartment warms up around it.
The ThermoPro TP19H Digital Instant Read Thermometer (View on Amazon) gives you direct, independent temperature readings anywhere inside the compartment. Its range of -58°F to 572°F covers the full span from a properly frozen -5°F to a warm, failing compartment, with ±0.9°F accuracy throughout the freezer operating range.
The 4.3″ stainless probe reaches easily to the center of shelves, the motion-sensing auto wake/sleep preserves the AAA battery across multiple tests, and the temperature lock function holds the reading after you remove the probe — useful when reaching into the back of a packed freezer.
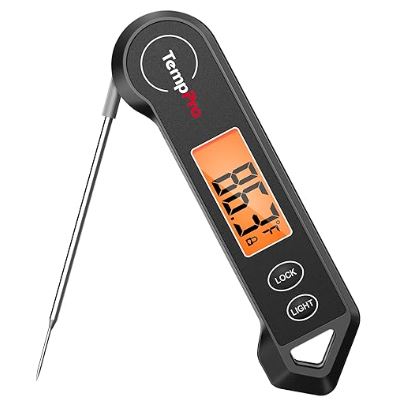
Taking Freezer Temperature Readings
Leave the freezer undisturbed for at least two hours before measuring. Open the door quickly, insert the TP19H probe at each position, hold it still for 30–45 seconds until the reading stabilizes, lock it, and record before moving on. Measure at a minimum of four locations: the center front of the top shelf, the center rear of the top shelf, the center of the bottom shelf, and just inside the door shelf if present.
A properly working freezer reads 0°F or below at all positions, with the back and center typically reading -2°F to -5°F. Any reading above 8°F indicates a performance problem. Readings of 15–25°F mean the freezer is failing to maintain safe frozen storage. Readings above 30°F mean the freezer is essentially operating as a cooler, not a freezer.
What the Temperature Map Tells You
If the back of the freezer is significantly colder than the front and sides, the evaporator is generating cold but the fan isn’t distributing it — pointing to evaporator fan failure or ice buildup around the fan.
If temperatures are uniform but too warm throughout, the problem is either the compressor cycle (start relay, thermostat) or total loss of airflow over the evaporator coils (heavy ice blockage from defrost system failure).
And if temperatures are wildly inconsistent — sometimes near freezing, sometimes not — the thermostat or thermistor is the most likely cause, as it’s intermittently failing to signal the compressor to run.
Step 2 — Identify Thermal Problems Without Opening Panels
The Etekcity Lasergrip 1080 Infrared Thermometer (View on Amazon) allows you to diagnose the two most common causes of a freezer not freezing — condenser overload and evaporator airflow failure — without removing panels or disconnecting components. Its -58°F to 1130°F range with 12:1 distance-to-spot ratio and adjustable emissivity handles both the hot condenser side and the cold evaporator output in the same diagnostic session.

Check the Condenser Coils
Pull the freezer or refrigerator-freezer unit away from the wall. The condenser coils are located either at the back of the unit (older models) or behind the bottom front grille (most modern models). With the compressor running, point the Lasergrip at the coil surface from 6–8 inches away.
Condenser coils in normal operation read 90–120°F — warm but not hot, indicating they are releasing heat efficiently. Coils coated with dust, lint, and pet hair read significantly hotter, often 140–180°F, because the insulating layer of debris prevents proper heat dissipation.
The compressor compensates by running longer and harder, but if the coil efficiency drops far enough, the system can no longer achieve freezing temperatures. A coil surface reading above 140°F during normal ambient temperatures is a strong indicator that cleaning is needed. Cleaning condenser coils is a free fix that restores full cooling capacity in many cases where the coils are the primary cause.
Check Evaporator Vent Output
Open the freezer door and locate the rear panel air vents — the slots through which the evaporator fan circulates cold air throughout the compartment. Point the Lasergrip at the vent face while the fan is running. You should see surface temperatures well below freezer compartment temperature — typically -5°F to 15°F at the vent face on a properly working unit. The significant temperature differential between vent output and compartment air confirms the evaporator is actively generating cold and the fan is distributing it.
A vent face reading near compartment temperature — say, 20–25°F when the compartment itself reads 22°F — means the evaporator fan is not circulating cold air. Either the fan motor has failed, or the evaporator coils have become completely encased in ice due to defrost system failure, blocking all airflow. In the ice blockage scenario, you’ll often hear the compressor running almost continuously (it keeps trying to cool), yet see no cold air movement at the vents.
Check the Door Gasket
Trace the Lasergrip along the full perimeter of the gasket from 6 inches away. The gasket surface should read near ambient room temperature consistently around the entire perimeter. A cold spot — a location reading 10°F or more below the surrounding areas — indicates the gasket is allowing cold air to bleed through at that point.
Confirm with the paper test: close the door on a sheet of paper at the suspected location and attempt to pull it out. No resistance means the gasket isn’t sealing. A leaking gasket continuously introduces warm, humid air into the freezer — accelerating both ice buildup on the evaporator and temperature rise in the compartment.
Step 3 — Test the Electrical Components
When the thermal survey identifies a likely electrical fault — or when coil cleaning and physical inspection haven’t resolved the issue — the KAIWEETS HT118A Digital Multimeter (View on Amazon) is the right tool for precise component testing. Auto-ranging TRMS measurement, NCV detection for live circuit safety checks, LED port indicators to prevent probe mis-connection, and CAT III 1000V / CAT IV 600V safety rating. Unplug the freezer before accessing any internal components.
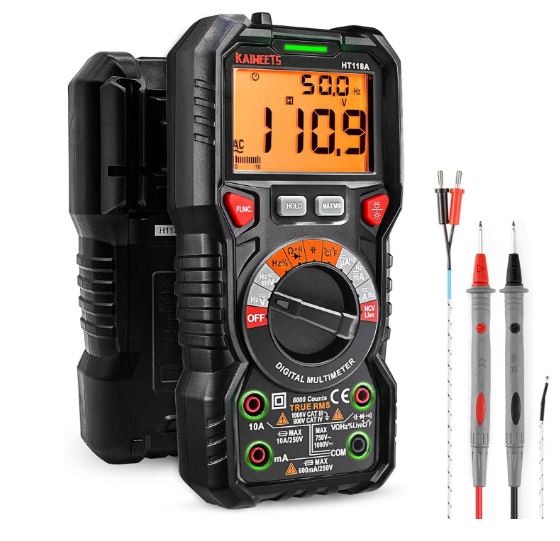
Test the Start Relay
The start relay is the most common single-component failure that causes a freezer to completely stop cooling. It provides the initial power surge that starts the compressor each cycle. When it fails, the compressor attempts to start, draws too much current, the thermal overload trips, and the whole system clicks off — repeating every few minutes in a pattern that sounds like a brief hum followed by a click. The freezer slowly warms up over hours.
Locate the compressor at the bottom rear of the unit. The start relay is a small rectangular plug-in component on the side of the compressor. Unplug it from the compressor and shake it. A working relay is completely silent. A failed relay rattles audibly — from the broken internal pellet. This shake test alone is highly reliable. Confirm by testing continuity across the relay’s run and start terminals with the HT118A. A replacement relay costs $10–$25 and installs by hand in under a minute.
Test the Evaporator Fan Motor
Locate the evaporator fan behind the rear panel inside the freezer compartment (typically 3–6 screws to access). Disconnect the motor wiring harness. Set the HT118A to resistance mode and test across the motor terminals. A functional evaporator fan motor reads 200–400 Ω. An OL reading indicates an open winding and the motor has failed.
Also spin the blade by hand — it must rotate completely freely and silently. Any resistance, grinding, or stiffness suggests the bearings are failing even if resistance tests within range. Replacement evaporator fan motors are model-specific and typically cost $20–$60.
Test the Defrost Heater
The defrost heater runs several times per day to melt accumulated frost off the evaporator coils. When it fails, frost builds up unimpeded across the entire evaporator — eventually blocking all airflow and killing cooling performance, even though the compressor and fans are still operational. This is the “slow failure” pattern: the freezer gradually warms over two to four weeks as ice accumulates.
With the rear panel removed and the evaporator coils visible, locate the defrost heater — a glass or metal heating element threaded through or clipped to the coils. Disconnect it from the wiring harness. Set the HT118A to resistance mode. A working defrost heater reads 10–70 Ω depending on the model (consult the tech sheet, usually found inside the fridge behind the bottom grille, for the exact specification). An OL reading confirms an open heater element — it must be replaced. Defrost heaters cost $15–$40.
Test the Defrost Thermostat
The defrost thermostat is a safety device that allows the defrost heater to turn on only when the evaporator coils are below approximately 30°F, preventing overheating. If the defrost thermostat fails open, it breaks the defrost heater circuit even when the coils are cold and need defrosting — same symptom as a failed heater but a different component.
Locate the defrost thermostat clipped to the evaporator coils. Disconnect it. Set the HT118A to continuity mode. At room temperature, a working defrost thermostat shows continuity — the contacts are closed. A thermostat showing OL at room temperature has failed open and must be replaced. Defrost thermostats cost $10–$25. Replace as a matched set with the defrost heater if both tests point to defrost system failure — the labor cost of a return trip makes it efficient to replace both at once.
Test the Temperature Thermostat
On freezers with a mechanical dial thermostat (most standalone chest and upright freezers, and older fridge-freezer combos), the thermostat controls when the compressor cycles on and off. A failed thermostat can prevent the compressor from running at all, or allow it to run only briefly before cutting out — leaving the freezer warmer than the set temperature.
With the thermostat accessible (typically a dial control inside the compartment, connected to a sensing bulb along the back wall), turn the dial to its highest/coldest setting. Set the HT118A to continuity mode. Probe the thermostat terminals.
A working mechanical thermostat shows continuity at the coldest setting. Advance the dial slowly toward the warmest setting — at some point you should hear a click as the contacts open and continuity is lost. No continuity at any dial position, or continuity that never breaks as you turn the dial, both indicate thermostat failure. Replacement thermostats are typically $15–$40.
Diagnostic Decision Guide
| What You Found | Most Likely Cause | Typical Part Cost |
|---|---|---|
| Temperature above 15°F throughout, brief hum then click every few minutes | Failed start relay | $10–$25 |
| Temperature uniform but too warm, back of freezer not significantly colder than front | Start relay or thermostat | $10–$40 |
| Temperature warmer at front, significantly colder at rear | Evaporator fan failure | $20–$60 |
| Excessive frost/ice buildup visible inside, vents blocked | Defrost heater or thermostat failure | $15–$65 combined |
| Temperature gradually rising over weeks, no frost visible | Dirty condenser coils | Free — cleaning only |
| Cold spots on gasket, paper test fails | Door gasket leak | $20–$60 |
| Temperature fluctuates widely and randomly | Temperature thermostat or thermistor fault | $15–$40 |
| Compressor never runs, no hum at all, not electrical fault | Compressor failure — professional repair required | $400–$800+ |
Frequently Asked Questions
My freezer feels cool but won’t reach 0°F. What’s the most likely cause?
A freezer that gets cold but can’t reach freezing is the classic signature of a defrost system problem. The evaporator is producing cold, but progressive ice buildup on the coils is reducing heat exchange efficiency — so the unit gets somewhere between 15–30°F but can’t go further. The evaporator fan motor is another strong candidate, particularly if one zone of the freezer is noticeably colder than others. Confirm compartment temperature with the ThermoPro TP19H, check the evaporator vent output temperature with the Etekcity Lasergrip, then test the defrost heater and fan motor with the KAIWEETS HT118A.
Can I manually defrost the freezer to temporarily fix it?
Yes, and it’s a worthwhile diagnostic step. Unplug the unit, remove all food, and leave the door open for 24–48 hours with towels on the floor to absorb meltwater. If the freezer returns to normal operation for two to four weeks before the problem reappears, defrost system failure is confirmed — frost is gradually building back up because the heater isn’t clearing it automatically. This tells you to test the defrost heater and defrost thermostat as the primary cause rather than spending time on the compressor or fan.
My freezer runs constantly but doesn’t freeze. Does that mean the compressor is failing?
Not necessarily — in fact, a constantly running freezer fan is more often a sign that the compressor is working and trying to compensate for a different problem. Dirty condenser coils, a leaking door gasket, and a failed evaporator fan all cause the compressor to run continuously without achieving target temperature. Test the condenser coils with the Lasergrip and check for gasket leaks before concluding the compressor is at fault. A genuinely failed compressor typically presents differently — it either doesn’t run at all, hums briefly and clicks off, or makes grinding or rattling sounds during attempted startup.
The freezer works fine in winter but fails in summer. What’s going on?
This is a condenser coil efficiency problem that heat stress exposes. During cooler months the system works despite some coil contamination, because ambient temperature is lower and heat dissipation is easier. As ambient temperature rises in summer, the margin disappears and the system can no longer achieve freezing temperatures. Clean the condenser coils thoroughly and confirm with the Lasergrip that surface temperatures drop back into the normal range after cleaning. If the unit is in a garage or utility room where summer ambient temperatures exceed 90–95°F, check your model’s operating temperature range — some freezers aren’t rated to operate in high-ambient environments.
How do I know if the problem is the defrost heater and not the defrost thermostat?
Both failures produce the same visible symptom — progressive ice buildup on the evaporator coils. The KAIWEETS HT118A distinguishes them cleanly. Test the defrost heater first: disconnect it and measure resistance. An OL reading confirms heater failure. If the heater tests in range, test the defrost thermostat: disconnect it and check continuity at room temperature. No continuity at room temperature means the thermostat has failed open. Since both parts are inexpensive ($10–$40 each) and labor to access them is the same, many technicians replace both simultaneously when defrost system failure is confirmed — it eliminates a callback if the secondary component was borderline.
At what point is it better to replace the freezer than repair it?
Apply the 50% rule: if the repair cost exceeds half the replacement value of an equivalent unit, replacement is typically the better investment. For standalone chest and upright freezers, this means a compressor failure on a unit over eight years old usually warrants replacement. Every other fault covered in this guide — start relay, evaporator fan, defrost heater and thermostat, temperature thermostat, door gasket — costs well under $100 in parts and is worth repairing on most units regardless of age. The ThermoPro, Lasergrip, and KAIWEETS HT118A together tell you which category the fault falls into before committing to any expense.
Conclusion on a Freezer Not Freezing
A freezer that isn’t freezing has a root cause that follows a logical pattern, and most patterns point to one of a handful of components that are inexpensive to replace. The ThermoPro TP19H maps the temperature problem objectively — telling you whether the issue is total loss of cooling, poor distribution, or failure to reach target temperature.
The Etekcity Lasergrip 1080 identifies the two most common non-electrical causes (condenser overload and evaporator airflow failure) in minutes, without removing a single panel. The KAIWEETS HT118A confirms or eliminates the start relay, evaporator fan, defrost heater, defrost thermostat, and temperature thermostat — the electrical components that control the entire cooling cycle.
In most cases, one of these checks produces a clear answer. A $15 start relay, a cleaned condenser coil, or a $25 defrost heater resolves the issue completely — and the tools that found the problem remain useful for every other appliance diagnostic covered in this series.

Hi, I’m Barlgan! I created Repair Me Yourself to empower homeowners to tackle appliance repairs with confidence. From decoding error codes to fixing cooling issues, I break down complex repairs into simple, actionable steps that save you time and money.