You can hear your freezer fan running normally, yet the temperature inside keeps rising. Your food is beginning to thaw, and you’re facing potential spoilage. This perplexing problem requires immediate attention.
A freezer fan running but not cooling typically indicates a failed compressor, low refrigerant levels, a defective start relay or capacitor, evaporator coil issues, or a malfunctioning temperature control system. The fan circulates air, but without the cooling system functioning properly, it’s just moving warm air instead of cold air.
This guide will help you diagnose why your freezer fan runs without producing cold air and determine whether you can fix it yourself or need professional help.
Quick Reference for a Freezer Fan Running But Not Cooling
| Cause | Symptoms | Difficulty Level | Estimated Fix Time |
|---|---|---|---|
| Failed Compressor | Fan runs, no cooling, warm exterior | Professional Only | 2-4 hours |
| Low Refrigerant | Gradual warming, compressor runs quietly | Professional Only | 1-2 hours |
| Defective Start Relay | Clicking sounds, compressor won’t start | Moderate | 30-60 minutes |
| Frozen Evaporator Coils | Frost buildup, partial cooling | Easy to Moderate | 4-8 hours |
| Faulty Temperature Control | Inconsistent operation, random cycling | Moderate | 45-90 minutes |
Why Is My Freezer Fan Running But Not Cooling?
When your freezer fan runs but doesn’t cool, you’ve identified an important diagnostic clue. The fan motor works, which means the freezer has power. The problem lies specifically with the refrigeration system or its control components.
Understanding the basic cooling process helps clarify what’s wrong. Your freezer uses a compressor to circulate refrigerant through coils. This refrigerant absorbs heat from inside the freezer and releases it outside. The fan distributes this cold air throughout the freezer compartment.
If any component in this cooling chain fails, the fan continues running but produces no cold air. Let’s examine each potential cause systematically.
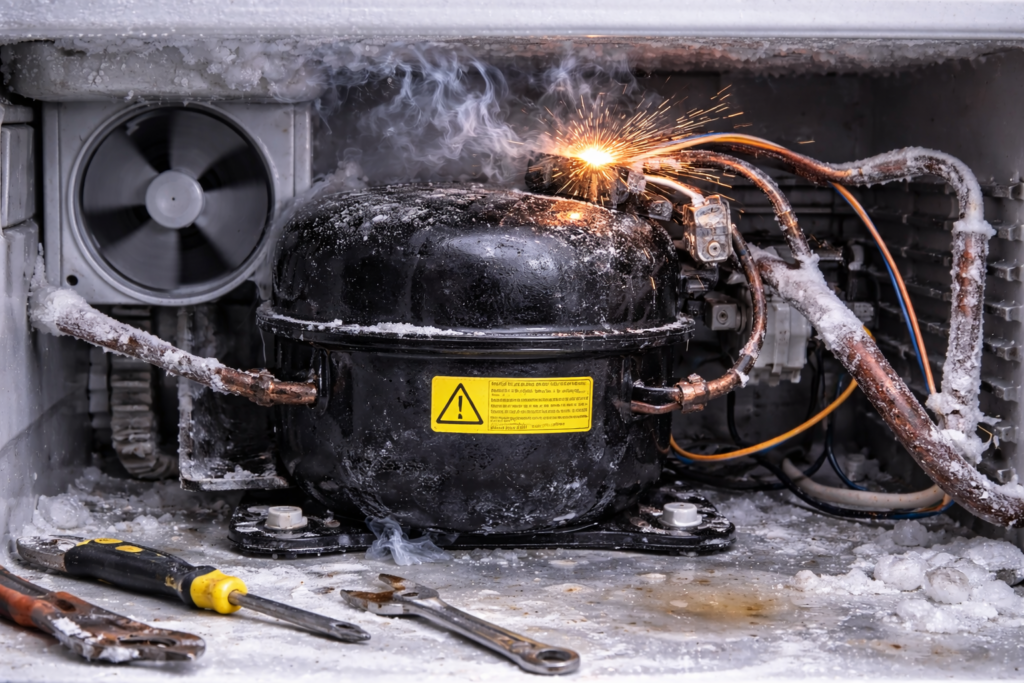
1. Failed or Failing Compressor
The compressor is your freezer’s heart. This motorized pump circulates refrigerant through the cooling system, creating the pressure and flow necessary for heat exchange.
When a compressor fails, refrigerant stops circulating even though the compressor may still hum or vibrate. No refrigerant circulation means no cooling, regardless of whether the fan runs.
Signs of Compressor Failure
- Your freezer makes humming or buzzing sounds but doesn’t cool. The compressor may feel warm or hot to the touch but isn’t vibrating normally.
- You hear clicking sounds followed by silence. This indicates the compressor is trying to start but failing immediately. The start relay or overload protector keeps shutting it down.
- The exterior of your freezer near the compressor remains room temperature or only slightly warm. A working compressor generates significant heat that you can feel on the back or bottom of the unit.
How to Diagnose Compressor Issues
Unplug your freezer for 5 minutes, then plug it back in. Listen carefully when power returns. A healthy compressor starts with a low hum that builds to steady operation within seconds.
A failing compressor clicks repeatedly, makes grinding noises, or stays silent except for the fan. These sounds indicate internal mechanical failure.
Feel the compressor housing (located at the back or bottom of your freezer). It should be warm to hot during operation. If it’s cool or barely warm after running for 30 minutes, it’s not working.
Testing the Compressor
Use a multimeter (View on Amazon) to test compressor windings. You’ll need to access the compressor terminals under the cover plate.
The terminals are labeled C (common), S (start), and R (run). Test resistance between each pair. You should get readings between 3 and 15 ohms depending on your freezer model.
An infinite reading or zero reading indicates failed windings. This means the compressor is dead and requires replacement.
How to Fix It
Compressor replacement is not a DIY job for several critical reasons. The repair requires specialized tools including refrigerant recovery equipment, vacuum pumps, and brazing torches.
Handling refrigerant requires EPA certification. Releasing refrigerant into the atmosphere is illegal and environmentally harmful.
Additionally, compressor replacement costs $300 to $600 including labor and parts. For freezers more than 8 years old, replacement often makes more financial sense than repair.
Contact a licensed HVAC or appliance repair technician if testing indicates compressor failure. They can assess whether repair is worthwhile based on your freezer’s age and condition.
Prevention Notes
Keep your freezer’s condenser coils clean. Dirty coils force the compressor to work harder, shortening its lifespan.
Ensure adequate ventilation around your freezer. Overheating accelerates compressor wear. Maintain at least 2 inches of clearance on all sides.
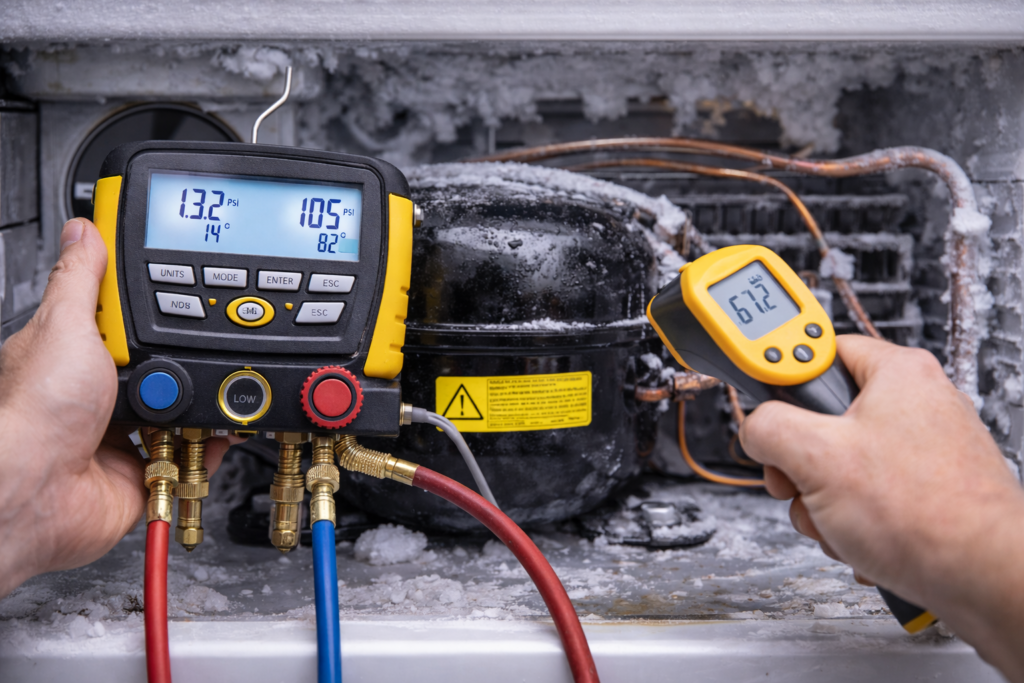
2. Low Refrigerant Levels
Refrigerant is the chemical that circulates through your freezer’s cooling system, absorbing heat inside and releasing it outside. Your freezer is a sealed system that should never need refrigerant added under normal conditions.
Low refrigerant indicates a leak somewhere in the system. Even a tiny leak eventually drains enough refrigerant to prevent proper cooling.
Signs of Refrigerant Loss
- Cooling gradually decreases over days or weeks rather than failing suddenly. Your freezer might cool slightly but can’t reach proper temperature.
- The compressor runs continuously trying to compensate for inadequate cooling. It never cycles off like it should during normal operation.
- Frost patterns appear unusual. You might see frost on some coils but not others, or frost forming in strange locations.
- Ice or frost may appear on the exterior refrigerant lines. This indicates refrigerant is leaking and immediately freezing when exposed to air.
How to Check for Refrigerant Issues
Listen to your compressor. A compressor running constantly without achieving proper cooling temperature suggests insufficient refrigerant.
Check for oily residue around pipe joints and connections. Refrigerant carries compressor oil, so leaks often show as oily spots.
Feel the refrigerant lines running from the compressor. In normal operation, one line should be very cold and the other warm. If both are barely cool or room temperature, refrigerant is low.
How to Fix It
Refrigerant work requires professional service. You cannot legally buy or handle refrigerant without EPA Section 608 certification.
A technician must locate the leak, repair it, evacuate the system, and recharge it with the correct refrigerant type and amount. This process costs $200 to $500 depending on leak location and repair complexity.
For older freezers using R-12 refrigerant (manufactured before 2000), refrigerant is expensive and increasingly scarce. Repair may not be cost-effective compared to purchasing a new freezer (View on Amazon).
Important Environmental Note
Never attempt DIY refrigerant work. Releasing refrigerants harms the ozone layer and contributes to climate change. Professional technicians have equipment to capture and recycle refrigerant safely.
3. Defective Start Relay or Capacitor
The start relay provides the electrical boost your compressor needs to begin running. The capacitor stores electrical energy and releases it to start the compressor motor.
These components can fail even when the compressor itself is healthy. A failed start relay or capacitor prevents the compressor from starting, so no cooling occurs despite the fan running normally.
Signs of Start Component Failure
- You hear clicking sounds from the compressor area every few minutes. This is the start relay attempting to engage the compressor repeatedly.
- The compressor hums briefly then stops. It’s trying to start but doesn’t have enough power to overcome initial resistance.
- Your freezer worked fine until recently, then suddenly stopped cooling. Start component failure often happens suddenly rather than gradually.
- The compressor is cool or barely warm to the touch. This indicates it’s not running at all, rather than running ineffectively.
How to Diagnose the Problem
Unplug your freezer and locate the compressor at the back or bottom. Find the relay and capacitor, which attach to the compressor housing.
Remove the start relay by pulling it straight off the compressor terminals. Shake it gently next to your ear. If you hear rattling, internal components have broken loose and the relay has failed.
For capacitors, look for visible signs of failure including bulging, leaking, or burn marks. Never touch capacitor terminals as they can hold dangerous electrical charges even when unplugged.
Testing Components
Test the start relay with a multimeter. It should show continuity between certain terminals when positioned correctly. Consult your freezer’s wiring diagram for specific testing procedures.
Capacitors require safe discharge before testing. Use an insulated screwdriver to short the terminals together briefly. Then test capacitance with a multimeter that has capacitance testing capability.
Expected capacitance values are printed on the capacitor body. Readings more than 10% off indicate failure.
How to Fix It
Replacing a start relay is a straightforward DIY repair. Unplug your freezer and remove the old relay from the compressor terminals.
Install the new relay by pressing it firmly onto the terminals. Ensure it’s fully seated and oriented correctly according to the wiring diagram.
Start relays cost $15 to $40 depending on your freezer brand. They’re available from appliance parts suppliers using your freezer’s model number.
Capacitor replacement involves similar steps but requires extra caution due to stored electrical charge. If you’re uncomfortable working with capacitors, hire a technician for this repair.
Replacement capacitors cost $20 to $60. Professional installation runs $100 to $200 including the part.
Safety Warning
Always unplug your freezer before working on electrical components. Capacitors can deliver dangerous shocks even when the appliance is unplugged. Discharge them properly before handling.
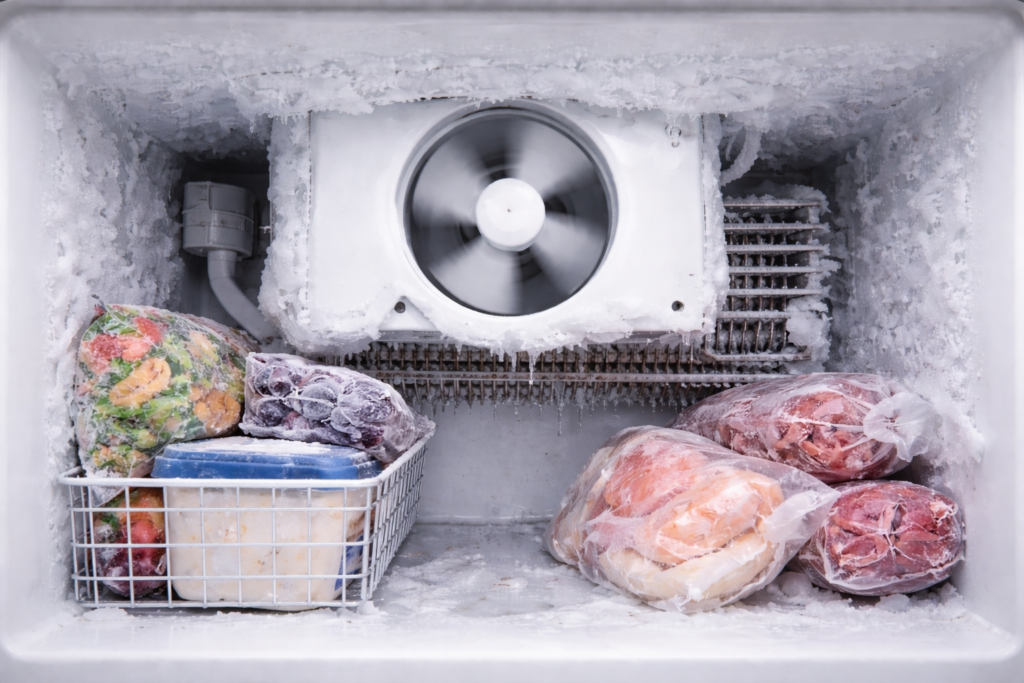
4. Frozen or Blocked Evaporator Coils
The evaporator coils sit behind your freezer’s back wall and are where refrigerant absorbs heat. Air passing over these extremely cold coils is what cools your freezer.
When evaporator coils freeze over with thick ice, air can’t flow across them properly. The fan runs, but it can’t pull heat from the coils to cool the freezer compartment.
Signs of Frozen Evaporator Coils
- Your freezer partially cools but can’t reach proper temperature. It might maintain 20°F to 30°F instead of the target 0°F.
- Heavy frost buildup appears on the back wall of your freezer. This frost might be several inches thick.
- You hear the fan running but feel minimal airflow from the vents. Ice blocks the air passages around the evaporator.
- The freezer cooled normally until recently, then gradually lost cooling power. This pattern suggests progressive ice buildup rather than sudden component failure.
What Causes Coil Freezing
A failed defrost system is the most common cause. Your freezer should automatically defrost the evaporator coils periodically. When defrost components fail, ice accumulates continuously.
Alternatively, a faulty defrost timer, thermostat, or heater prevents ice removal. The coils get progressively more encased in ice until airflow stops completely.
How to Fix It
Complete manual defrosting is the immediate solution. Unplug your freezer and remove all food to a cooler with ice.
Leave the freezer door open for 6 to 8 hours. Place towels around the base to absorb melting water. You can speed the process slightly with fans directing room-temperature air into the freezer.
Never use heat guns, hairdryers, or sharp objects to remove ice. These can damage the evaporator coils or refrigerant lines, creating expensive leaks.
Once fully defrosted, plug in your freezer and monitor cooling. If it works normally for a few days then gradually loses cooling again, your defrost system has failed.
Repairing the Defrost System
Defrost system repair involves testing and replacing the defrost timer, heater, or thermostat. These repairs are covered in detail in defrost system troubleshooting resources.
If you’re comfortable with electrical testing and removing freezer panels, these repairs are manageable DIY projects costing $30 to $100 in parts.
Otherwise, professional repair costs $150 to $300 including parts and labor.
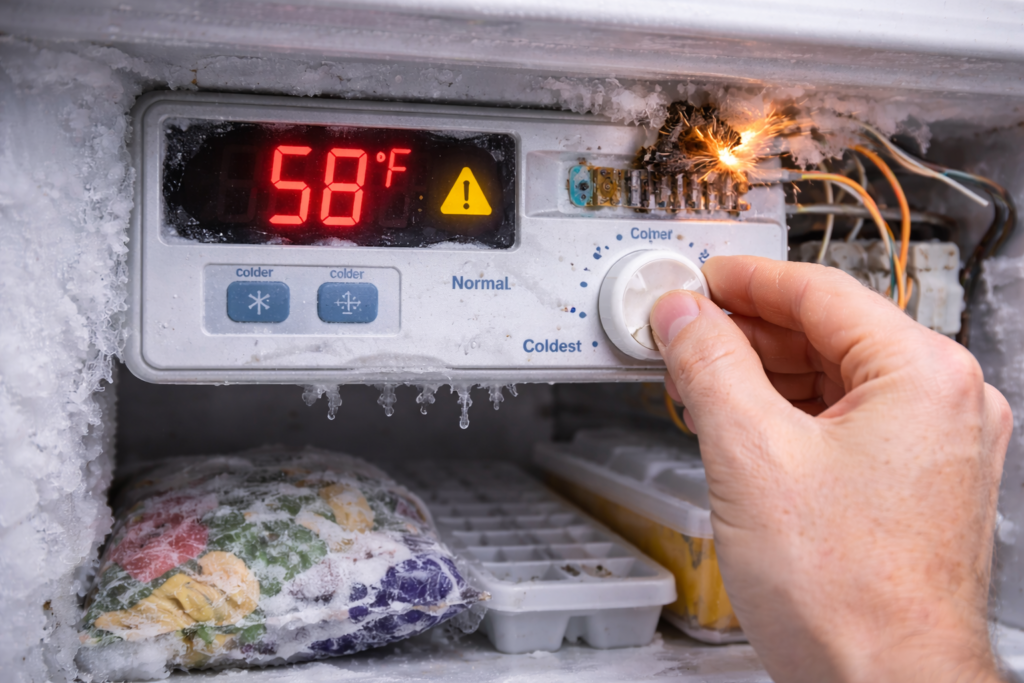
5. Malfunctioning Temperature Control System
Your freezer’s temperature control system includes the thermostat or electronic control board that monitors temperature and controls when the compressor runs.
When this system malfunctions, it may not signal the compressor to run even though the fan operates independently. The fan circuit works, but the cooling circuit doesn’t activate.
Signs of Control System Problems
- The fan runs constantly, but the compressor never starts or runs only occasionally. You don’t hear the typical compressor hum that should accompany fan operation.
- Your freezer worked intermittently before failing completely. Sometimes it cooled properly, other times it didn’t, with no clear pattern.
- The control dial or digital display seems unresponsive. Adjusting settings produces no change in operation.
How to Diagnose Control Issues
Locate your temperature control. For dial controls, it’s typically inside the freezer compartment. Electronic controls may be on the exterior or interior.
Try adjusting the control to the coldest setting. Listen for the compressor to start within a few minutes. If nothing changes, the control signal isn’t reaching the compressor.
For electronic controls, check for error codes on the display. Consult your user manual for code meanings.
Testing the Thermostat
Mechanical thermostats can be tested with a multimeter. Unplug your freezer and access the thermostat by removing its mounting screws.
Disconnect the wires and test continuity across the terminals. A functioning thermostat shows continuity when set to coldest and the sensing tube is at room temperature.
No continuity indicates a failed thermostat requiring replacement. Thermostats cost $25 to $80 depending on your freezer model.
Electronic Control Boards
Electronic controls are more complex and difficult to test without specialized equipment. Visual inspection can reveal obvious problems like burn marks, corrosion, or damaged components.
If you suspect electronic control failure, replacement is usually necessary. Control boards (View on Amazon) cost $100 to $300 depending on complexity.
How to Fix It
Replacing a mechanical thermostat is straightforward. Remove the old unit, disconnect wires (photograph them first for reference), and install the new thermostat using the same wire connections.
For electronic control boards, carefully disconnect all wire harnesses, remove mounting screws, and install the replacement board. Ensure all connections match the original configuration.
If you’re uncertain about electrical work, hire a professional for control system repairs. Incorrect wiring can damage the new component or create safety hazards.
Frequently Asked Questions
How can I tell if my compressor is running?
Place your hand on the compressor housing at the back or bottom of your freezer. A running compressor vibrates noticeably and feels warm to hot.
You’ll also hear a steady humming sound, different from the whooshing of the fan. The hum may pulse slightly but should remain constant.
If you feel no vibration and hear no hum, your compressor isn’t running even if the fan operates normally.
Can a freezer run without cooling temporarily?
Yes, during defrost cycles your freezer temporarily stops cooling while the fan may continue running. However, defrost cycles only last 20 to 30 minutes.
If your freezer runs without cooling for hours, you have a genuine problem rather than a normal defrost cycle.
Temperature should never rise above 10°F to 15°F during normal defrost cycles. Higher temperatures indicate malfunction.
Is it worth repairing a freezer that won’t cool?
This depends on the freezer’s age, repair cost, and replacement cost. For freezers less than 5 years old, repair usually makes sense unless the compressor has failed.
Repairs costing more than 50% of replacement value generally aren’t worthwhile. A new basic freezer costs $400 to $800.
Consider energy efficiency too. Newer freezers use significantly less electricity than models over 10 years old. Energy savings can offset replacement cost over time.
How long should I wait before calling a technician?
If your freezer won’t cool and you’ve verified the fan runs, check these items first. Ensure the freezer is plugged in securely and the outlet works. Verify the temperature control isn’t accidentally set to warmest or off.
If these quick checks don’t reveal the problem, contact a technician promptly. Food safety becomes critical after 4 hours without proper cooling.
Transfer food to coolers with ice if repair will take more than a few hours. Don’t wait until food spoils to seek professional help.
What temperature indicates my freezer isn’t cooling properly?
Your freezer should maintain 0°F to 5°F consistently. Temperatures above 10°F indicate a cooling problem.
At 15°F to 20°F, some foods begin thawing, particularly ice cream and items near the door. Above 20°F, food safety becomes a concern within hours.
Use a freezer thermometer to monitor temperature accurately. Don’t rely solely on whether items feel frozen, as this can be misleading.
Restore Your Freezer’s Cooling Power
You now understand why your freezer fan runs without producing cold air and the potential causes behind this problem. Several issues require professional diagnosis and repair, while others you can address yourself.
Start by checking the easiest possibilities. Verify temperature control settings are correct. Listen and feel for compressor operation. Check for heavy frost on the back wall indicating frozen evaporator coils.
If the compressor won’t start and you hear clicking sounds, test the start relay. This affordable component is easy to replace and solves many cooling failures.
For frozen evaporator coils, complete manual defrosting provides temporary relief. However, investigate and repair the underlying defrost system failure to prevent recurrence.
Compressor failure and refrigerant leaks require professional service. These repairs involve specialized equipment, legal restrictions, and safety concerns beyond DIY capability.
When calling for professional help, provide specific symptoms. Mention that the fan runs but doesn’t cool, describe any unusual sounds, and note how long the problem has existed. This information helps technicians diagnose efficiently.
Consider your freezer’s age and repair cost when deciding between repair and replacement. Sometimes investing in a new, energy-efficient model makes more financial sense than repairing an old unit.
Act quickly when cooling fails to protect your food and minimize losses. Most cooling problems worsen over time rather than resolving themselves.

Hi, I’m Barlgan! I created Repair Me Yourself to empower homeowners to tackle appliance repairs with confidence. From decoding error codes to fixing cooling issues, I break down complex repairs into simple, actionable steps that save you time and money.