Your refrigerator shows 37°F on the built-in display. You adjust the dial, wait 24 hours, and it still says 37°F. You assume everything is fine — until milk goes off three days early, or a health inspector’s spot check reveals the unit has been running at 43°F.
Built-in temperature displays are one of the most misleading indicators in the modern kitchen. They report a single air temperature reading at a fixed sensor location, often near the evaporator outlet where temperatures are coldest. The rest of the compartment — particularly lower shelves, door shelves, and the rear corners — can vary by 5–10°F from that reading.
More critically, the display shows current air temperature, not the temperature over time. A fridge that hits 37°F briefly after each compressor cycle can average 44°F across the full cycle and still display the lower number at the moment you check.
Accurate refrigerator temperature measurement requires three things: a thermometer that monitors continuously rather than at a single moment, an instant-read probe for verifying specific zones and calibrating your monitoring device, and a method for detecting thermal performance issues at the surface level before they become a food safety problem. This guide covers all three.
Quick-Reference Summary Table
| Tool | Role | Approx. Price | Where to Buy |
|---|---|---|---|
| AcuRite 00986M Wireless Fridge & Freezer Thermometer | Continuous dual-compartment monitoring, min/max records, programmable alarms | ~$20–$30 | Amazon |
| ThermoPro TP19H Digital Instant Read Thermometer | Spot-check specific zones, calibrate monitoring thermometer against ice water | ~$15–$20 | Amazon |
| Etekcity Lasergrip 1080 Infrared Thermometer | Surface temperature verification — airflow zones, gasket performance, condenser output | ~$16–$22 | Amazon |
Why Built-In Temperature Displays Are Unreliable
Understanding the limitations of the built-in display is the starting point for accurate refrigerator temperature measurement. Most residential refrigerators use a single NTC thermistor — a temperature-sensitive resistor — positioned at one location inside the fresh food compartment, typically near the air return vent or evaporator outlet. The electronic control board reads this sensor and displays the result as “the” temperature of the refrigerator.
Three structural problems make this reading unreliable for food safety assessment. First, the sensor position is the coldest point in the compartment — air coming directly from the evaporator — which means the display routinely underreports the temperature at shelf level, especially at lower positions and toward the front of the compartment.
Second, the sensor reads instantaneous air temperature, not average temperature over time. Air temperature in a refrigerator fluctuates by 3–8°F across each compressor cycle, and the display captures a snapshot that may reflect either the coldest or warmest point in that cycle depending on when you look.
Third, thermistor calibration drifts over time. A sensor that read accurately when the appliance left the factory may read 4–5°F low after several years of use, making the display look acceptable while food is actually stored above safe temperature.
The practical consequence: a fridge displaying 37°F can be running at an average temperature of 42–45°F, especially in lower shelf zones and during overnight periods when nobody is opening it to check. This is the scenario that produces unexplained food spoilage and the kind of food safety violations that catch commercial kitchens off guard.
Step 1 — Set Up Continuous Monitoring With a Dedicated Thermometer
The most important shift in refrigerator temperature accuracy is moving from spot-check measurement to continuous monitoring. A single reading taken once a day tells you the temperature at that moment. Continuous monitoring with min/max records tells you the range the compartment reached across the entire period — including overnight, during loading, and during any power interruption.
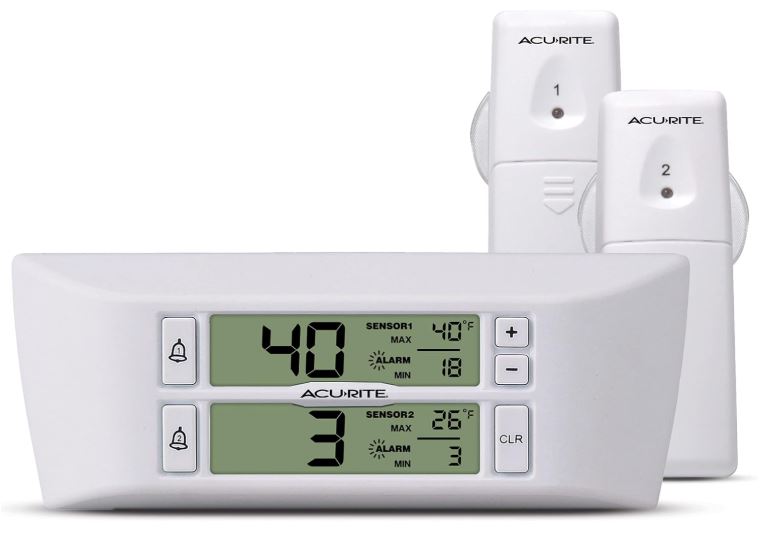
The AcuRite 00986M Wireless Fridge & Freezer Thermometer (View on Amazon) is purpose-built for this function. The system includes two wireless sensors — one for the fresh food compartment, one for the freezer — that transmit readings every 60 seconds to an external LCD display unit.
The display mounts magnetically on the fridge door or wall-mounts via an integrated keyhole, showing current, maximum, and minimum temperatures for both compartments without you opening either door. The sensor range is -40°F to 100°F, the wireless transmission range is 75 feet, and the programmable alarm triggers audible and visual alerts when either compartment exceeds your preset high or low limits.
Critically, the alarm includes a 15-minute delay before triggering — which prevents false alerts from door openings during normal loading and unloading, but ensures a genuine temperature excursion (failing compressor, door left ajar) triggers a real alert. AcuRite has been manufacturing measurement instruments since 1943, and the 00986M represents a purpose-designed approach to the specific problem of passive, continuous refrigerator temperature monitoring.
Where to Place the Sensors
Sensor placement is the most important variable in accurate refrigerator temperature measurement, and where most homeowners and even commercial operators get it wrong. Placing the sensor near the air vent outlet — the coldest zone — produces readings that look good while missing what food on the middle and lower shelves actually experiences.
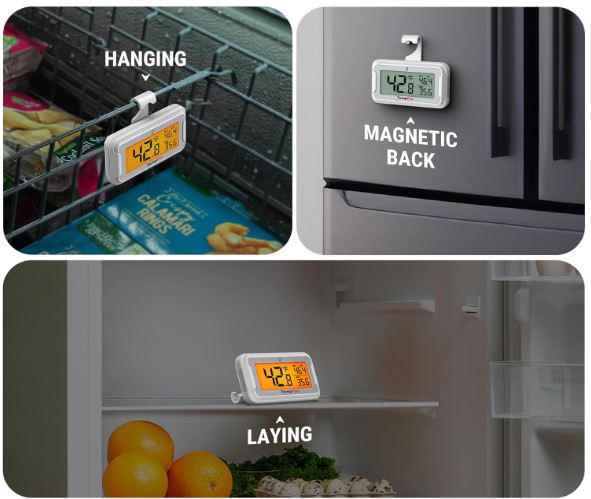
For the fresh food compartment, place the sensor on the middle shelf, at approximately the center-front position. This is the zone where most perishable food is stored and where temperature most directly affects food safety. Avoid the back wall (too close to airflow), the door shelf (too warm and variable), and the top shelf above the air vent (coldest, not representative). The AcuRite sensor clips to shelf edges or uses a suction cup — the shelf-clip position at center-front gives the most representative reading of actual food storage conditions.
For the freezer, place the sensor at the geometric center of the compartment, away from the evaporator panel and door. Use lithium batteries in the freezer sensor as specified by AcuRite — alkaline batteries can fail unpredictably at sustained sub-zero temperatures.
Setting the Alarms
Configure the high alarm for the fresh food compartment at 40°F. This is the FDA food safety threshold — the point above which bacterial growth accelerates. Set the low alarm at 32°F — temperatures at or below this risk freezing produce and compromising texture.
For the freezer, set the high alarm at 8°F. Anything above 0°F is technically outside the recommended range, but a threshold of 8°F prevents nuisance alerts during normal compressor cycling while catching a genuine warming trend.
The 15-minute delay built into the AcuRite alarm system means these thresholds work practically — the alarm won’t trigger every time you load groceries, but will alert you if the temperature stays elevated long enough to represent a real food safety risk.
Reading the Min/Max Records
The min/max records stored by the AcuRite are the most diagnostically valuable data the unit provides. Reset the records after you’ve verified the fridge is performing normally, then leave the unit undisturbed for 24–72 hours.
Check the max temperature recorded for the fresh food compartment. If the max reading is at or above 40°F during normal operation — no extended power outage, no prolonged door opening — the refrigerator has a performance issue that needs investigation even if the current display looks fine.
A max reading above the alarm threshold that didn’t trigger the alarm indicates the high temperature event lasted less than 15 minutes — still worth noting, and worth investigating with the probe thermometer.
Step 2 — Verify Zone-by-Zone Accuracy With an Instant-Read Probe
The AcuRite provides a continuous picture of the middle-shelf temperature in both compartments. Accurate refrigerator temperature assessment also requires knowing how temperature varies across different zones — bottom shelf, door shelf, crisper drawers — because these zones routinely differ by 4–8°F from the middle shelf reading, and some food categories are particularly sensitive to these variations.
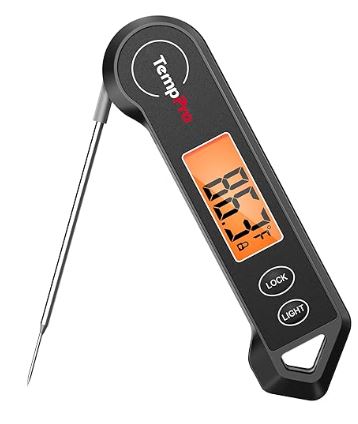
The ThermoPro TP19H Digital Instant Read Thermometer (View on Amazon) performs this zone-mapping efficiently. Its ±0.9°F accuracy from 14–212°F and 3–4 second response time let you take readings at multiple positions quickly — before the door-open warming effect skews the readings significantly. The temperature lock function holds the reading after the probe is removed, so you can record each position without leaning into the fridge. At $15–$20, it’s the most cost-effective precision probe available in this accuracy class.
Zone Temperature Map — What to Expect
With the fridge undisturbed for at least two hours, open the door and take rapid readings at each of the following positions, recording each before moving to the next. Allow 30–45 seconds per reading for stabilization.
| Zone | Expected Temperature | Food Safety Notes |
|---|---|---|
| Top shelf (near air vent) | 33–36°F | Coldest zone — good for raw meat, dairy |
| Middle shelf (center) | 35–38°F | Reference zone — target for AcuRite sensor |
| Bottom shelf | 37–41°F | Warmer — avoid raw meat storage here |
| Crisper drawers | 36–40°F | Designed for produce; humidity controlled |
| Door shelf (mid-height) | 40–45°F | Warmest zone — condiments only, not dairy or meat |
| Freezer center | 0°F or below | Safe frozen storage threshold |
A temperature spread of 8–10°F between the top shelf and door shelf is entirely normal and expected. The problem arises when the middle shelf — the zone your monitoring thermometer watches — reads 37°F but the bottom shelf or rear corners read 43–45°F. This indicates an airflow distribution issue, often caused by overloading blocking the air return path.
Calibrating the AcuRite Sensor Against the TP19H
Calibration verification ensures your continuous monitoring is reporting accurate absolute temperatures, not just tracking relative trends. To verify the AcuRite sensor against a known reference, use the TP19H ice water calibration method.
Prepare an ice water bath: fill a glass with crushed ice (at least 70% of volume) and add just enough cold water to fill the gaps. Stir for 30 seconds and wait 3 minutes for temperature equilibration. The equilibrated ice water mixture will be exactly 32°F at sea level. Insert the TP19H probe fully into the mixture without touching the glass — it should read 32.0°F ±0.9°F within 30 seconds. If it reads outside that range, use the TP19H’s built-in calibration function to zero it against 32°F.
Now place the AcuRite sensor in the same ice water bath (the sensor is suitably waterproof for this test). Wait 5–10 minutes for the wireless display to stabilize. Compare the AcuRite reading to 32°F. An offset of ±2°F is acceptable for this class of thermometer and within published specification.
An offset greater than ±3°F means your monitoring data is systematically biased — account for it when interpreting min/max records, and consider positioning the AcuRite sensor in the middle of the compartment (rather than near food) to reduce the impact of placement-related variation.
Step 3 — Spot-Check Surface Temperatures With an Infrared Thermometer
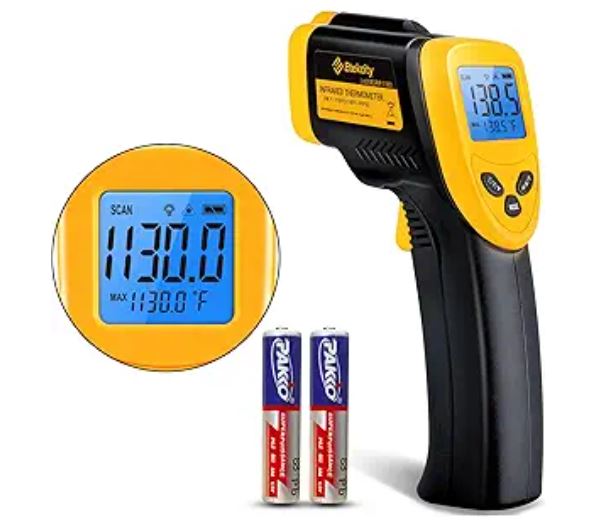
The Etekcity Lasergrip 1080 Infrared Thermometer (View on Amazon) adds a third measurement mode to refrigerator temperature verification — non-contact surface temperature scanning that reveals performance issues the probe thermometer and monitoring sensor can’t detect on their own.
Gasket Surface Check
With the fridge at operating temperature, scan the door gasket perimeter from 6–8 inches with the Lasergrip. The gasket surface should read at or near ambient room temperature consistently around its full perimeter. A localized cold spot — 10°F or more below surrounding areas — indicates a gasket seal failure allowing cold air to bleed through.
A leaking gasket doesn’t just raise operating temperature; it introduces humidity into the compartment, accelerates frost buildup in combination fridges, and forces the compressor to run longer, affecting the accuracy of your average temperature readings by increasing cycle amplitude.
Rear Panel Airflow Verification
Open the fridge door and scan the rear panel vents where cold air enters the fresh food compartment. The Lasergrip should read significantly below compartment temperature at an active vent — typically 20–30°F below the ambient compartment air during a cooling cycle.
A vent reading near compartment temperature indicates either the evaporator fan has stopped or ice has built up on the evaporator blocking airflow. In either case, the monitoring thermometer will accurately record that temperatures are rising, but the Lasergrip tells you why — the cold source is present but not being distributed.
Verifying After Adjustment
Whenever you adjust the temperature dial, use the AcuRite max/min records rather than the display to verify the change has taken effect. After an adjustment, reset the AcuRite records and wait 24 hours. If the new maximum has dropped below the previous maximum, the adjustment had the intended effect. If the maximum temperature is unchanged despite the dial being turned colder, the thermostat is not translating the dial position into meaningful compressor behavior — a sign the temperature control needs testing.
Accuracy Reference Standards
| Standard | Fresh Food Target | Freezer Target | Action Threshold |
|---|---|---|---|
| FDA Food Code | 41°F max | 0°F or below | Corrective action above threshold |
| USDA Recommendation | 35–38°F optimal | 0°F or below | Investigate if consistently above 40°F |
| WHO Food Safety | 5°C (41°F) max | -18°C (0°F) or below | Discard high-risk food if above threshold >4 hours |
| Commercial Kitchen Standard | 35–38°F | 0°F to -5°F | Documented temperature logs required |
The FDA and USDA don’t agree exactly on optimal fresh food temperature — the FDA’s Food Code sets 41°F as the safety ceiling, while the USDA recommends 35–38°F as the optimal operating range. For practical purposes, target 35–38°F.
A fridge consistently measuring 38–40°F is acceptable but worth monitoring closely. A fridge measuring above 40°F, even occasionally, represents a food safety risk that should be investigated.
Frequently Asked Questions
How do I know if my refrigerator thermometer is accurate?
Calibrate it against an ice water bath. Prepare a mixture of crushed ice and a small amount of cold water, stir, and wait 3 minutes to equilibrate. The mixture will hold at exactly 32°F regardless of ambient temperature. A properly calibrated thermometer reading within ±1–2°F of this reference is performing within specification. If your thermometer reads 35–36°F in ice water, it is reading 3–4°F warm everywhere — adjust your interpretation of its readings accordingly, or use the TP19H’s built-in calibration function to zero it against the ice water reference.
My fridge display says 37°F but the thermometer I put inside reads 42°F. Which is correct?
Your independent thermometer is more likely to be correct, particularly if it’s been calibrated against an ice water reference and placed at mid-shelf center position. The built-in sensor is positioned at the coldest zone in the compartment (near the evaporator outlet or air return), and its calibration drifts over time. A 5°F discrepancy between the built-in display and an independent thermometer at shelf level is not unusual on appliances more than 3–4 years old. Trust the independent reading, and turn the temperature dial toward colder settings until the independent thermometer stabilizes at 35–38°F.
How much temperature variation between zones is normal in a refrigerator?
A spread of 8–10°F between the coldest zone (top shelf near the air vent) and the warmest zone (door shelf) is normal and expected. What matters for food safety is that the zones where perishable food is stored — middle and upper shelves — stay within 35–38°F. Door shelves, which routinely run 40–44°F in many refrigerators, should contain only condiments, juices, and items with natural preservatives. Raw meat, dairy, and leftovers should never be stored on door shelves regardless of what the main thermometer reads.
How often should I reset the min/max records on the monitoring thermometer?
Reset the min/max records after any event that produced an expected temperature excursion — loading a large grocery shop, extended power outage, or servicing the appliance. During normal periods, leave the records running for 3–7 days at a time and review the maximum reading. A maximum that never exceeds 39°F during normal use confirms the fridge is performing consistently. A maximum that regularly hits 42–44°F — even if the current reading looks normal — tells you the fridge is routinely reaching unsafe temperatures during overnight cycles or during recovery after loading, and the root cause needs investigation.
Can I use the AcuRite sensor in both the fridge and freezer simultaneously?
Yes — the AcuRite 00986M ships with two sensors specifically for this purpose, one defaulted to refrigerator monitoring and one to freezer. Both sensors transmit to the same external display, which shows current, max, and min for each compartment simultaneously. Use lithium batteries in the freezer sensor for reliable operation at sustained sub-zero temperatures; alkaline batteries can lose capacity rapidly below 0°F. The display unit mounts magnetically to the fridge door or hangs on a wall within the 75-foot wireless transmission range.
Relevant: Why Refrigerator Temperature Keeps Fluctuating and How to Fix It
Conclusion on How to Check Refrigerator Temperature
Accurate refrigerator temperature measurement is a three-part process. The AcuRite 00986M gives you the continuous dual-compartment monitoring and min/max records to know what temperature your fridge actually reached overnight, during loading, and through every compressor cycle — not just at the moment you happened to look.
The ThermoPro TP19H gives you the precision instant-read capability to map zone-by-zone variation, catch the 5–8°F spread between top and bottom shelves, and verify your monitoring sensor is calibrated accurately. The Etekcity Lasergrip 1080 lets you check gasket integrity, airflow distribution, and condenser performance at the surface level — identifying the physical causes behind any temperature readings that don’t look right.
Together, these three tools cost less than the food waste from a single temperature excursion event, and provide a level of temperature confidence that the built-in display alone can never deliver.

Hi, I’m Barlgan! I created Repair Me Yourself to empower homeowners to tackle appliance repairs with confidence. From decoding error codes to fixing cooling issues, I break down complex repairs into simple, actionable steps that save you time and money.