Everyone remembers the first time they attempted an appliance repair without the right tools. Maybe it was trying to remove a panel screw with the wrong size screwdriver and stripping the head. Or reaching into a dark appliance cavity with a phone torch held between the teeth. Or replacing a part based on a symptom description alone — no testing, no confirmation — and discovering three days later that the original component wasn’t even the problem.
Bad experiences with appliance repair almost always trace back to one of two things: wrong diagnosis or wrong tools. This guide focuses on the second one — because the right toolkit doesn’t just make repairs easier, it makes correct diagnosis possible in the first place. Without the ability to test, measure, and inspect, you’re not repairing — you’re gambling.
The good news for beginners is that a genuinely capable home appliance repair toolkit doesn’t require a large investment or any prior technical experience to build. It requires choosing the right tools in the right order — tools that work together as a diagnostic and repair system rather than a random collection of hardware. This guide builds that system from the ground up, explaining what each tool does, why it earns its place, and exactly which models give beginners the best combination of capability, safety, and value.

Quick Reference: The Beginner’s Best Toolkit for Home Appliance Repair
| Tool | Primary Role | Recommended Model on Amazon |
|---|---|---|
| Digital multimeter | Electrical testing — continuity, voltage, resistance | Klein Tools MM450 Multimeter |
| Non-contact voltage tester | Safety — confirm power is off | Fluke 1AC-A1-II VoltAlert |
| Outlet tester | Outlet wiring verification | Sperry Instruments STK001 Outlet Tester |
| Screwdriver set | Panel removal, component access | DEKOPRO 258-Piece Screwdriver Set |
| Nut driver set | Hex-head fastener removal | Bondhus 7-Piece Nut Driver Set |
| Needle-nose pliers | Wiring connectors, small components | Klein Tools J203-8 Needle-Nose Pliers |
| Adjustable wrench | Water supply line connections | Channellock 812PW Adjustable Wrench |
| Appliance thermometer | Temperature verification | ThermoPro TP03B Digital Probe Thermometer |
| Infrared thermometer | Surface temperature scanning | Etekcity Lasergrip 800 Infrared Thermometer |
| Flashlight / headlamp | Visibility in dark spaces | Black Diamond Spot 400 Headlamp |
| Flexible inspection camera | Internal visual inspection | DEPSTECH 10FT Articulating Endoscope Camera |
| Magnetic parts tray | Fastener organisation | Olsa Tools Magnetic Parts Tray |
| Appliance repair manual app | Error codes, wiring diagrams | RepairClinic / PartSelect |
The Philosophy Behind This Appliance Repair Toolkit
Most beginner tool guides make the same mistake: they list tools in isolation without explaining how they work together. A screwdriver is a screwdriver. A multimeter is a multimeter. But in practice, effective appliance repair is a sequence — safety first, diagnosis second, access third, repair fourth, verification last — and each tool in a well-designed kit serves a specific role in that sequence.
This toolkit is built around that sequence rather than around categories of tools. Every item earns its place by doing something that no other item in the kit does. Nothing is included for completeness or to make the list look impressive. Everything here is something a beginner will actually reach for — repeatedly, across different appliances, in the first year of learning repair.
The total cost of the complete kit as recommended sits between $250 and $350, depending on where you buy and which price tier you choose within each category. That sounds like a significant investment until you consider that a single dishwasher service call typically costs $150–$250 in labor alone — and the first repair this kit helps you do correctly pays for a meaningful portion of it immediately.
Layer 1: Safety Tools — The Non-Negotiables
No tool in this kit matters more than the safety tools. Before any panel is removed, any wiring is touched, or any component is tested, you need absolute confirmation that the power is off and the outlet supplying the appliance is correctly wired. Skipping this step isn’t bravery — it’s the most common way experienced people get hurt.
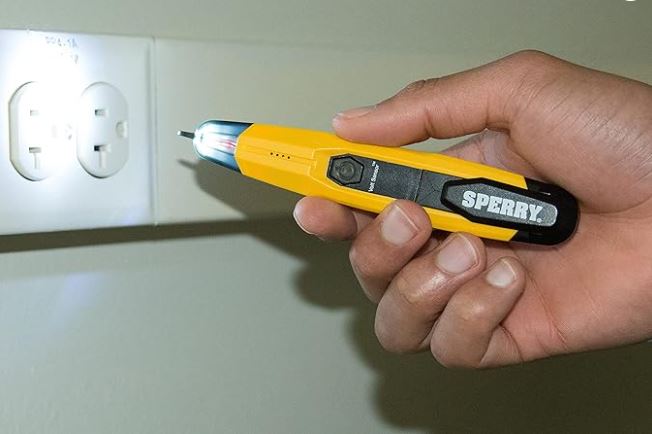
Non-Contact Voltage Tester
The non-contact voltage tester is the first tool you pick up before any repair begins — not the screwdriver, not the multimeter. It detects live AC voltage through the electromagnetic field surrounding a wire without any physical contact. Hold it near the power cord where it enters the appliance, near any terminal block, or near any wiring inside the machine. If voltage is present, it beeps and lights up. If it’s silent and unlit, you’re clear to proceed.
The Fluke 1AC-A1-II VoltAlert (View on Amazon) is the right choice here because safety tools are the one category where brand and build quality are non-negotiable. It auto-senses on pickup, auto-powers off when set down, has a slim tip for tight spaces, and carries a CAT III/IV safety rating that covers every residential electrical situation. At $20–$28, it’s the cheapest insurance you’ll ever buy.
Use it every single time. Before every repair. Even when you’re certain the power is off. The habit takes two seconds and the habit is the point.
Outlet Tester
The outlet tester is the first tool deployed before an appliance repair begins — plug it into the outlet the appliance uses and the indicator lights tell you instantly whether the outlet is correctly wired. Open ground, reversed polarity, open neutral — any of these wiring faults can cause appliances to behave erratically in ways that look like internal faults but are actually supply problems.
This matters more than most beginners realize. A misswired outlet is a relatively common finding, particularly in older homes, and diagnosing an appliance fault without ruling out the outlet first is the diagnostic equivalent of treating a patient without taking their history. The Sperry Instruments STK001 Outlet Tester (View on Amazon) costs under $15 and answers the outlet question definitively in three seconds.
Layer 2: Diagnostic Tools — The Brain of the Kit
Safety confirmed, the next priority is diagnosis. The single most important principle for beginners to internalize early is this: never replace a part without testing it first. Parts cost money. Return policies are awkward. And more importantly, replacing an untested part that turns out to be fine means the actual fault is still present and still undiagnosed. The diagnostic tools in this layer are what separate informed repair from expensive guesswork.
Digital Multimeter
The multimeter is the most important diagnostic tool in this entire kit — more important than any other single item. It measures three things that together diagnose the majority of appliance electrical faults: continuity (whether current can flow through a component), voltage (whether the correct supply is reaching a component), and resistance (whether a component’s electrical characteristics are within specification).
Continuity testing alone — which takes about 30 seconds per component — confirms or rules out failed heating elements, blown thermal fuses, faulty door switches, defective lid switches, and open temperature sensors. These five component types account for a substantial proportion of all common appliance failures across dryers, washing machines, refrigerators, ovens, and dishwashers. A beginner with a multimeter and the knowledge of how to use continuity mode is equipped to diagnose the majority of faults they’ll encounter in the first year.
The Klein Tools MM450 Multimeter (View on Amazon) is the right multimeter for beginners because it combines True RMS accuracy — important for modern appliances with inverter motors — with an auto-ranging function that removes the need to manually select measurement ranges, a large backlit display, a responsive continuity beeper, a temperature probe for thermostat testing, and a CAT III/IV 600V safety rating. It’s built to a standard that professional electricians trust, which means it will last through years of use rather than needing replacement when it encounters a real-world measurement challenge.
Beginners should invest an hour learning to use the multimeter on known-good components before attempting fault diagnosis — test a fresh battery (should read ~1.5V DC), test continuity on an intact piece of wire (should beep), and test the resistance of a light bulb filament (should show a specific resistance value). Building intuition on known quantities first makes fault diagnosis on unknown components immediately more interpretable.
Appliance Thermometer and Infrared Thermometer
Temperature is the second major diagnostic dimension after electrical testing — and for refrigerators, ovens, dryers, and dishwashers, it’s often the most immediately informative one. A refrigerator running 8°F above specification. An oven consistently 30°F below set temperature. A dryer exhaust 20°F hotter than normal. These temperature deviations tell you exactly which system is failing and in which direction before you open a single panel.
A digital probe thermometer — the ThermoPro TP03B Digital Probe Thermometer (View on Amazon) — measures interior air temperature accurately and quickly. It’s the right tool for checking refrigerator and freezer compartment temperature, oven cavity temperature during a bake cycle, and dishwasher wash water temperature. Its ±1°F accuracy and 4-second response time make it practical for real diagnostic work rather than rough estimation.
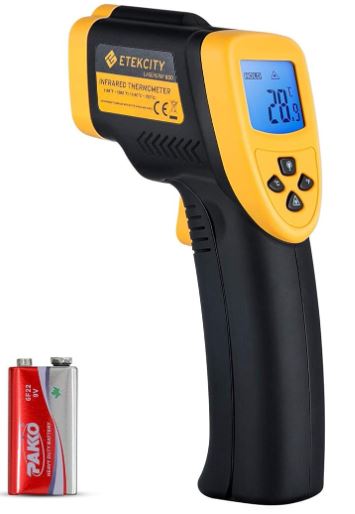
An infrared thermometer — the Etekcity Lasergrip 800 Infrared Thermometer (View on Amazon) — adds surface temperature measurement without contact. Aimed at refrigerator door gaskets, condenser coils, dryer exhaust vents, motor housings, and heating element surfaces, it reveals thermal patterns that probe thermometers can’t access. The combination of both thermometers — probe for air temperature, infrared for surface temperature — covers every appliance temperature diagnostic scenario a beginner will encounter.
Flexible Inspection Camera
An inspection camera belongs in the diagnostic layer rather than the access layer because its primary value is informational — it shows you what’s physically present inside the appliance before you decide whether and how to disassemble it. The difference between opening a washing machine knowing there’s a coin jammed between the drum and tub and opening it without that knowledge is the difference between a targeted 20-minute repair and a two-hour exploratory disassembly.
The DEPSTECH 10FT Articulating Endoscope Camera (View on Amazon) covers the access points of every common home appliance with its IP67 waterproofing, semi-rigid cable, and strong close-range image quality. It connects to both iOS and Android via WiFi and captures photos and video directly to your phone. For beginners specifically, the ability to see inside an appliance before opening it builds diagnostic confidence that makes every subsequent step less intimidating — you’re not guessing what you’ll find, you’re confirming what you already know is there.
Layer 3: Access Tools — Getting Inside Cleanly
With safety confirmed and diagnosis complete, the access tools get you physically inside the appliance without damaging it. This layer is where most beginners underinvest — using whatever screwdriver is closest rather than the right one — and where most cosmetic damage to appliances happens. Stripped screw heads, broken plastic clips, and scratched panels are almost always the result of using the wrong tool for the access task.
Screwdriver Set
A comprehensive screwdriver set for appliance work needs to cover three fastener types that appear consistently across all major appliance brands: Phillips head in sizes #1, #2, and #3; flathead in multiple widths; and Torx in sizes T10, T15, T20, T25, and T27. The Torx sizes are critical — major manufacturers including Samsung, LG, Bosch, and Whirlpool use Torx fasteners extensively on panels and component housings, and attempting to remove them with a Phillips driver strips the head immediately.
The DEKOPRO 258-Piece Screwdriver Set (View on Amazon) covers all of these, plus additional specialty bits that occasionally appear on appliance fasteners. The bits fit a standard handle and are organized in a case that makes finding the right size fast. It represents exceptional value for the breadth of fastener types covered.
A separate note on technique: use the correct size driver for each fastener, not the closest approximation. A Phillips #2 driver in a Phillips #1 screw head will strip it. A Torx T20 driver in a T15 socket will damage both. Taking ten seconds to confirm the correct driver size before applying any torque prevents the most common access-related appliance repair mistake.
Nut Driver Set
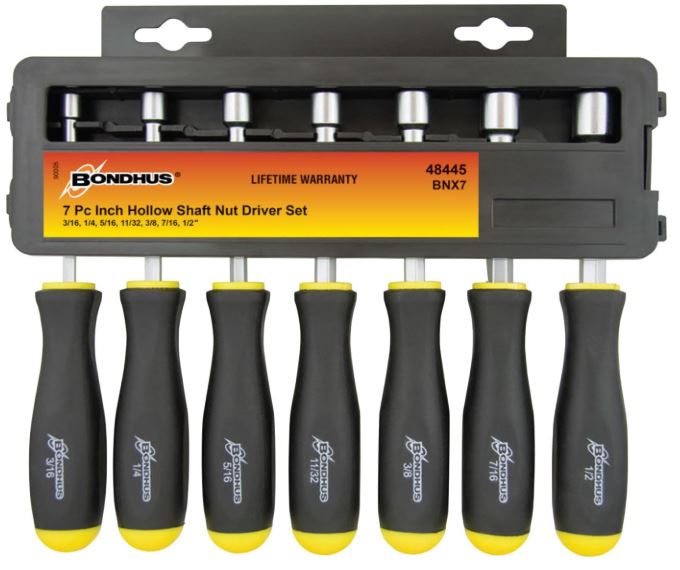
Many appliance component housings, motor mounts, and panel brackets are secured with hex-head screws that look like miniature bolts. These require nut drivers rather than screwdrivers — the wrong tool will either slip off entirely or damage the fastener head. A set covering ¼”, 5/16″, 11/32″, 3/8″, 7/16″, ½”, and 9/16″ covers the full range of hex fastener sizes found in residential appliances.
The Bondhus 7-Piece Nut Driver Set (View on Amazon) uses high-quality steel that grips hex heads securely without rounding. Magnetic tips hold fasteners on the driver during removal — a feature that becomes essential when working in tight spaces where a dropped screw disappears into the appliance interior.
Needle-Nose Pliers
Inside appliances, wiring connectors are the fasteners that require the most dexterity to work with — they’re small, often in tight locations, and require both a secure grip and the ability to release a locking tab simultaneously. Needle-nose pliers provide the reach and grip that fingers alone can’t manage in confined spaces. A pair with a built-in wire cutter adds the ability to trim damaged wire ends cleanly before splicing — a repair that comes up more often than beginners expect on older appliances.
The Klein Tools J203-8 Needle-Nose Pliers (View on Amazon) is a professional-grade pair built to the durability standard of a tool that will last 20 years in a home toolkit. The jaw profile is narrow enough for confined appliance interiors, and the spring-loaded opening reduces hand fatigue during extended use.
Adjustable Wrench
Dishwasher and washing machine repairs frequently involve water supply line connections — threaded fittings that connect supply hoses to inlet valves. An adjustable wrench handles the full range of these fitting sizes without requiring a complete socket set. The Channellock 812PW Adjustable Wrench View on Amazon) is a well-made adjustable wrench with a smooth jaw adjustment that grips fittings cleanly without slipping.
One important technique note: always use two wrenches on threaded plumbing connections — one to hold the fitting stationary and one to turn the nut — to avoid transferring torque to the appliance’s internal plumbing, which can crack plastic fittings.
Layer 4: Support Tools — The Difference Makers
These tools don’t fit neatly into safety, diagnostic, or access categories — but experienced repairers reach for them constantly, and beginners who include them from the start work noticeably faster and with fewer mistakes.
Flashlight and Headlamp
The interior of every appliance is dark. A phone torch pointed into a machine while you work with both hands is not a solution — it’s a compromise that makes every task harder and less safe. A dedicated headlamp keeps your hands free and directs light exactly where you’re looking without any effort.
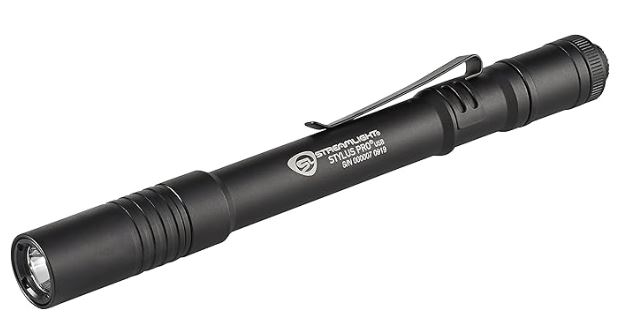
The Black Diamond Spot 400 Headlamp (View on Amazon) is a rechargeable LED headlamp with enough brightness for any appliance interior, a beam pattern adjustable from flood to spot, and a comfortable head mount that stays in place during extended repair sessions. Combined with a slim penlight like the Streamlight Stylus Pro Penlight (View on Amazon) for directing light into specific cavities, this covers every visibility need in appliance repair work.
Magnetic Parts Tray
The single most common cause of a repair taking twice as long as it should is a small screw rolling off a surface and disappearing. A magnetic parts tray holds every fastener removed during disassembly in a single organized location — and the magnetic base keeps it from being knocked over when you bump the work surface.
The Olsa Tools Magnetic Parts Tray (View on Amazon) is a robust option with a deep rim that prevents fasteners from rolling out under vibration. Use multiple trays for complex disassembly — one per panel removed, labeled with masking tape — so that reassembly becomes a straightforward reversal rather than a puzzle.
Repair Manual App and Online Resources
The most underestimated tool in any beginner’s kit costs nothing. RepairClinic and PartSelect both maintain free online databases of appliance wiring diagrams, error code libraries, disassembly guides, and component specifications searchable by model number. The model number — found on a label inside the door, behind a kick plate, or on the rear panel of most appliances — unlocks a complete technical reference for that specific machine.
Before attempting any repair, look up the appliance model on RepairClinic. Read the wiring diagram. Understand which components are in the circuit you’re investigating. Know the resistance specifications for the sensors and thermistors before you test them so you can interpret your multimeter readings against the manufacturer’s specifications rather than guessing whether a reading is normal.
YouTube repair channels — particularly Appliance Factory Parts, Word of Advice TV, and Bald and Bankrupt Home Repair — provide visual walkthroughs of specific repairs that complement the technical documentation. Watching someone remove the drum of the same washing machine model you’re about to open is worth more than any written guide for building disassembly confidence.
Starter Kit vs. Complete Kit: A Staged Investment Approach
Not every beginner needs everything on day one. Here’s a sensible staged approach that gets you functional immediately and adds capability as your experience grows.
Stage 1 — Core Diagnostic Kit ($100–$130)
This covers the safety verification and electrical diagnostic capability that handles the majority of appliance faults a beginner will encounter. Everything else builds on this foundation.
| Tool | Approx. Cost |
|---|---|
| Non-contact voltage tester | $24 |
| Outlet tester | $14 |
| Digital multimeter | $50 |
| Screwdriver set | $28 |
| Magnetic parts tray | $14 |
| Stage 1 Total | $130 |
Stage 2 — Visual and Temperature Diagnostics ($60–$90 additional)
Add these once you’ve completed two or three repairs with the Stage 1 kit and want to expand diagnostic capability into temperature measurement and visual inspection.
| Tool | Approx. Cost |
|---|---|
| Infrared thermometer | $18 |
| Digital probe thermometer | $12 |
| Headlamp | $38 |
| Inspection camera | $42 |
| Stage 2 Total | $110 |
Stage 3 — Full Access and Utility ($70–$100 additional)
Add these as specific repair tasks demand them — the nut driver and wrench become essential once you encounter hex fasteners and plumbing connections.
| Tool | Approx. Cost |
|---|---|
| Nut driver set | $22 |
| Needle-nose pliers | $24 |
| Adjustable wrench | $28 |
| Penlight | $20 |
| Stage 3 Total | $94 |
What the Complete Tool Kit Lets You Repair Appliances at Home
A beginner equipped with all three stages of this toolkit — and a willingness to consult RepairClinic and YouTube for appliance-specific guidance — is equipped to diagnose and repair the following faults independently across major home appliances.
On a dryer: heating element failure, thermal fuse failure, door switch fault, thermal limiter trip, drum belt failure, idler pulley failure, blower wheel obstruction, and exhaust duct blockage.
On a washing machine: lid switch or door latch failure, drain pump blockage or failure, motor coupling failure, water inlet valve fault, drum bearing wear assessment, and control board error code diagnosis.
In a refrigerator: defrost thermostat failure, evaporator fan motor fault, condenser fan motor fault, door gasket failure, thermistor fault, defrost timer failure, and drain channel ice blockage.
On a dishwasher: spray arm blockage, filter and sump debris accumulation, drain hose blockage, water inlet valve fault, door latch switch failure, and heating element failure.
On an oven or range: bake element failure, broil element failure, temperature sensor fault, igniter failure on gas ranges, and thermostat calibration assessment.
These faults collectively represent the vast majority of what residential appliance technicians are called out to repair — and they’re diagnosable and fixable by a careful beginner with the right tools and adequate reference material.
Frequently Asked Questions
What is the most important tool to buy first for appliance repair?
The non-contact voltage tester and the digital multimeter together form the essential core that everything else builds on. If budget forces a choice between the two for a first purchase, buy the voltage tester first — because it’s the safety gate that has to be in place before any other tool is used. Add the multimeter immediately after, as it’s the diagnostic instrument that transforms every subsequent repair from guesswork into evidence-based diagnosis.
Can a beginner really fix appliances without any prior experience?
Yes — with the right tools and reference material. The majority of common appliance faults involve failed components that are clearly identified by electrical testing and straightforward to replace with basic hand tools. The barrier isn’t technical complexity — it’s having the right tools to diagnose accurately and the right information to guide disassembly. Both are accessible to anyone willing to invest a few hours in learning the process.
Is it worth buying individual tools or a pre-assembled appliance repair kit?
Pre-assembled appliance repair kits sold as a single package almost universally compromise on tool quality — particularly on the multimeter and voltage tester, which are the two tools where quality and safety rating matter most. Building the kit from individual tools as recommended here gives you professional-grade safety and diagnostic instruments alongside practical hand tools, rather than a collection of items selected for margin rather than performance.
How long does it take to become competent at basic appliance repair?
Most beginners become comfortable with basic diagnosis and component replacement after two to three repairs completed with proper reference material. The first repair takes longest because the process is unfamiliar. By the third or fourth repair on the same appliance type, disassembly, testing, and reassembly feel systematic rather than daunting. Within six months of occasional appliance repair work, most people reach a level of competence that handles 70–80% of common household faults without assistance.
What tools are needed specifically for refrigerator repair?
The core kit covers most refrigerator diagnosis — the multimeter tests thermistors, defrost thermostats, fan motors, and compressor overload protectors. The infrared and probe thermometers assess temperature performance. The inspection camera accesses the drain channel and condenser area. One additional tool worth adding for refrigerators specifically is a set of quarter-turn ¼” hex bit drivers, as many refrigerator component brackets use ¼” hex screws that a standard screwdriver can’t access in the confined spaces behind refrigerator panels.
Should a beginner attempt microwave repairs?
No — and this deserves a direct answer. Microwave ovens contain a high-voltage capacitor that stores a lethal electrical charge even when the appliance is unplugged. This charge can remain present for hours or days after disconnection. Discharging it safely requires specific knowledge and equipment that goes beyond the scope of this toolkit. Microwaves are the one major home appliance category where professional service is genuinely the right recommendation for anyone without specific high-voltage training.
Conclusion on ‘Best Toolkit for Home Appliance Repair’
A beginner’s appliance repair toolkit isn’t about collecting tools — it’s about building a diagnostic and repair system where every item serves a specific purpose in a coherent workflow. The tools in this guide are not randomly assembled. They’re selected to work together across the safety, diagnosis, access, and support stages of every appliance repair a beginner is likely to encounter.
Start with Stage 1 — the voltage tester, outlet tester, multimeter, screwdriver set, and magnetic tray. These five items cost around $130 together and equip you to safely diagnose and access the majority of common appliance faults immediately. Add the visual and temperature tools in Stage 2 when you want to expand diagnostic capability. Complete the kit with Stage 3 as specific repairs demand it.
The first time you use this kit to correctly diagnose and replace a $15 thermal fuse that was causing a dryer to run without heat — a repair that would have cost $180 in service fees — you’ll understand exactly why building the right toolkit from the start is the most valuable investment a home repair beginner can make.
Browse beginner appliance repair tools on Amazon and start building your kit today.

Hi, I’m Barlgan! I created Repair Me Yourself to empower homeowners to tackle appliance repairs with confidence. From decoding error codes to fixing cooling issues, I break down complex repairs into simple, actionable steps that save you time and money.