Your refrigerator is running. The compressor kicks on and off at regular intervals. Everything sounds normal. But food is spoiling faster than it should, ice cream is soft, and you’re not sure whether the problem is the appliance or just how it’s being used. Before you call a technician or start replacing parts, there’s a faster and cheaper first step: measure the actual temperature.
Most people assume their fridge is at the right temperature because the dial is set correctly. That assumption is often wrong. Thermostats drift, door seals degrade, evaporator coils ice over, and defrost systems fail — all without any obvious external sign. The only way to know what’s actually happening inside your refrigerator or freezer is to measure it directly.
An infrared thermometer gives you instant, non-contact surface temperature readings across every zone of your fridge or freezer in minutes. It’s not the only temperature testing tool you’ll need — and this guide explains why — but for a fast, systematic first pass at refrigeration diagnosis, it’s genuinely hard to beat.
Quick Reference: Best Infrared Thermometers for Fridge and Freezer Testing
| Infrared Thermometer | Temperature Range | D:S Ratio | Accuracy |
|---|---|---|---|
| Etekcity Lasergrip 800 | -58°F to 1382°F | 12:1 | ±1.5°F |
| Klein Tools IR1 | -4°F to 752°F | 10:1 | ±2°F |
| Fluke 62 MAX | -22°F to 1202°F | 10:1 | ±1.5°F |
| Etekcity Lasergrip 1080 | -58°F to 1022°F | 12:1 | ±1.5°F |
Why Temperature Testing Matters for Fridge and Freezer Diagnosis
Refrigerators and freezers operate within narrow temperature bands that directly affect food safety, energy efficiency, and component longevity. A fridge that runs 5°F warmer than it should isn’t just a mild inconvenience — it accelerates bacterial growth, shortens food shelf life, and signals an underlying fault that will worsen over time.
The FDA recommends refrigerator temperatures at or below 40°F and freezer temperatures at 0°F. Most manufacturers calibrate their thermostats to maintain 35–38°F in the fresh food compartment. When temperatures drift outside these ranges, something has failed — and temperature measurement is step one in finding out what.
Common faults that temperature testing reveals include a failing door gasket that allows warm air infiltration, a defrost thermostat stuck open that allows frost buildup on the evaporator coil, a condenser that’s dirty and unable to dissipate heat efficiently, a thermistor sending incorrect temperature readings to the control board, and a failing compressor or refrigerant leak causing inadequate cooling. Every one of these faults produces a specific temperature pattern that an infrared thermometer — combined with a probe thermometer — helps you identify.
Infrared Thermometer vs. Probe Thermometer: Understanding the Difference
This is a distinction that matters enormously for refrigeration diagnosis, and it’s worth spending a moment on before getting into specific models.
An infrared thermometer measures surface temperature — the temperature of whatever object you’re pointing it at. It reads quickly, requires no contact, and lets you scan multiple surfaces in seconds. It’s ideal for checking the temperature of evaporator coils, condenser coils, freezer walls, door panels, and the air outlet vents inside the fridge.
A probe thermometer — either a dial type or digital with a stem — measures air temperature or the internal temperature of food and liquids. It gives you the ambient temperature inside the compartment, which is what food safety standards are based on.
For thorough refrigerator and freezer diagnosis, you need both. The infrared thermometer tells you what’s happening at specific surfaces — is the evaporator coil reaching the correct temperature? Is the condenser coil too hot? Are the door edges warming up, suggesting a gasket leak? The probe thermometer tells you the overall compartment temperature, which is the end result of everything working correctly or failing.
Neither tool replaces the other. Used together, they give you a complete thermal picture of your refrigeration system.
What to Look for in an Infrared Thermometer for Fridge Testing
Low Temperature Range
This is the most important spec for refrigeration work and the one most buyers overlook. Many infrared thermometers are designed primarily for high-temperature applications — cooking, HVAC, industrial work — and their accuracy degrades significantly at the low end of their range. For fridge and freezer testing you need accurate readings from around -20°F to 40°F (-29°C to 4°C). Check the stated accuracy at low temperatures specifically, not just the headline range.
Distance-to-Spot Ratio
The distance-to-spot (D:S) ratio tells you how large the measurement area is relative to your distance from the target. A 12:1 ratio means the infrared thermometer measures a spot 1 inch in diameter at 12 inches distance. For refrigerator work — where you’re often measuring from 6 to 18 inches away in a confined space — a 10:1 or 12:1 ratio gives you enough precision to target specific components without measuring an area so large it averages out the reading you need.
Accuracy Specification
Consumer-grade infrared thermometers typically claim ±1.5°F to ±2°F accuracy. For refrigeration diagnosis, ±2°F is workable but tight — because you’re measuring within a range where 2°F represents a meaningful difference from specification. Look for ±1.5°F or better if you want readings you can interpret with confidence.
Emissivity Adjustment
Emissivity is the measure of how efficiently a surface radiates infrared energy. Shiny metal surfaces — like evaporator coils and condenser fins — have low emissivity, which causes infrared thermometers to read significantly colder than the actual surface temperature. A thermometer with adjustable emissivity lets you correct for this. Most consumer models have fixed emissivity around 0.95, which is accurate for most non-metallic surfaces but will give misleading readings on bare metal. If you plan to measure evaporator or condenser coils directly, either use a model with adjustable emissivity or apply a small piece of black electrical tape to the surface first and measure the tape.
Response Time
Faster response time means you can scan multiple surfaces quickly without waiting for the reading to stabilize. For refrigerator diagnosis where you’re sweeping across door seals, vent positions, and wall panels, a response time of 0.5 seconds or less keeps the process efficient.
Display Backlight
You’ll be measuring inside a dark refrigerator with the door open. A backlit display is a practical necessity, not a luxury feature. Check that the backlight is bright enough to read clearly under ambient lighting conditions.
The Best Infrared Thermometers for Fridge and Freezer Testing
Etekcity Lasergrip 800 — Best Budget Pick
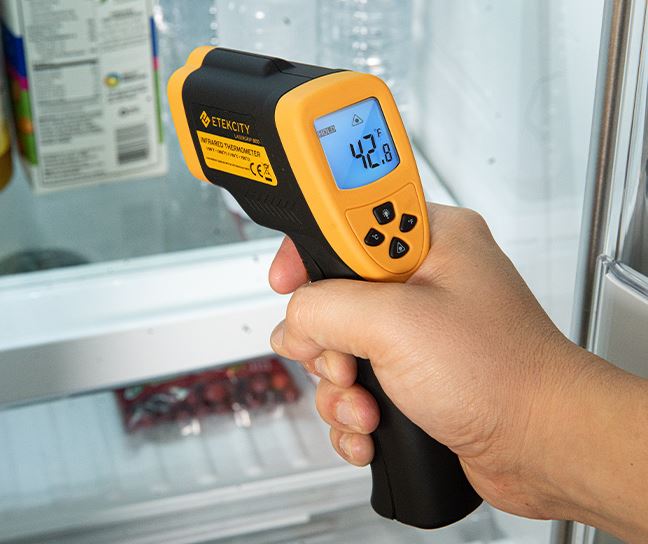
The Etekcity Lasergrip 800 Infrared Thermometer (View on Amazon) is one of the most widely used infrared thermometers in the consumer market, and for good reason. It covers -58°F to 1382°F with ±1.5°F accuracy, has a 12:1 D:S ratio, and a clear backlit display. The low-temperature performance is genuinely solid for a sub-$22 device — it reads accurately within refrigerator and freezer ranges without the significant drift you see in cheaper alternatives.
It has fixed emissivity at 0.95, which means bare metal readings will be off — but for door panels, plastic interior walls, food surfaces, and vent areas, it’s accurate and reliable. The trigger-and-point operation is intuitive enough for anyone to use immediately. For a first infrared thermometer aimed primarily at fridge and freezer checking, the Lasergrip 800 delivers genuine value.
Etekcity Lasergrip 1080 — Best Mid-Budget Pick
The Etekcity Lasergrip 1080 Infrared Thermometer (View on Amazon) is the step-up version of the 800, adding a dual laser for better targeting precision and a slightly more robust build. The measurement range and accuracy are similar, but the dual laser makes it easier to see exactly where you’re measuring — particularly useful when you’re targeting a specific zone inside a crowded fridge interior. At $25–$35, it’s a modest upgrade that adds meaningful precision for not much more money.
Klein Tools IR1 — Best Mid-Range Pick
The Klein Tools IR1 Infrared Thermometer (View on Amazon) brings professional build quality into the mid-range price tier. It covers -4°F to 752°F — a range optimized more for electrical and HVAC work than extreme industrial temperatures, which suits appliance diagnosis well. Accuracy is ±2°F and the 10:1 D:S ratio is appropriate for the distances involved in fridge testing.
What sets the IR1 apart from budget options is build durability and the brand’s commitment to accuracy consistency across the temperature range. Klein Tools calibrates and tests its instruments to trade standards, which means the stated specs reflect real-world performance rather than best-case laboratory conditions. If you already own Klein Tools electrical equipment, the IR1 integrates naturally into that kit.
Fluke 62 MAX — Best for Serious DIY and Semi-Pro Use
The Fluke 62 MAX Infrared Thermometer (View on Amazon) is where consumer-grade accuracy meets professional-grade build quality. It offers ±1.5°F accuracy with a 10:1 D:S ratio, covers -22°F to 1202°F, and is rated IP54 for dust and splash resistance — which matters when you’re working around defrost water and condensation inside refrigerators. The dual laser provides a clear targeting circle rather than a single dot, giving you a much better sense of the measurement area at any given distance.
Fluke instruments are factory-calibrated to NIST-traceable standards, which means accuracy claims are meaningful and consistent. If you’re diagnosing refrigeration problems seriously — perhaps across multiple appliances or as part of regular home maintenance — the 62 MAX+ is an investment that will serve you for years.

How to Test a Fridge and Freezer with an Infrared Thermometer
The power of an infrared thermometer in refrigeration diagnosis comes from systematic surface scanning rather than single-point measurement. Here’s how to approach it methodically.
Start with the door gaskets. Run the infrared thermometer along the entire perimeter of both the fridge and freezer door gaskets while the doors are closed — you’ll need to measure from the side through a narrow gap, or briefly open the door and scan the gasket surface itself. Warm spots along the gasket perimeter indicate where the seal is failing and allowing warm air infiltration.
Next, measure the interior wall temperatures in multiple zones. The back wall near the evaporator should be the coldest point in the fridge compartment, typically 5–10°F colder than the ambient interior air. Uniformly warm readings across the back wall when the compressor has been running suggest evaporator frost buildup or a failed defrost cycle.
Check the air vents — the openings through which cold air circulates from the freezer into the fresh food compartment. These should be distinctly colder than the surrounding interior. If they’re reading close to ambient interior temperature, airflow is restricted — either from frost buildup, a failed evaporator fan, or a blocked vent.
Access the condenser coils (usually at the back or underneath the fridge) and scan their surface temperature. A condenser running significantly hotter than ambient room temperature — more than 20–30°F above room temperature — indicates restricted airflow from dirty coils or a failing condenser fan.
Finally, compare your surface readings against probe thermometer readings of the interior air. A large gap between a cold back wall surface and a warm interior air temperature often points to a fan problem rather than a refrigerant or compressor issue.
Recommended Companion Tools for Complete Refrigeration Testing
| Tool | Role in Diagnosis | Recommended Model |
|---|---|---|
| Digital Probe Thermometer | Interior air temperature measurement | ThermoPro TP03 |
| Multimeter | Defrost thermostat / thermistor testing | Klein Tools MM400 |
| Clamp Meter | Compressor current draw | Klein Tools CL390 |
| Refrigerator Door Gasket Test Kit | Gasket seal integrity | Magnetic card / paper test |
| Flashlight / Headlamp | Visibility in dark compartments | Black Diamond Spot |
Frequently Asked Questions
Can an infrared thermometer accurately measure the inside of a fridge?
Yes, with one important qualification. An infrared thermometer measures surface temperatures accurately — door panels, interior walls, evaporator coil surfaces, and food surfaces. It does not directly measure air temperature. For the most complete picture of refrigerator performance, use the infrared thermometer for surface scanning and a digital probe thermometer for ambient air temperature measurement inside the compartment.
What temperature should my fridge and freezer read on an infrared thermometer?
Interior wall surfaces in a correctly functioning refrigerator typically read 33–40°F in the fresh food compartment and -5°F to 5°F in the freezer. The back wall near the evaporator will read colder than other surfaces. These are surface readings — ambient air temperature inside the compartment, measured with a probe thermometer, is what food safety standards (below 40°F for fridge, 0°F for freezer) are based on.
Why does my infrared thermometer give different readings on metal surfaces inside the fridge?
Shiny metallic surfaces have low emissivity — they reflect infrared energy rather than emitting it proportionally, which causes infrared thermometers to read colder than the actual surface temperature. Most consumer IR thermometers are calibrated for emissivity around 0.95, which is accurate for plastic, food, and painted surfaces but not for bare metal. To get accurate readings on metal evaporator or condenser coils, apply a small piece of black electrical tape to the surface and measure the tape instead.
How do I know if my fridge’s temperature problem is a gasket, thermostat, or evaporator issue?
Temperature patterns tell the story. Warm spots specifically along door edges indicate gasket failure. Uniformly elevated temperatures throughout the fridge with frost buildup on the back wall point to a defrost system failure. Consistently warm temperatures despite a running compressor with no frost buildup suggest a refrigerant or compressor issue. An infrared thermometer helps you identify which pattern is present, which then guides which specific component to test with a multimeter.
Is an infrared thermometer enough on its own to diagnose a fridge problem?
It’s an excellent starting point but not a complete diagnostic tool on its own. It tells you where temperatures are abnormal. To confirm why they’re abnormal — whether a defrost thermostat has failed, a thermistor is out of spec, a fan motor has seized, or a compressor is underperforming — you need a multimeter for component testing and a clamp meter for load assessment. Think of the infrared thermometer as the tool that tells you where to look, and the multimeter as the tool that confirms what’s wrong.
Can I use a cooking infrared thermometer for appliance testing?
You can use it for basic surface temperature checks, but cooking-focused IR thermometers are typically optimized for high-temperature accuracy — their stated accuracy may not hold at refrigeration temperatures. Check the low-temperature accuracy specification specifically. A thermometer that’s accurate to ±2°F at 500°F may be ±5°F or worse at 35°F. For reliable refrigeration work, use a model whose accuracy is specified at low temperatures.
How often should I check my fridge temperature?
A quick temperature check every three to six months is a practical maintenance habit — particularly for older appliances or after any change in performance like unusual noises, increased energy bills, or food spoiling faster than normal. It takes five minutes and can catch a developing fault — a weakening door gasket, early defrost system drift — before it becomes a costly repair.
Conclusion
An infrared thermometer is not the only tool you need to diagnose refrigerator and freezer problems — but it’s one of the fastest and most informative first steps available. The ability to scan door gaskets, evaporator surfaces, condenser coils, and interior zones in minutes, without moving food or disassembling anything, turns a vague symptom into a specific set of surfaces worth investigating further.
For most home users, the Etekcity Lasergrip 800 or 1080 provides reliable performance at a price that makes the decision easy. Step up to the Klein Tools IR1 or Fluke 62 MAX+ if you want professional-grade accuracy consistency and build quality that will last through years of regular use.
Pair your infrared thermometer with a digital probe thermometer for air temperature, a multimeter for component testing, and a clamp meter for compressor load assessment — and you have a complete refrigeration diagnostic toolkit that covers the full range of common fridge and freezer faults without a service call.
Browse infrared thermometers on Amazon and find the right model for how and where you work.

Hi, I’m Barlgan! I created Repair Me Yourself to empower homeowners to tackle appliance repairs with confidence. From decoding error codes to fixing cooling issues, I break down complex repairs into simple, actionable steps that save you time and money.