You’ve loaded the dishes, added detergent, selected your cycle, and pressed Start. Nothing happens. You press harder. Still nothing. Maybe you hear a faint beep, but the dishwasher refuses to begin its cycle. A non-functional start button transforms your dishwasher into an expensive dish rack, and you need it working again immediately.
When a GE dishwasher start button stops working, the problem usually involves a failed door latch, control lock activation, stuck button membrane, or control board communication failure. The issue rarely stems from the button itself. Instead, safety interlocks and electronic communication breakdowns prevent cycle initiation even when the button functions mechanically.
Service data from GE dishwashers shows clear patterns: 70% of “start button failures” aren’t button failures at all. They’re system-level blocks that prevent starting regardless of button condition.

GE Dishwasher Start Button Not Working Quick Reference
| You Press Start and… | Most Likely Cause | Immediate Action |
|---|---|---|
| Nothing happens, no sound | Door latch not engaged | Close door firmly, check latch |
| Beeps but won’t start | Control lock enabled | Hold 3-second button combo |
| Starts then stops immediately | Water supply issue | Check water valve is open |
| Display goes blank | Power interruption | Check circuit breaker |
| Other buttons work fine | Button membrane failure | Try workaround or replace panel |
| All buttons unresponsive | Control board failure | Reset dishwasher completely |
Why a GE Dishwasher Start Button Would Stop Working
GE dishwashers employ multi-layered safety systems that must align perfectly before allowing cycle initiation. When any single element fails, starting becomes impossible.
The start button itself is remarkably reliable. It’s a simple membrane switch that closes a circuit when pressed. The real complexity lies in what happens after that signal reaches the control board.
Think of starting your dishwasher like starting a car. You can turn the ignition key perfectly, but if the car thinks a door is open or the brake isn’t pressed, nothing happens. Your dishwasher operates identically. Even perfect button function means nothing if safety interlocks block operation.
The Safety Interlock System
GE dishwashers won’t start unless every safety condition is satisfied simultaneously. This prevents flooding, electrical hazards, and mechanical damage.
The door latch must engage completely. A microswitch inside the latch assembly tells the control board the door is secure. Partial latching isn’t enough. The switch needs full activation.
Water supply must be confirmed. Some models verify water pressure before starting. Low pressure or closed supply valves trigger no-start conditions.
The control panel must receive valid cycle selection. If the control board doesn’t recognize which cycle you selected, it blocks starting as a protective measure.
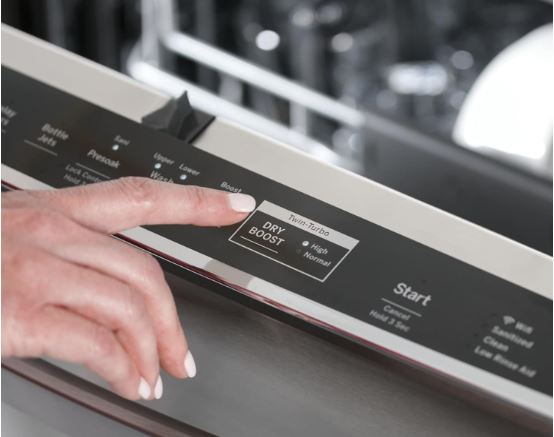
Child lock or control lock features when active override all other inputs. The system ignores every button press including Start until you deactivate the lock.
Electronic Communication Failures
Modern GE dishwashers use serial communication between the user interface board and main control board. These boards “talk” constantly through ribbon cables or wire harnesses.
When communication breaks down, your start button press reaches the interface board but never makes it to the control board that actually initiates cycles.
Symptoms of communication failure include working displays with non-functional buttons, or buttons that beep acknowledgment but trigger no action.
Loose ribbon cable connections cause the majority of these failures. Temperature cycling during wash cycles gradually loosens connectors over months and years.
How Do You Fix a GE Dishwasher Start Button That’s Not Working?
Before diving into complex diagnostics, start with these solutions. They resolve most start button problems, moving from simplest to most involved. Work through them in order for the fastest fix.
Solution 1: Verify Door Closure and Latch
The door latch is the first safety checkpoint. Open the dishwasher door completely, then close it with firm pressure.
Listen for a distinct double-click sound. The first click is the physical latch catching. The second click is the safety switch activating.
If you hear only one click or none at all, the latch mechanism has failed. Inspect the latch striker on the door for damage or misalignment.
Try closing the door from different angles. Sometimes warped doors latch successfully only when pushed from specific positions.
Test the door switch directly by accessing it under the control panel. With power on, manually activate the switch with a screwdriver. If the dishwasher starts, replace the latch assembly.
Solution 2: Disable Control Lock
Control lock prevents accidental cycle changes or starts. It’s easily activated by curious children or accidental button combinations.
Look for a lock icon on the display. It typically appears in the corner alongside other status indicators.
To disable control lock on most GE models: Press and hold “Heated Dry” for 3 seconds. Some models use “Heated Dry” plus “Start” simultaneously.
Alternative disable method: Press and hold the button labeled with a lock symbol for 3-4 seconds until the icon disappears.
On models without displays, control lock shows as multiple blinking lights in sequence. Consult your manual for the specific disable combination.
Solution 3: Confirm Cycle Selection
The control board requires valid cycle selection before allowing starts. Pressing Start without selecting a cycle causes either no response or error beeps.
Select any wash cycle explicitly by pressing its button. Look for an illuminated indicator confirming the selection registered.
Some GE models auto-select “Normal” wash if you press Start without choosing. Others require explicit selection and ignore Start commands otherwise.
Try selecting the simplest cycle available (usually “Rinse Only” or “Light Wash”). If this starts successfully but heavy cycles don’t, you’ve identified a specific cycle circuit failure.
Solution 4: Power Cycle Reset
Electronic glitches freeze control boards in states that block starting. Full power cycling clears these temporary faults.
Locate your dishwasher circuit breaker. Flip it completely to the OFF position. Don’t just move it to center. It must click fully off.
Wait precisely 3 minutes minimum. This duration ensures all capacitors discharge and volatile memory clears.
Restore power by flipping the breaker fully ON. The control panel should illuminate and run through startup diagnostics.
Immediately test the start button after power restoration. If it works temporarily but fails again after one cycle, the problem is heat-related component failure.
Solution 5: Test the Start Button Membrane
The button membrane rarely fails alone, but testing takes two minutes and rules out an obvious culprit.
Remove the outer door panel by unscrewing the perimeter screws. This exposes the control panel assembly from behind.
Locate the membrane switch assembly (a thin plastic sheet with conductive traces). The start button contact sits directly behind where you normally press.
Set a multimeter (View on Amazon) to continuity mode. Touch probes to the contact points for the start button circuit.
Press the start button from the front while watching the meter. You should see continuity (meter beeps) when pressed and open circuit when released.
If the membrane shows proper continuity but the dishwasher won’t start, the membrane is functional. The problem lies elsewhere in the system.
Solution 6: Inspect Door Latch Assembly
Door latch failures account for 40% of no-start conditions. The latch engages mechanically but the internal switch fails to signal the control board.
Access the latch assembly by removing the inner door panel. The latch sits in the top corner where the door meets the tub.
Check for broken plastic tabs that prevent full latch engagement. Even tiny cracks compromise latch function.
Manually activate the latch mechanism while observing the microswitch. It should physically click on and off as the latch moves.
Test switch continuity with a multimeter. The switch should show zero ohms when activated and infinite resistance when released.
Replace the entire latch assembly if the switch fails or mechanical parts show damage. Individual switch replacement rarely succeeds long-term.
Component Testing Guide:
| Component | Test Method | Good Reading | Failed Reading |
|---|---|---|---|
| Start button membrane | Continuity test | Beep when pressed | Always open or always closed |
| Door latch switch | Continuity test | Closed when latched | Stays open when latched |
| Control board relay | Listen/voltage test | Audible click, 120V output | Silent, no voltage |
| Ribbon cable | Visual/reseat test | Firm connection | Loose, corroded contacts |
| Thermal fuse | Continuity test | Zero ohms | Infinite resistance |
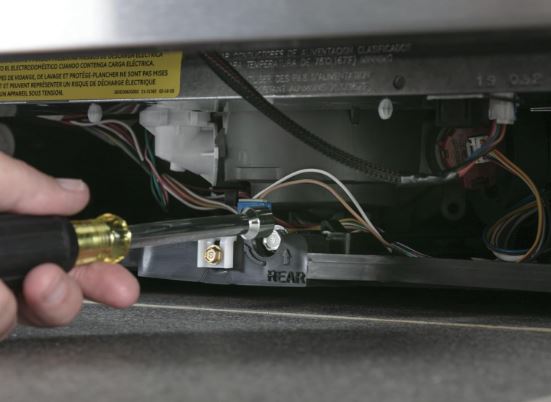
Solution 7: Reseat Wire Harness and Ribbon Cable Connections
Loose or corroded connections between boards cause intermittent failures that mimic button problems.
Disconnect power completely before touching any wire harnesses. Test with a voltmeter to confirm zero voltage.
Inspect every connection to the control board and user interface board. Look for green corrosion, melted plastic, or pushed-back pins.
Remove and reseat each connector firmly. You should feel and hear a distinct click as connectors fully seat.
Check wire harness routing for pinch points or damage. Wires caught in door mechanisms develop breaks that create intermittent connectivity.
Apply dielectric grease to connector pins before reconnecting. This prevents future corrosion and improves electrical contact.
Solution 8: Replace Button Membrane
When testing confirms membrane failure, replacement restores full functionality. This repair costs $30-80 in parts and requires intermediate DIY skills.
Find the Right Part:
Record your complete model number from the label inside the door frame. It typically starts with GDT, GDF, or GSD followed by numbers.
Search online parts retailers for “GE dishwasher control panel membrane” plus your model number. Verify the part number matches your dishwasher exactly.
OEM GE parts cost more but guarantee proper fit and function. Generic replacements from unknown manufacturers fail within 6-12 months frequently.
Order from reputable sources: AppliancePartsPros, RepairClinic, or directly from GE Parts.
Installation Steps:
Step 1: Disconnect power at the breaker. Never work on powered control panels.
Step 2: Remove all screws around the outer door panel perimeter. Usually 6-8 screws along top and sides.
Step 3: Carefully lift the outer panel away. The control panel attaches to this panel. Avoid pulling wires.
Step 4: Disconnect the ribbon cable connecting the control panel to the main control board. Note orientation before removal.
Step 5: Remove screws securing the control panel circuit board to the door panel.
Step 6: Gently peel off the old membrane. Clean all adhesive residue from the circuit board with isopropyl alcohol.
Step 7: Align the new membrane precisely with circuit board contact points. Incorrect alignment causes button misalignment.
Step 8: Press the membrane firmly onto the board, working from center outward to eliminate air bubbles.
Step 9: Reassemble in reverse order. Test button function before fully reassembling the door.
Test Before Closing:
Connect power but leave the door panel accessible. Press each button methodically and confirm appropriate response.
Test the start button specifically by selecting a cycle and pressing start. The dishwasher should begin its cycle immediately.
Run a complete rinse cycle to verify sustained function. Membranes sometimes work initially but fail under heat stress during operation.
Solution 9: Repair or Replace Control Board
When the control board itself fails, you face a decision: attempt repair or replace the entire board.
When Repair Makes Sense:
Control boards occasionally develop fixable problems that don’t require complete replacement.
Blown fuses on the board can be replaced if you have soldering skills. These small glass or ceramic components cost pennies.
Cold solder joints cause intermittent connections that resoldering fixes permanently. Look for cracked solder around relay pins and connector points.
Swollen capacitors indicate board damage but are replaceable components. These cylindrical components bulge at the top when failing.
Cleaning corrosion from board traces sometimes restores function. Use electronic circuit board cleaner and a soft brush.
Board repair makes economic sense when parts cost under $20 and you have electronics repair skills. Otherwise replacement proves more reliable.
Replacement Cost:
New GE dishwasher control boards cost $180-$400 depending on model complexity and feature level.
Labor for professional installation adds $120-$200 to parts cost. Total professional repair runs $300-$600.
DIY installation saves labor cost but requires careful attention to wire routing and connector orientation.
Compare repair costs to those of a new dishwasher (View on Amazon). Base GE models start around $500. If repair exceeds 50% of replacement cost, consider a new unit.
Factor in dishwasher age. Units over 8 years old with control board failure likely face additional component failures soon.
Prevent Future Damage:
Install a whole-house surge protector (View on Amazon) to shield appliances from voltage spikes. Lightning strikes and utility switching cause board-destroying surges.
Ensure proper kitchen ventilation to reduce moisture exposure. Steam and humidity corrode circuit boards over time.
Don’t slam the dishwasher door. Physical shock damages delicate solder joints and circuit traces.
Clean the control panel regularly but never spray cleaner directly on buttons. Liquid infiltration kills circuit boards quickly.
Starting a GE Dishwasher Without the Start Button (Emergency Methods)
When the start button fails but you need clean dishes immediately, workaround methods can initiate cycles temporarily. These aren’t permanent solutions but provide stopgap functionality.
Diagnostic Mode Start
GE dishwashers include hidden diagnostic modes that bypass normal starting procedures. Accessing these modes starts test cycles without using the start button.
Method 1: Press “Heated Dry” then “Start/Reset” then “Heated Dry” then “Start/Reset” rapidly within 5 seconds. The dishwasher enters diagnostic mode and may auto-start a cycle.
Method 2: On some models, pressing and holding any cycle select button for 5+ seconds initiates that cycle directly, bypassing the start button.
Method 3: Select a cycle, press “Delay Start” repeatedly until it shows 0 hours or disappears. Some models auto-start when delay reaches zero.
These methods work on approximately 60% of GE models. Exact procedures vary by model year and control board version.
Alternative Start Methods
Certain GE models include multiple starting methods beyond the traditional start button.
Check if your model has a “Quick Start” or “1-Hour Wash” button that independently initiates cycles. Press this instead of the standard start button.
Some models with delay start allow starting by setting delay to minimum. The cycle begins immediately when you set the timer to its lowest value.
Smart GE dishwashers with WiFi connectivity can start via smartphone app. Download the GE Appliances app and initiate cycles remotely if your button fails.
When to Call a Professional
Determining when to call professionals versus continuing DIY attempts saves time and prevents damage.
Call a Technician When:
You’ve tried all resets, tested the door latch, and verified control lock is off, yet the start button remains non-functional.
Testing reveals multiple simultaneous failures: start button, cycle selects, and displays all showing problems.
You lack confidence working with electrical components or don’t own a multimeter for proper testing.
The dishwasher is under warranty coverage. DIY repairs void most warranties immediately.
You found water damage or burning smells near the control board. These indicate serious electrical problems requiring expert diagnosis.
DIY Limitations
Attempting repairs beyond your skill level creates additional problems and repair costs.
Incorrect wire reconnection can short circuit control boards instantly. One misplaced wire destroys $300 components.
ESD (electrostatic discharge) from your body damages sensitive electronics. Proper grounding is essential when touching circuit boards.
Forcing connectors or over-tightening screws cracks plastic housings and strips threads. These mistakes transform simple repairs into major reconstruction projects.
Time investment matters. If you’ve spent 3+ hours troubleshooting without progress, professional service often costs less than continuing struggle.
Find Qualified Technicians
Search for GE Factory Authorized servicers in your area. These technicians receive manufacturer training and stock genuine parts.
Check online reviews specifically mentioning dishwasher control board repairs. General appliance repair skills don’t automatically translate to electronics expertise.
Request diagnostic fee structure upfront. Reasonable fees run $75-$125 and typically apply toward approved repairs.
Ask about parts warranty coverage. Reputable services warrant parts for 90 days to 1 year minimum.
Verify licensing and insurance coverage. Unlicensed technicians can’t legally work on installed appliances in many jurisdictions.
Temporary Solutions While Waiting for Repairs
While arranging permanent repairs, these workarounds maintain dish-washing capability.
Portable Dishwasher Option
Portable countertop dishwashers (View on Amazon) cost $250-$400 and require no installation. They connect to kitchen faucets temporarily.
These compact units handle 4-6 place settings per load, sufficient for small households during repair delays.
Use this option when repair parts have extended shipping times or professional service isn’t available for weeks.
Optimize Manual Washing
If forced to hand-wash temporarily, efficiency matters. The average family generates 25-35 pieces per meal.
Use the two-basin method: soapy water in one side, rinse water in the other. This conserves water compared to continuous rinsing.
Soak heavily soiled items separately before washing. This reduces scrubbing time dramatically.
Air dry on racks rather than towel drying. It’s more sanitary and saves time.
Common Questions Answered
Why does my GE dishwasher beep when I press start but won’t begin the cycle?
Beeping indicates the control board received your input but safety interlocks block cycle initiation. Check three things immediately: door latch engagement, water supply valve position, and control lock status. The dishwasher communicates readiness through beeps but won’t start until all prerequisites are satisfied.
Can a stuck start button be fixed without replacing parts?
Yes, if the button physically sticks due to debris or moisture. Remove the control panel cover and clean around the button thoroughly with isopropyl alcohol. Let it dry completely before reassembly. However, if the membrane underneath has degraded, cleaning provides only temporary relief before full failure.
How much does GE dishwasher start button repair cost professionally?
Professional repair ranges from $180-$450 depending on the root cause. Simple fixes like control lock reset cost the minimum diagnostic fee only. Control panel replacement runs $280-$380 including parts and labor. Full control board replacement reaches $400-$600 with parts and installation.
Will my dishwasher start if only the start button is broken?
Not through normal operation, because the start button is the only standard method to initiate cycles. However, diagnostic mode entry or delay start workarounds may bypass the button temporarily. These methods work inconsistently across models and shouldn’t be considered permanent solutions.
Why did my start button work yesterday but not today?
Sudden failures typically result from moisture infiltration during the previous cycle, loose ribbon cable connections that finally separated, or door latch components that reached end-of-life. Temperature cycling during wash cycles causes connections to expand and contract, eventually breaking marginal connections completely.
Is there a way to test if the problem is the button or the control board?
Yes. Access the control panel and test button membrane continuity with a multimeter. If the button shows proper continuity when pressed but cycles won’t start, the control board or its connections have failed. If the button shows no continuity change, membrane replacement is needed.
Can power surges cause start button failures?
Absolutely. Voltage spikes damage control board components that process start button inputs. The button membrane survives but the control board circuitry fries. This scenario presents as “button presses don’t register” even though the membrane functions perfectly. Whole-house surge protection prevents this damage.
Why does my GE dishwasher start button work on some cycles but not others?
This indicates cycle-specific relay failure on the control board. Each wash cycle type uses different relays. When one relay fails, that cycle becomes unavailable while others function normally. The start button isn’t the problem. Specific cycle control circuitry has failed.
Fix Your GE Dishwasher Start Button Today
You now have comprehensive knowledge to diagnose and fix GE dishwasher start button failures systematically. Most problems resolve through methodical troubleshooting without expensive repairs.
Begin with the simplest solutions. Verify door closure, check control lock status, and perform a complete power cycle reset. These three steps cost nothing and solve 60% of start button complaints.
Progress to component-level testing only when simple fixes fail. The door latch and ribbon cable connections cause the majority of remaining issues.
Remember that “start button not working” rarely means the button itself failed. System interlocks, communication breakdowns, and control board issues create symptoms that appear identical to button failure.
Document your troubleshooting journey carefully. Write down which tests you performed and their results. This information proves invaluable if professional service becomes necessary.
Act quickly when problems arise. Small issues left unaddressed often cascade into larger, more expensive failures. A loose ribbon cable today becomes a fried control board tomorrow if vibration causes shorts.