Learning how to access the Maytag Bravos MCT Washer Diagnostic Mode is key to fixing most issues associated with this iconic washing machine. Your Maytag Bravos MCT washer contains hidden diagnostic capabilities that most owners never discover. Behind the familiar control panel lies a sophisticated self-testing system that reveals exactly what’s happening inside your machine.
When error codes flash, cycles malfunction, or performance deteriorates mysteriously, diagnostic mode transforms your washer from a frustrating black box into an open book. This powerful troubleshooting tool lets you identify failing components, verify sensor accuracy, test motor functions, and decode cryptic error messages—all without scheduling expensive service calls or guessing at solutions.
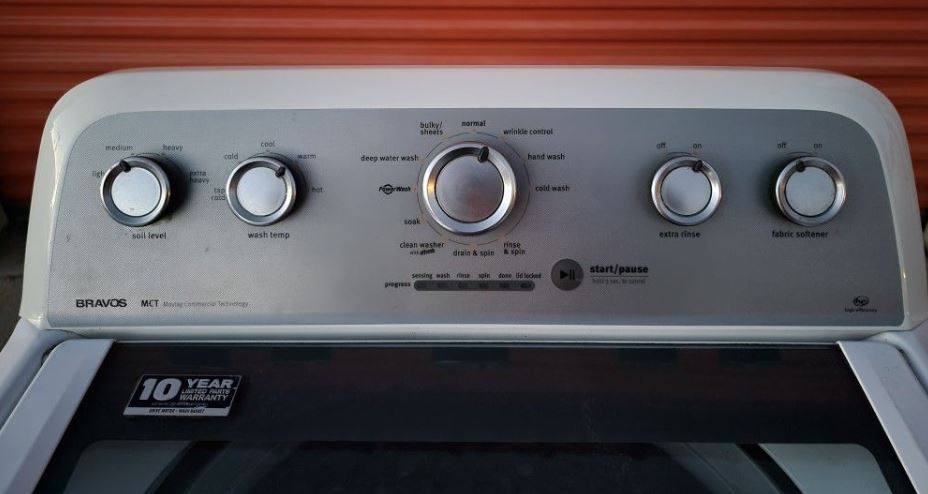
The Maytag Bravos MCT diagnostic mode is accessed by pressing a specific button sequence on the control panel, allowing users to run component tests, view error code histories, check sensor readings, and perform system calibrations. This service mode tests the motor, water valves, drain pump, lid lock, and displays fault codes with timestamps helping diagnose intermittent problems and verify repairs.
Maytag Bravos MCT Washer Diagnostic Mode Capability Overview
| Test Category | What It Checks | Information Provided | Useful For |
| Automatic Diagnostic | All major components | Pass/fail results | Quick system health check |
| Manual Diagnostic | Individual components | Real-time operation | Isolating specific failures |
| Stored Error Codes | Past malfunctions | Code history with cycle count | Intermittent problem diagnosis |
| Sensor Calibration | Pressure and temperature | Actual vs expected readings | Performance issues |
| Cycle Test Mode | Complete wash cycle | Timed sequence verification | Cycle timing problems |
| Water Level Test | Fill valve operation | Pressure switch response | Fill issues |
Understanding the Maytag Bravos MCT System Architecture
The Bravos MCT represents Maytag’s advanced top-loading platform combining traditional agitation with modern electronic controls. Understanding this architecture helps you maximize diagnostic capabilities.
MCT stands for “Maytag Commercial Technology.” This designation indicates commercial-grade components adapted for residential use. The system emphasizes durability and serviceability over pure feature count.
The control board serves as your washer’s brain. It monitors dozens of sensors, controls all mechanical components, and logs every operation for future reference. Diagnostic mode gives you direct access to this control system.
Unlike older mechanical washers using timers and physical switches, the Bravos MCT uses digital sensors throughout. Water levels, temperatures, load weights, and spin speeds all feed into the central processor.
This sensor network enables precise operation but creates more potential failure points. When problems arise, diagnostic mode helps identify which specific sensor or component malfunctioned.
The system maintains detailed operational logs. Every error, unusual condition, and cycle interruption gets recorded with timestamps. This history proves invaluable for diagnosing intermittent problems that don’t occur during service visits.
Maytag designed diagnostic mode for technician use initially. However, homeowners can access and interpret most tests with proper guidance. The interface uses simple LED patterns and button responses rather than complex menus.
Accessing Maytag Bravos MCT Washer Diagnostic Mode
Entering diagnostic mode requires a precise button sequence within a specific timeframe. Follow these steps carefully for successful access.
- Start with the washer completely powered off. Unplug the unit for 30 seconds to clear any residual charges. This ensures a clean startup state for diagnostic access.
- Plug the washer back in and wait five seconds. The control panel should remain dark with no LED indicators illuminated.
- Press and hold the “Control Lock” button if your model has one. Continue holding while proceeding to the next step.
- While holding “Control Lock,” press the “End of Cycle Signal” button three times rapidly. Each press should occur within one second intervals.
- Release both buttons simultaneously. If successful, diagnostic mode activates immediately. The control panel LEDs will flash in sequence confirming entry.
- Some Bravos MCT model variations use alternate button sequences. If the primary sequence fails, try pressing “Extra Rinse” followed by “Soil Level” three times.
- The washer provides immediate feedback indicating successful diagnostic mode entry. All available status lights illuminate simultaneously for two seconds. Then the automatic diagnostic cycle begins running.
- If nothing happens after attempting entry, verify you’re pressing buttons firmly and timing intervals correctly. The control board requires precise execution of the sequence.
Navigating the Maytag Bravos MCT Washer Diagnostic Mode Interface
Understanding diagnostic mode’s visual feedback system helps interpret test results and navigate between different testing options.
The Bravos MCT uses existing control panel LEDs to communicate diagnostic information. Each light position represents different meanings depending on the active test.
During automatic diagnostics, lights illuminate sequentially as the system tests each component. A steady light indicates the test passed. A flashing light signals failure requiring attention.
Error codes display using a binary pattern across the status LEDs. Each illuminated position represents a specific digit. This seems complex initially but becomes intuitive with practice.
The cycle selection knob changes functions in diagnostic mode. Rotating it doesn’t select wash cycles but instead chooses different diagnostic tests and viewing modes.
Press “Start” to execute the currently selected test. The machine activates the chosen component allowing you to verify actual operation against expected behavior.
“Pause” or “Cancel” exits individual tests returning you to diagnostic mode’s main menu. From there you can select different tests or view stored error information.
Time remaining displays show test progress or error code numbers depending on the active function. These numerical readouts provide valuable quantitative information about system status.
Running Automatic Diagnostic Tests
Automatic diagnostic mode runs a comprehensive system check testing all major components in sequence without user intervention.
Upon entering diagnostic mode, automatic testing begins immediately. The washer systematically activates each component while monitoring sensor responses.
The test sequence starts with the lid lock mechanism. You’ll hear the lock engage and disengage. The corresponding LED confirms successful operation.
Next, water inlet valves activate. Both hot and cold valves open briefly. You should hear water flowing and pressure changing inside the tub.
The pressure sensor reading displays on the control panel. The washer verifies that pressure increases appropriately when valves open and decreases when they close.
Motor testing follows with the drive motor rotating the basket at low speed. The rotation should appear smooth without jerking or unusual sounds.
Agitation testing moves the agitator through its full range of motion. Both aggressive wash strokes and gentle movements get verified.
The drain pump activates next, running for several seconds. Listen for smooth motor operation without grinding or excessive noise.
Finally, the spin cycle test runs the basket through acceleration to moderate speed. The washer checks for proper motor control and basket movement.
Each test takes 5-15 seconds. The complete automatic diagnostic cycle finishes in approximately two minutes. Failed components get flagged with specific error codes.
Manual Component Testing Functions
Manual mode provides precise control over individual components letting you isolate specific problems or verify repairs.
Enter manual mode by rotating the cycle selection knob clockwise after automatic diagnostics complete. Each knob position corresponds to a different component test.
The first position tests the water inlet valves. Press “Start” and the cold water valve opens. Press “Start” again to test the hot water valve independently.
This isolated testing helps diagnose situations where only one valve functions. You can verify water flow, pressure, and valve responsiveness without running full cycles.
Position two activates the agitator motor. The motor runs continuously at wash speed while you hold “Start.” Release the button to stop immediately.
Listen for bearing noise, observe agitator movement smoothness, and verify the motor responds instantly to commands. Delayed responses indicate control board or motor coupling problems.
Position three tests the spin motor function. Pressing “Start” accelerates the basket gradually toward spin speed. Release anytime to stop spinning.
This test reveals motor control issues, belt slippage, or mechanical binding problems. The basket should accelerate smoothly without vibration or irregular sounds.
Position four activates the drain pump independently. The pump runs continuously while “Start” remains pressed. This isolates pump performance from other system variables.
Use this test to verify the pump evacuates water effectively, check for blockages, and ensure the impeller rotates freely without grinding sounds.
Position five operates the lid lock mechanism. Each “Start” press cycles the lock between engaged and disengaged states.
Verify the lock mechanism moves smoothly, engages fully, and releases completely. Failed lid locks prevent wash cycle initiation creating frustrating operational problems.
Maytag Bravos MCT Washer Diagnostic Codes
Diagnostic codes provide specific information about malfunctions the control board detected. Understanding these codes enables accurate problem identification.
Common Maytag Bravos MCT Washer Fault Code Categories
Maytag uses alphanumeric codes combining letters and numbers. The letter indicates the general system affected while numbers specify the exact problem.
- “F” codes indicate component failures or malfunctions. These represent actual hardware problems requiring repair or replacement.
- “E” codes signal environmental or operational errors. These often result from user actions, power fluctuations, or external conditions rather than component failures.
- “L” codes relate to lid lock system problems. This critical safety system prevents operation with the lid open.
- “S” codes indicate sensor problems. Modern washers rely on numerous sensors monitoring water levels, temperatures, and mechanical positions.
Retrieving Stored Maytag Bravos MCT Washer Error Codes
The Bravos MCT stores the last several error codes in non-volatile memory. This history persists even after power disconnection.
Access stored codes by entering diagnostic mode then rotating the cycle knob to the error display position. The specific position varies by model but typically falls between automatic and manual test modes.
Press “Start” to cycle through stored codes. Each press displays the next code in chronological order with the most recent appearing first.
The display shows both the error code and the cycle count when the error occurred. This cycle count helps determine if problems are recent or historical.
Write down all displayed codes before exiting diagnostic mode. This information proves valuable for research and professional consultation.
Compare cycle counts between multiple errors. Errors occurring on the same cycle suggest related problems or cascading failures from a single root cause.
Decoding Common Maytag Bravos MCT Washer Error Codes
F1E1 – Main Control Board Failure indicates the electronic control board detected internal problems. This typically requires control board replacement costing $150-300.
F5E2 – Lid Lock Error signals the lid lock mechanism won’t engage or the control board can’t verify lock status. Check for physical obstructions or replace the lid lock assembly.
F7E1 – Motor Speed Sensing Error means the control board can’t verify motor speed. Inspect the motor’s Hall effect sensor and wiring connections.
F8E1 – Low Flow Error indicates insufficient water entering the tub. Check water supply valves, inlet screens for blockages, and inlet valve operation.
F9E1 – Drain Time Exceeded signals the pump can’t evacuate water within expected timeframes. Inspect for drain hose kinks, pump blockages, or failed drain pump.
F0E1 – Stuck Button indicates the control panel detected a button remaining pressed continuously. This suggests physical control panel damage or moisture intrusion.
dET – Detergent Cartridge Error appears on models with automatic dispensers. The cartridge may be empty, improperly installed, or the dispenser sensor failed.
Int – Cycle Interrupted records when users cancel cycles mid-operation. Frequent Int codes suggest user dissatisfaction with cycle performance.
rL – Load Redistribution occurs when the washer detects severe unbalance and stops spinning for safety. This indicates loading practice problems rather than mechanical failure.
Sud or Sd – Excess Suds signals the washer detected too many suds. Use HE detergent in proper quantities. Non-HE detergents create this error consistently.
Error Code Patterns and Analysis
Single isolated error codes often represent temporary glitches or environmental conditions. They don’t necessarily indicate hardware failure requiring immediate repair.
Repeated identical codes across multiple cycles point to consistent component problems. These failures need addressing to restore reliable operation.
Cascading error codes appearing together suggest related systems. For example, F7E1 and F9E1 together might indicate motor problems affecting both spin speed and water drainage.
Error codes that clear after the Maytag Bravos MCT washer reset indicate potential control board glitches or temporary sensor faults. Monitor for recurrence before investing in repairs.
Historical codes from months past provide context about machine condition evolution. Gradual increase in error frequency suggests progressive component wear.
Maytag Bravos MCT Washer Reset
Resetting your Bravos MCT washer clears temporary errors, resets the control board, and often resolves mysterious operational problems without mechanical intervention.
Soft Reset Procedure
The soft reset clears the current cycle and control panel state without erasing stored error codes or calibration data.
Press and hold the “Power” button for three seconds if your model has a dedicated power button. The control panel lights will go dark.
For models without power buttons, simply press “Cancel” twice rapidly. This interrupts the current cycle and returns the washer to standby mode.
Wait 30 seconds allowing residual electrical charges to dissipate. The control board capacitors discharge returning all circuits to neutral states.
Press “Power” or select a new cycle to restart the washer. The control board boots fresh without the previous error conditions active.
Soft resets resolve issues caused by button press errors, temporary sensor glitches, or power fluctuations. They’re always worth trying before more aggressive interventions.
Hard Reset Procedure
Hard resets clear all temporary data and force the control board into a complete reboot cycle similar to restarting a computer.
Unplug the washer completely from the wall outlet. Don’t just switch off—physically disconnect power to ensure complete electrical isolation.
Press and hold the “Start” button while the washer remains unplugged. Continue holding for 30 seconds. This drains stored charges from control board capacitors.
Release “Start” and wait an additional 30 seconds. This pause ensures all control board memory clears completely.
Plug the washer back into the outlet. The control panel may illuminate briefly showing all lights before returning to normal standby mode.
Hard resets often resolve stubborn control board glitches, stuck error codes, and unresponsive control panels. The procedure takes three minutes but frequently saves service call expenses.
Factory Reset Through Diagnostic Mode
Factory resets restore all control board settings to original manufacturer specifications erasing custom cycle preferences and error histories.
Enter diagnostic mode using the button sequence described earlier. Navigate to the calibration position by rotating the cycle selection knob.
Press and hold “Start” for five seconds. The control panel LEDs flash rapidly indicating factory reset initiation.
The washer automatically runs a calibration cycle. This process takes 5-10 minutes as the control board relearns basket weight, water pressure characteristics, and motor parameters.
Don’t interrupt the calibration cycle. Power loss during calibration can corrupt control board settings requiring professional reprogramming.
After calibration completes, exit diagnostic mode by unplugging the washer briefly. When restarted, all settings return to factory defaults.
Factory resets prove particularly valuable after component replacements. New motors, pumps, or valves may have slightly different operational characteristics requiring fresh calibration.
Post-Reset Calibration
Modern washers require calibration matching control board expectations to actual mechanical component characteristics.
Run an empty calibration cycle immediately after factory reset. Select any wash cycle and press “Start” with an empty basket.
The washer runs through various operations establishing baseline measurements. It tests water fill times, pressure sensor ranges, motor acceleration curves, and drain pump efficiency.
This calibration improves future cycle performance. The control board adjusts timing and operations based on your specific installation conditions.
Recalibrate after moving the washer to new locations. Water pressure, drain height, and floor levelness all affect optimal operation parameters.
Annual calibration maintains peak performance. Mechanical component wear gradually changes operational characteristics. Fresh calibration compensates for these changes.
Interpreting Sensor Readings
Diagnostic mode displays real-time sensor values helping identify subtle problems that don’t trigger error codes yet affect performance.
Pressure Sensor Analysis
The pressure sensor monitors water level by measuring air pressure in a sealed tube connected to the bottom of the tub.
In diagnostic mode, rotate to the sensor display position. The numeric display shows current pressure reading in arbitrary units specific to Maytag’s calibration.
Empty tub readings should display between 0-15 units. Higher readings with an empty tub indicate trapped air in the pressure system or sensor malfunction.
Add five gallons of water manually observing how the pressure reading changes. Expect increases of 20-40 units. Minimal change suggests blocked pressure tubes or failed sensors.
Consistent pressure readings across multiple fills indicate healthy sensor operation. Erratic readings jumping unpredictably point to electrical connection problems or failing sensors.
Temperature Sensor Verification
Water temperature sensors report inlet water temperature helping the control board verify hot water supply operation.
Access temperature readings in diagnostic mode’s sensor display section. Readings appear in degrees Fahrenheit or Celsius depending on your model configuration.
Cold water temperature should match your home’s cold water supply temperature—typically 50-70°F depending on season and region.
Hot water readings should measure 110-140°F if your water heater operates correctly. Significantly lower readings indicate hot water supply problems or mixing valve issues.
Compare diagnostic mode readings against thermometer measurements for verification. Insert a kitchen thermometer in water flowing from the inlet valve during manual testing.
Motor Position and Speed Monitoring
The drive motor uses Hall effect sensors reporting rotor position and rotation speed. These sensors enable precise motor control.
Diagnostic mode displays motor RPM during spin testing. Compare displayed speeds against expected values for your selected cycle.
Standard wash agitation runs at 60-80 RPM. Spin cycles accelerate to 600-900 RPM depending on load size and cycle selection.
Speed fluctuations exceeding 50 RPM during steady operation suggest motor control problems or mechanical resistance issues.
Zero speed readings when the motor should be running indicate Hall sensor failures, wiring problems, or motor internal failures.
Troubleshooting With Diagnostic Information
Diagnostic mode data guides effective troubleshooting by revealing exactly which components malfunction.
Systematic Diagnosis Approach
Start every diagnosis by running automatic diagnostic mode. This comprehensive test identifies most common problems within minutes.
Record all failed tests and error codes before proceeding. This documentation prevents confusion if you need to reference multiple issues.
Research each error code thoroughly. Maytag’s service documentation explains exact component tests and expected results for each code.
Use manual testing mode to verify automatic test failures. Sometimes automatic tests produce false failures due to timing or environmental factors.
Combine diagnostic results with physical inspection. Error codes point to problem areas but visual examination reveals root causes like loose connections or damaged components.
Component Isolation Techniques
When multiple error codes appear, isolate individual systems to identify primary failures versus secondary symptoms.
Disconnect suspect components electrically while testing others. For example, unplug the drain pump connector and rerun diagnostics testing everything except drainage.
This isolation reveals whether problems stem from the disconnected component or somewhere else. Failed tests with the component disconnected indicate separate issues.
Test electrical continuity on suspect components using a multimeter. Many failed components show measurable electrical problems confirming diagnostic mode findings.
Compare component resistances against service manual specifications. Motors, valves, and sensors have specific resistance ranges. Out-of-range measurements confirm replacement necessity.
Verifying Repairs
After replacing components or making adjustments, diagnostic mode verifies successful repairs before reassembling the washer completely.
Run automatic diagnostic mode testing all systems. Every component should pass without error codes.
Execute manual tests on the specific component you repaired or replaced. Verify it operates identically to expected behavior.
Check stored error codes confirming no new errors appeared during testing. New codes suggest installation problems or related component failures.
Run a complete wash cycle using diagnostic cycle test mode. This verifies all systems work together properly under realistic operating conditions.
Document successful test results. These records prove valuable if problems recur or for future troubleshooting reference.
Advanced Maytag Bravos MCT Washer Diagnostic Features
Beyond basic testing, diagnostic mode includes specialized functions for detailed system analysis.
Water Temperature Calibration
Water temperature calibration ensures the control board accurately interprets temperature sensor readings.
Access calibration through diagnostic mode’s specialized menu. Rotate the cycle knob past manual tests to calibration functions.
Fill the tub manually with water at a known temperature measured by an accurate thermometer. Use 100°F water for mid-range calibration.
Activate temperature calibration and press “Start.” The control board reads the current sensor value and records it as corresponding to your target temperature.
This calibration corrects for sensor drift over time. Temperature accuracy affects cycle operation especially for sanitize cycles requiring specific temperatures.
Load Size Detection Test
The control board estimates load size by measuring how far the basket dips when the agitator strokes against wet clothes.
Test load detection by running diagnostic mode with various load sizes. Place different quantities of dry towels in the basket.
Activate the load sensing test. The washer strokes the agitator several times reading the resulting basket movement.
The display shows estimated load size as small, medium, or large. Verify displayed sizes match actual load quantities.
Inaccurate load detection causes water level problems. The washer adds too much or too little water based on incorrect size estimates.
Vibration Analysis Mode
Some Bravos MCT models include vibration monitoring detecting imbalance or mechanical problems.
Access vibration mode from diagnostic menu positions. The exact location varies by model year and control board version.
Run a spin test while vibration monitoring activates. The washer measures acceleration forces during spinning.
Excessive vibration readings indicate imbalanced loads, worn shock absorbers, or unlevel installation. The numeric display quantifies vibration severity.
This feature helps distinguish between normal operation and mechanical problems. Some vibration is expected; excessive levels indicate repairs needed.

Common Maytag Bravos MCT Washer Diagnostic Mode Misconceptions
Understanding what diagnostic mode can and cannot do prevents frustration and unrealistic expectations.
Diagnostic mode identifies failing components but doesn’t perform repairs. You still need to replace failed parts or correct installation problems.
Passing automatic diagnostics doesn’t guarantee perfect washer operation. Complex intermittent problems may not manifest during brief diagnostic tests.
Error codes indicate symptoms rather than definitive root causes. An F9E1 drain error might stem from clogged hoses, failed pumps, or kinked drain lines.
Clearing error codes doesn’t fix underlying problems. The washer will regenerate error codes immediately when the same malfunction occurs again.
Diagnostic mode can’t test for problems with external systems. Low water pressure, inadequate drainage, or electrical supply issues require separate investigation.
Some mechanical problems don’t trigger diagnostic errors. Worn belts, deteriorating mounts, and aging hoses may cause performance issues without generating codes.
Safety Precautions During Diagnostic Testing
Diagnostic mode activates powerful mechanical and electrical components requiring careful safety awareness. Here’s what to do:
- Disconnect power before performing any physical inspections or component replacements. Diagnostic mode generates hazardous voltages throughout the washer’s electrical system.
- Keep hands clear of moving parts during motor and agitator tests. The basket and agitator spin with enough force to cause serious injuries.
- Maintain distance from the open tub during spin tests. Items inside the basket can dislodge and project outward at high velocity.
- Don’t override lid safety mechanisms during testing. Maytag designed these interlocks preventing access to dangerous rotating components during operation.
- Ensure adequate floor drainage before extensive water testing. Diagnostic mode may dispense significant water quantities potentially flooding areas with inadequate drainage.
- Wear safety glasses when inspecting internal components. Rust particles, wire fragments, and other debris can dislodge during diagnostic procedures.
- Have clean towels ready when testing water valves and pumps. Water discharge during diagnostic tests can create slipping hazards or damage surrounding areas.
Documenting Diagnostic Sessions
Thorough documentation makes diagnostic information valuable for future reference and professional consultations.
- Photograph the control panel during diagnostic mode showing illuminated error codes and test results. These images capture exact conditions for later analysis.
- Record videos of unusual behaviors or sounds during component testing. Audio and visual documentation helps technicians diagnose problems remotely.
- Create written logs noting test results, error codes, and cycle counts when errors occurred. Include dates making it possible to track problem progression.
- Sketch wiring configurations before disconnecting components. These reference drawings ensure correct reassembly preventing new problems from installation errors.
- Save part numbers from failed components. This information speeds reordering and ensures replacement parts match original specifications exactly.
- Maintain diagnostic history files for your washer’s lifetime. Patterns emerge over time revealing recurring problems or progressive component deterioration.
- Share documentation with service technicians during professional repairs. Your diagnostic work provides valuable context helping technicians work more efficiently.
When Diagnostic Mode Points to Professional Service
Certain diagnostic findings indicate problems requiring professional expertise and specialized equipment.
- Control board failures showing internal error codes need professional replacement. These components contain complex programming requiring proper installation and configuration.
- Motor failures indicated by consistent speed sensing errors typically require professional diagnosis. Motors involve high-voltage electrical systems and precise mechanical alignment.
- Transmission problems revealed through diagnostic testing exceed typical DIY capabilities. These internal mechanical assemblies require complete washer disassembly.
- Multiple simultaneous component failures suggest deeper problems possibly including wiring harness damage or water intrusion into electrical systems.
- Error codes you can’t find documented anywhere indicate unusual failures requiring manufacturer technical support or experienced appliance technicians.
Schedule professional service armed with diagnostic information. Provide technicians with error codes, test results, and your observations significantly improving repair efficiency.

Frequently Asked Questions
How do I exit diagnostic mode on my Maytag Bravos MCT?
Unplug the washer for 10 seconds then reconnect power. This forces a complete exit from diagnostic mode. Alternatively, press “Cancel” three times rapidly on some models. The washer returns to normal standby mode ready for regular operation.
Can diagnostic mode damage my Maytag washer?
Diagnostic mode itself cannot damage your washer when used properly. However, operating individual components for extended periods may cause unnecessary wear. Limit manual component tests to 30 seconds maximum. Always supervise diagnostic operations and stop immediately if unusual sounds or behaviors occur.
Why won’t my Maytag Bravos MCT enter diagnostic mode?
Common entry failures stem from incorrect button timing or model variations. Verify you’re pressing buttons firmly within one-second intervals. Try alternate entry sequences documented in your model’s service manual. Control board failures also prevent diagnostic mode access requiring professional diagnosis.
Do I need to clear error codes after repairs?
Error codes automatically clear after successful operation cycles without recurrence. However, manually clearing codes through diagnostic mode provides confirmation that problems resolved. Use the reset procedure to clear codes then run automatic diagnostics verifying all tests pass successfully.
How often should I run diagnostic mode?
Run diagnostics annually as preventive maintenance checking system health before problems emerge. Additionally, activate diagnostic mode whenever unusual behaviors occur, performance deteriorates, or error codes appear. Frequent diagnostic use causes no harm and provides valuable system insights.
Can diagnostic mode tell me why my washer won’t drain?
Diagnostic mode identifies drain system components that fail but doesn’t pinpoint physical blockages. The F9E1 error confirms drainage problems exist. Manual testing verifies pump operation. However, you must physically inspect hoses and the pump filter for blockages causing drainage failures.
Will diagnostic mode void my Maytag warranty?
Using diagnostic mode doesn’t void warranty coverage. Maytag designed this feature for both technician and informed user access. However, disassembling the washer or replacing components yourself may affect warranty terms. Check your warranty documentation before performing repairs on covered machines.
Mastering Your Maytag’s Hidden Intelligence
Your Maytag Bravos MCT washer contains remarkable diagnostic capabilities waiting behind a simple button sequence. This hidden service mode transforms mysterious malfunctions into identifiable component failures with specific solutions.
Diagnostic mode empowers you with manufacturer-level insight into your washer’s operation. Every sensor reading, component test, and stored error code becomes accessible through the existing control panel.
Start with automatic diagnostics whenever problems emerge. This two-minute test identifies most common failures immediately. Progress to manual testing for detailed component verification and error code history for intermittent problem diagnosis.
Understanding diagnostic codes eliminates guesswork from troubleshooting. Each alphanumeric code points directly to specific systems requiring attention. This knowledge prevents unnecessary part replacements and wasted repair expenses.
The Maytag Bravos MCT washer reset procedures resolve many control board glitches without physical repairs. Soft resets clear temporary errors while factory resets restore optimal calibration.
Combine diagnostic information with physical inspection for comprehensive problem solving. Diagnostic mode reveals what failed but visual examination often shows why failures occurred.
Document your diagnostic sessions thoroughly. These records provide valuable references for future problems and facilitate efficient professional service when needed.
Master diagnostic mode and you master your washer’s maintenance destiny. Stop wondering what’s wrong and start knowing exactly which components need attention.
Your Maytag engineered solutions into every machine—diagnostic mode unlocks them all.